How To Install Reverse Osmosis System Under Sink

You know that moment when you’re staring at a glass of tap water, and it tastes a little... adventurous? Like a regretful sip from a garden hose in 1998? That’s when the idea...
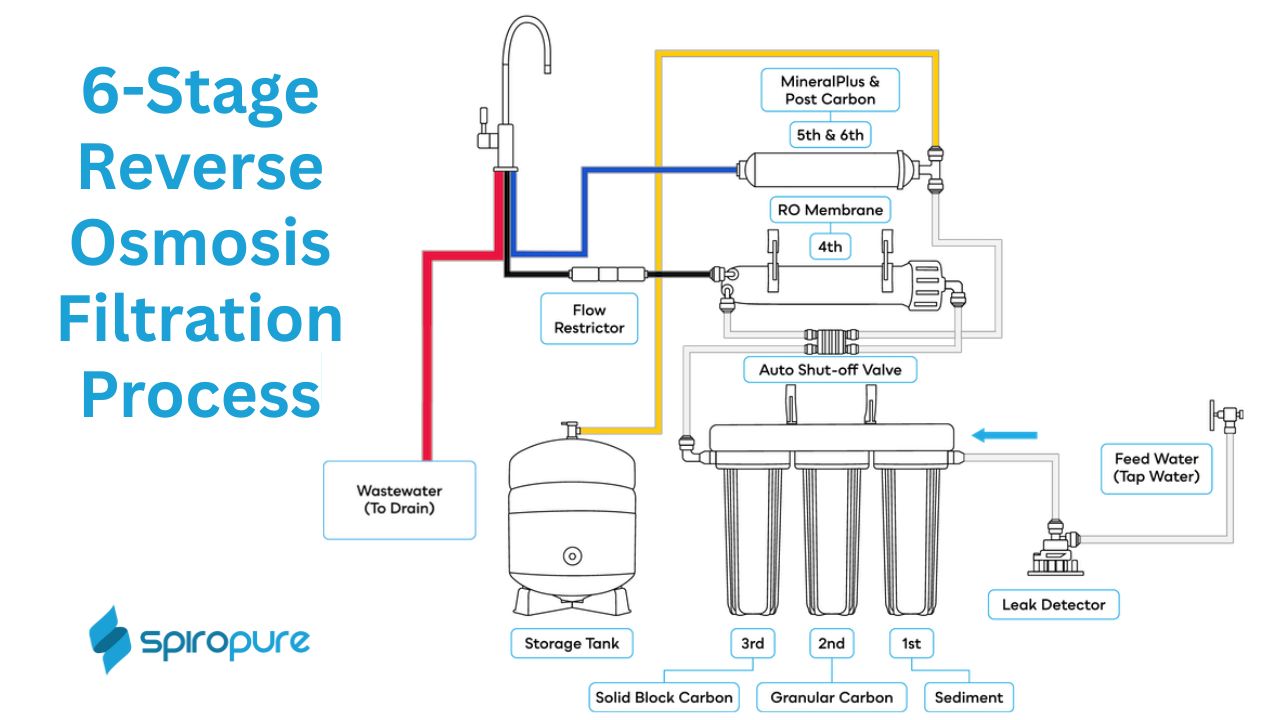
You know that moment when you’re staring at a glass of tap water, and it tastes a little... adventurous? Like a regretful sip from a garden hose in 1998? That’s when the idea of a reverse osmosis system starts whispering your name. It sounds technical and expensive, but really, it’s just a fancy way to turn your tap water into the kind of stuff you’d pay three bucks for at a gas station.
Installing one under your sink sounds like a job for a plumber with a PhD. But I promise, it’s more like assembling IKEA furniture, except you won’t end up with a mysterious extra screw and a wobbly bookshelf. You’ll get crisp, clean water, and that’s a victory you can taste.
Before You Start: The "Did I Actually Buy This?" Phase
First, open the box and spread everything out on the floor like you’re prepping for a surgery on a robot. You’ll see a few filter canisters, some tiny tubes, a chrome faucet, and a storage tank that looks like a miniature propane tank for a dollhouse. Don’t panic. That tank is your new best friend—it holds the good water.
Must Read
Expect to find about seventeen different plastic fittings, each the size of a grape. You’ll also get a little wrench that looks like it belongs in a kid’s tool set. Ignore the impulse to throw it away. That wrench is the hero of this story, and you’ll be hugging it later when you tighten a nut in a cramped cabinet.
Getting Down & Dirty (Under the Sink)
Clear out everything under your sink. This is where you’ll discover that half-empty bottle of dish soap from 2019 and a mysterious sponge that’s harder than a hockey puck. You need room to work, so be ruthless. Throw out the sponge. You’ll thank yourself later when you’re not fighting for elbow space.
Now, locate your cold water supply line. That’s the braided metal hose that feeds your kitchen faucet. Turn off the valve by twisting it clockwise until it stops. Trust me, you don’t want a surprise shower—especially one that smells faintly of your neighbor’s cat’s breath.
The Dance of the Fittings
You’ll install a little brass saddle valve on that cold water line. It’s like putting a tiny clamp on a garden hose, but with a tiny spike that pokes a hole. Yes, it sounds brutal, but it’s how the water gets rerouted to your new system. Just tighten it with the wrench until it bites, but don’t Hulk-smash it—you don’t want to crack the pipe.
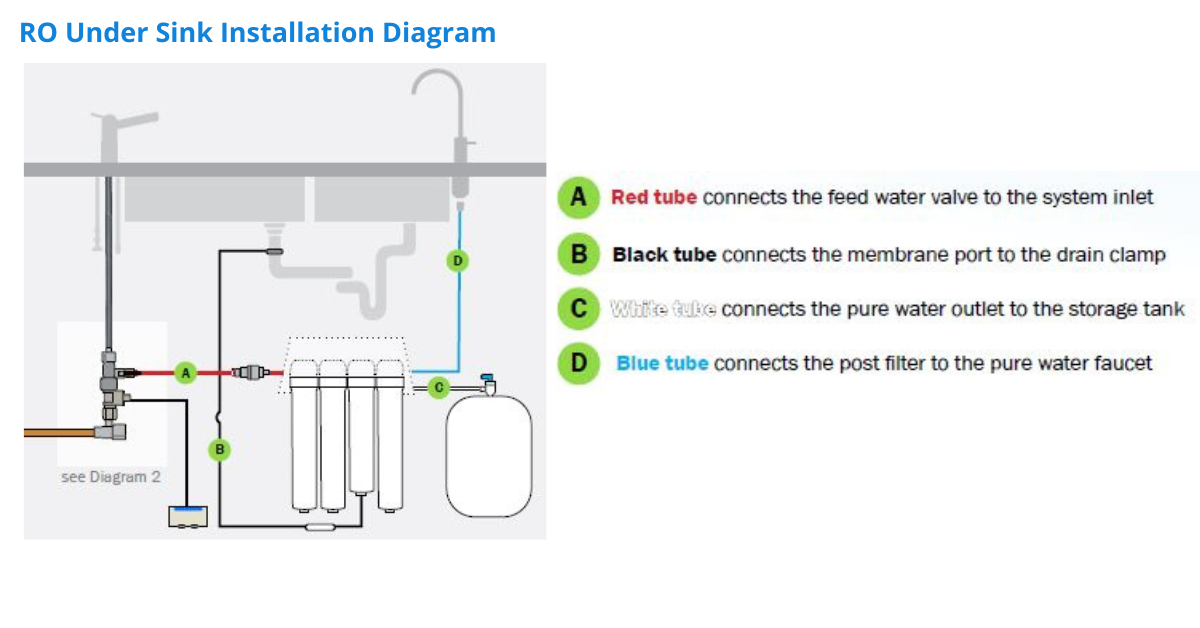 Ultra High Purity Under Sink Reverse Osmosis System Mineral-Free Water
From the saddle valve, you’ll run a thin plastic tube to the first filter housing. This is the part where you’ll feel like a spy in a cheesy 80s movie, sneaking a secret water line through the cabinet. Push the tube into the push-fit connector until you hear a satisfying click. That sound is your new favorite sound.
Mounting the Faucet (The "I Hope I Measured Right" Moment)
Your sink or countertop will need a hole for the dedicated RO faucet. If you already have an extra hole, congratulations—you just saved yourself twenty minutes of swearing. If not, you’ll need to drill one. Use a carbide-tipped bit, go slow, and think of it as giving your kitchen a tiny, elegant hat.
Once the faucet is in place, tighten the big nut underneath with your fingers first. Then use that tiny wrench to snug it up. Don’t overtighten, or you’ll crack the plastic base and have to start over—which is the plumbing equivalent of getting a flat tire on your way to a barbecue.
Connecting the "Water Brain"
Now, run a tube from the final filter stage to the storage tank. The tank has a little blue handle that looks like it controls a submarine. Open that handle before you turn the water on—if you forget, the tank won’t fill, and you’ll stand there scratching your head like a confused golden retriever.
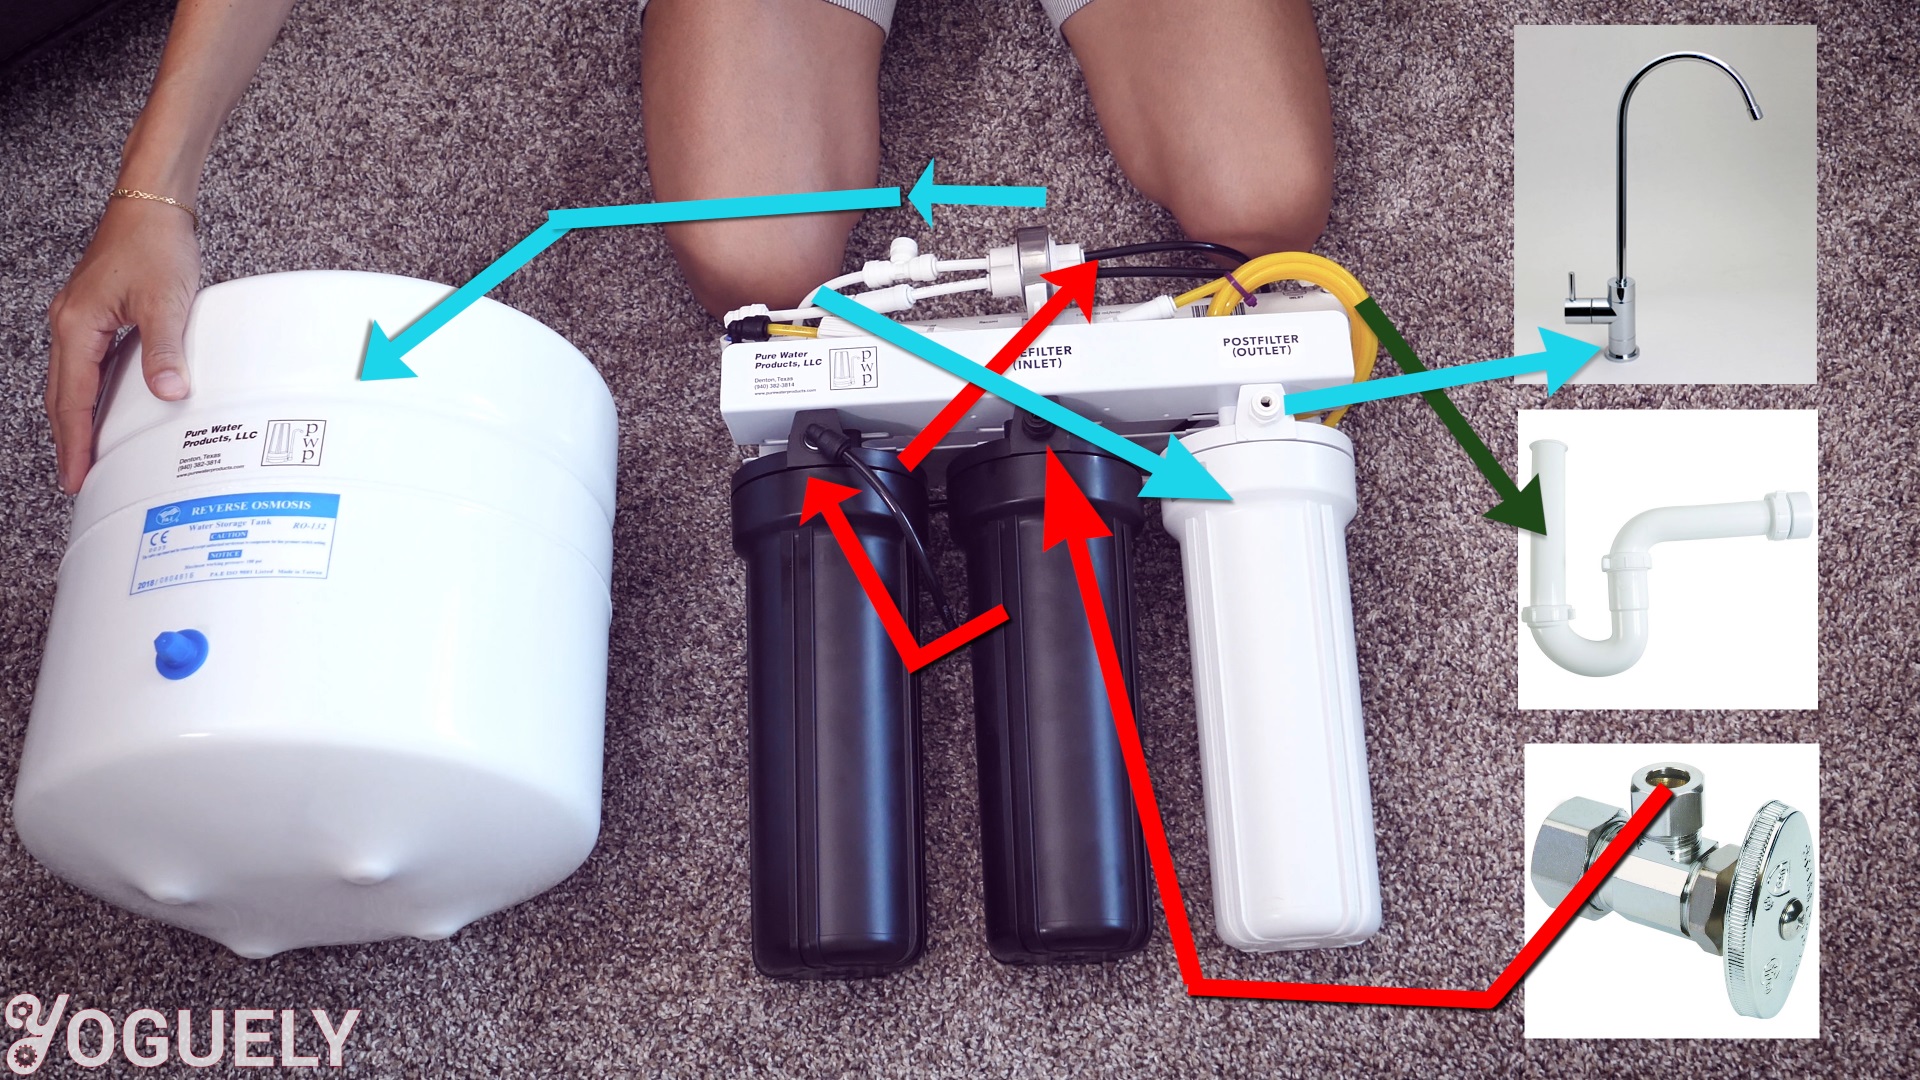 How To Install Under Sink Filter System at Wendy Noland blog
Connect the last tube from the tank to the faucet. Double-check all the push-fit connections. Give each one a gentle tug. If it pops off, you’ll have a tiny fountain under your sink, and nobody wants a floor that smells like a wet basement.
The Big Turn-On & The Bleeding
Slowly open the cold water valve under the sink. You’ll hear a gurgling noise, like your sink just drank a bubble tea. That’s normal. Let the system run for a few minutes. Then open the new faucet—expect a bunch of sputtering and air bubbles. It’ll look like a shaken soda bottle, but that’s just the system purging the carbon dust from the new filters.
Let the water run for about thirty minutes. Yes, thirty minutes. It’s boring, but it flushes out the “new filter taste,” which is like licking a plastic wrapper. Once it’s clear, you’re done.
Your First Victory Sip
Pour yourself a glass from your new faucet. Take a sip. That clean, neutral, pure taste? That’s the taste of you not having a $100 plumbing bill. You did it. The weird little robot under your sink is now your personal water sommelier.
Now, go enjoy a glass of ice water without worrying about your town’s weird calcium deposits. And when a guest asks where you got the fancy tap water, just smile and say, “I built it myself.” They’ll nod with respect. You’ve earned it.
