Reverse Osmosis Water Filtration System Installation

You know that moment when you fill a glass from the tap and catch a whiff of something vaguely chemical? That’s your kitchen’s subtle plea for an upgrade. Installing a reverse...
You know that moment when you fill a glass from the tap and catch a whiff of something vaguely chemical? That’s your kitchen’s subtle plea for an upgrade. Installing a reverse osmosis (RO) water filtration system isn’t just a plumbing project; it’s a lifestyle flex. It’s the difference between drinking water that’s “fine” and water that tastes like it came from a mountain spring in a David Attenborough documentary.
The “Why” That Starts the Journey
We live in a world of fancy water bottles and influencer-endorsed alkaline pitchers. But reverse osmosis is the quiet, hardworking cousin that actually removes the stuff you don’t want: lead, chlorine, fluoride, and even those trace pharmaceuticals nobody talks about at dinner parties. Think of it as the bouncer at the VIP club of your hydration—only pure H₂O gets past the velvet rope. The Environmental Protection Agency has long recognized RO as one of the most effective methods for reducing contaminants, making it the gold standard for home filtration.
Plus, there’s the aesthetic payoff. That clear, crisp taste? It makes your morning coffee taste like a barista’s love letter. I’m not saying it will fix your life, but it might just fix your 2 PM slump.
Must Read
Gathering Your Tools (and Courage)
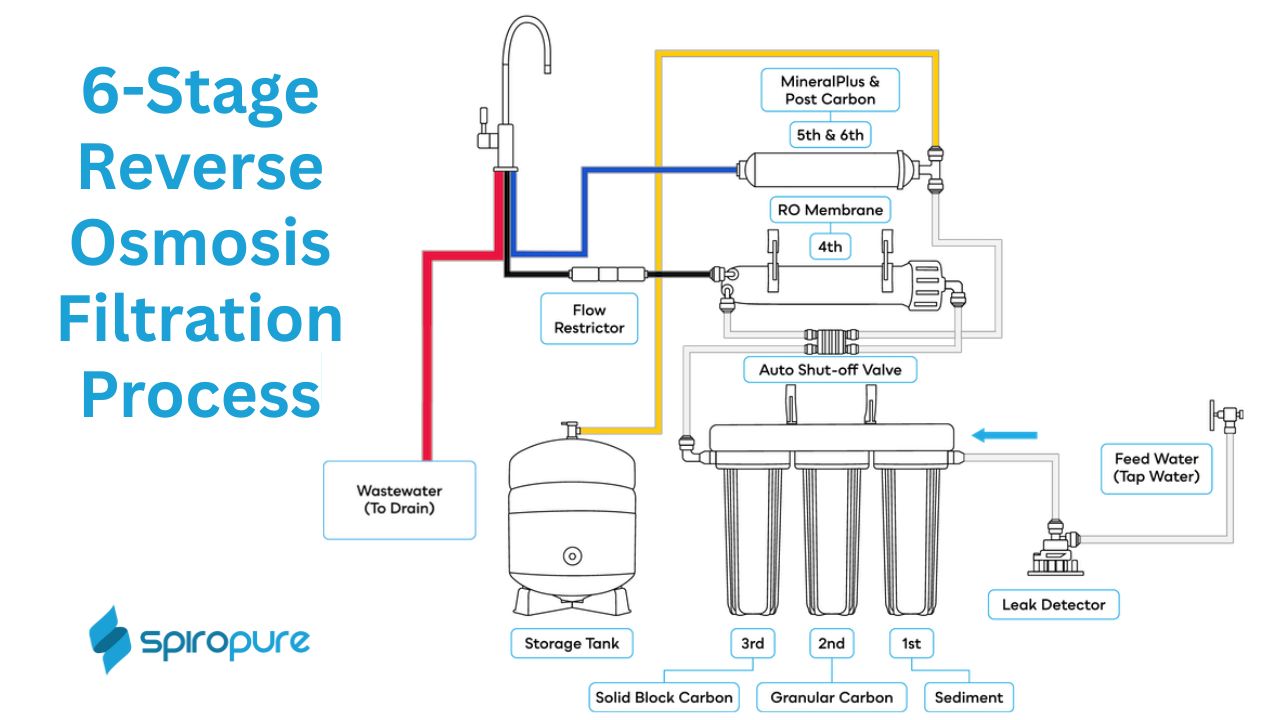
Before you dive in, remember this is not open-heart surgery. You don’t need a degree in thermodynamics. You need a drill, an adjustable wrench, some Teflon tape, and a playlist that makes you feel like a DIY god—think the Rocky soundtrack or maybe Ocean’s Eleven for a heist vibe. Most RO kits come with a detailed manual that looks like IKEA instructions after a night of espresso, but take a breath. The basic components include the faucet, the storage tank, and the filter cartridges (usually a sediment filter, carbon block, and the RO membrane itself).
Practical Tip: Measure your under-sink space. Nothing kills the vibe like realizing your shiny new tank won’t fit next to your garbage disposal. Measure twice, drill once is the mantra here—borrowed from carpentry, but it works for your plumbing future.
The Ritual of Installation
Start by shutting off the cold water supply under the sink. This is crucial, unless you enjoy impromptu indoor pools. Then, install the feed water adapter (the little valve that taps into your existing pipe). Wrap those threads with Teflon tape like you’re gift-wrapping a precious artifact—three to five wraps is the sweet spot. Next, drill a hole for the dedicated faucet if your countertop doesn’t have one. Pro tip: use a diamond-tipped hole saw if you have granite, and go slow. You’re not in a race; you’re creating a monument to purity.
Connect the color-coded tubing—blue for cold water, red for hot (though RO rarely uses hot), and black for waste water. It’s like a grown-up Lego set, except the reward is a glass of water that doesn’t taste like a swimming pool. Once everything is finger-tight, turn the water back on. Check for leaks with a paper towel—think of it as a detective scene from True Detective, but with less existential dread.
 Reverse Osmosis Water Filter System
A Little Cultural Detour
Did you know the concept of reverse osmosis was first observed in 1748 by a French scientist named Jean-Antoine Nollet? He was experimenting with pig bladders (yes, really) and noticed water could be forced through. Fast forward to the 1960s, and the technology went to space with NASA, purifying astronaut pee into drinking water. So when you install your system, you’re channeling a little bit of Apollo 13 energy—turning the unpalatable into the pristine. That’s a dinner party fact that will make you sound very interesting.
Letting It Run (and the Zen of Waiting)
Once installed, you need to let the system flush. This means letting it run for at least two full tanks of water to rinse the new filters. It’s like a baptism for your plumbing. The first batch will look cloudy or taste vaguely of plastic; do not drink it. Go make a cup of herbal tea or read a book. This waiting period is a little ritual in patience, a small reminder that good things—like truly clean water—take a moment. The storage tank will fill slowly, usually over two to four hours, because RO works by trickling through membranes at the speed of a turtle with purpose.
Fun Fact: An RO system typically wastes about three to four gallons of water for every gallon it purifies. Modern units use more efficient membranes, but if you’re eco-conscious, collect the “waste” water for your plants. They won’t mind the extra minerals—it’s like giving them a little spa treatment.
The First Sip and Daily Life
When you finally fill that glass—clear, cold, silent—you’ll notice the difference immediately. It’s not just thirst-quenching; it’s clarifying. You’ll find yourself drinking more water throughout the day, maybe even skipping the soda or the sugary iced tea. Your ice cubes become crystal-clear, less like frozen fog and more like gems. It’s a small upgrade, but one that touches every meal, every tea bag, every moment of hydration.
In a world of chaos, there’s a quiet satisfaction in knowing you made something pure. Installing an RO system is a gentle rebellion against convenience culture—it’s you, a wrench, and a little knowledge, turning tap water into a personal resource. So go ahead, become that person who offers guests a glass of water and says, “Try this—it’s from my own system.” They’ll smile, sip, and suddenly understand why you’ve been so weirdly happy about a pipe under the sink. That’s the real win: not just cleaner water, but a cleaner sense of what you control in your own home.
