How To Install Soft Water System

So, you’ve been fighting the good fight against hard water. You know the signs, right? That weird white crust on your faucets, the way your soap refuses to lather like it’s on...
:max_bytes(150000):strip_icc()/installing-a-water-softener-2718669-FINAL-1-ee8de137dcf84b5db1e28f84a7dec11b.png)
So, you’ve been fighting the good fight against hard water. You know the signs, right? That weird white crust on your faucets, the way your soap refuses to lather like it’s on strike.
I once spent a whole weekend scrubbing a shower head with vinegar. Not my finest moment. You deserve better, my friend.
Installing a soft water system sounds terrifying. Like, “call-a-professional-and-hide-your-wallet” terrifying. But honestly? It’s more like a Saturday afternoon project than brain surgery.
Must Read
Let’s get one thing straight first: we’re talking about a whole-house system. The kind that connects to your main water line. Not a little pitcher in the fridge.
You’ll need a few tools. Grab a pipe wrench, some Teflon tape, a screwdriver, and a bucket. Never forget the bucket. It’s the hero of every plumbing story.
Step One: Find Your Water Main
This is the pipe that brings water into your house. It’s usually in the basement, garage, or near the water heater. Go find it. I’ll wait. Done? Good.
Turn off the water at the main shut-off valve. You don’t want to become a surprise fountain. Trust me on this one.
Open a faucet somewhere low in the house to drain any leftover water. A bathtub faucet works great. This prevents a messy shower when you cut the pipe.
Step Two: Pick Your Spot
Your softener needs to go after the main shut-off valve, but before the water heater. That’s the golden rule. Don’t argue with the golden rule.
Leave about three feet of space around the unit for salt refills. You’ll thank yourself later when you’re hoisting a forty-pound bag of salt. Your back will thank you, too.
Also, put it somewhere with a floor drain. If it ever leaks (it won’t, but play along), you want water going down, not across your basement.
Step Three: Cut the Pipe
Here’s where the real fun begins. Use a pipe cutter for copper pipes, or a hacksaw for PVC. Measure twice, cut once. Cliché, but it’s true.
 Installing A Water Softener , How To Install Water Softener System
You’re creating a gap for the softener’s bypass valve. This is a little thing that lets you redirect water around the softener for maintenance. Don’t skip the bypass, seriously.
When you cut, expect a few drips. That’s what the bucket is for. Place it under the cut. You’re now a plumber. Congratulations, you’re officially fancy.
Step Four: Connect the Bypass Valve
Your softener kit comes with a bypass valve. It looks like a plastic cube with knobs. You’ll attach it to the inlet and outlet ports on the back of the unit.
Make sure the arrows on the valve match the water flow direction. Water goes in the “in” side and comes out the “out” side. It’s not rocket science, but it is water science.
Secure it with those little clips included in the box. If you lose them, you’ll be improvising with zip ties. Zip ties work, but they look sad.
Step Five: Connect to the Pipe
Now, connect the bypass valve to your cut pipe. Use flexible copper or PEX tubing if you’re lazy (I’m lazy). Use rigid pipe if you want to impress your neighbors.
Wrap every threaded connection with Teflon tape. Wrap it clockwise three or four times. This is the secretsauce that stops drips.
Tighten everything with a wrench, but don’t Hulk it. Just snug. Overtightening cracks plastic, and then you’re crying into the bucket. We don’t want that.
Step Six: Set Up the Drain Line
Your softener needs to “regenerate” every few days. That means it flushes out the nasty minerals. You need a drain hose for that.
Run a small hose from the softener’s drain port to a floor drain, a laundry tub, or a dedicated pipe. Use a standpipe if you can, but a simple drain works too.
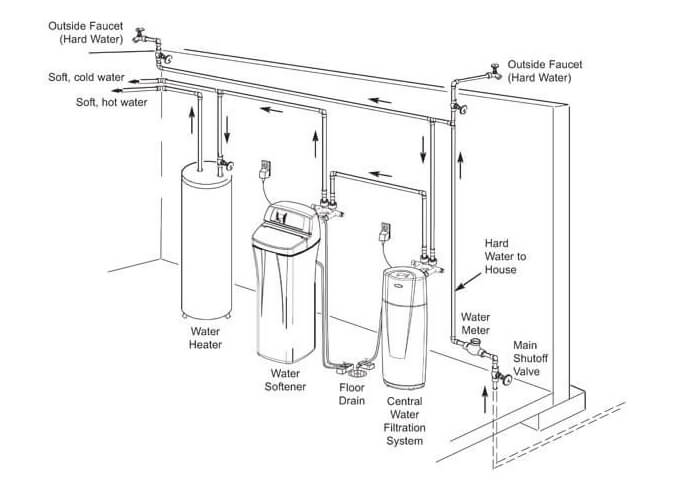 Salt Water Softener System Diagram Water Softeners Why? Service
Make sure the hose is lower than the softener. Gravity is your lazy assistant here. Don’t make it climb uphill—water hates climbing.
Step Seven: Add Salt
Open the top lid of your softener. It’s a big plastic tank. Pour in a bag of water softener salt. Not table salt. Table salt is for french fries, not plumbing.
Fill it about halfway. The tank comes with a little grid that holds the salt. Don’t bury it, but don’t skimp either. It needs a nice, salty bath.
Then, dump in a bottle of resin cleaner if you’re fancy. It helps keep the system from turning into a smelly swamp. Your shower will smell like nothing, which is the goal.
Step Eight: Program and Test
Plug the softener into a regular outlet. It has a little control panel that looks like a microwave from 1995. Press some buttons. Set the time and the water hardness level.
How hard is your water? You can buy a test strip at a hardware store for two bucks. Or guess. If your soap doesn’t lather, you guessed “hard.”
Open the water main again slowly. Check for leaks at every connection. Watch the bucket. If it’s still dry, you’re a plumbing genius.
One Last Thing
Run a regeneration cycle manually. The manual will tell you how. Look for a button labeled “Regen.” Press it, and go make a coffee.
After twenty minutes, test a faucet. The water will feel silky. Like you’re washing your hands in luxury clouds. That’s soft water, baby.
You did it. You fought the crust and won. Now go enjoy a shower that doesn’t leave you feeling like you’ve been rinsed with chalk. You earned it.
:max_bytes(150000):strip_icc()/installing-a-water-softener-2718669-FINAL-1-ee8de137dcf84b5db1e28f84a7dec11b.png&description=How+To+Install+Soft+Water+System)