How To Hook Up A Water Softener

So, you’ve decided to become a water-softening hero. Congratulations! You’re about to banish that chalky, white scale from your faucets forever. But first, you have to hook th...
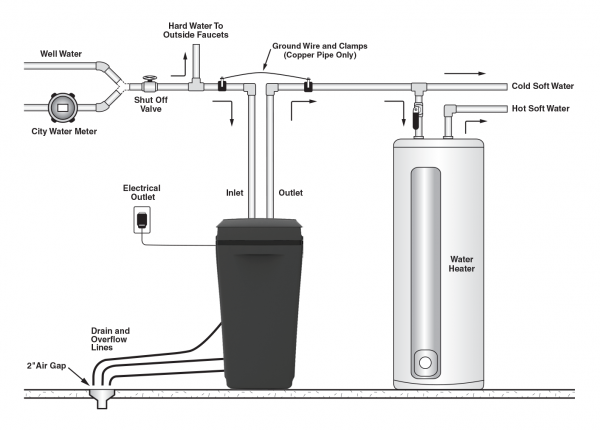
So, you’ve decided to become a water-softening hero. Congratulations! You’re about to banish that chalky, white scale from your faucets forever. But first, you have to hook the thing up. Don’t worry—it’s easier than assembling IKEA furniture, and you won’t end up with leftover screws this time.
Before you start, turn off your main water supply. Yes, really. Go find that big valve near your water meter and give it a gentle twist clockwise. If you skip this step, you’ll be doing a very enthusiastic interpretive dance in a sudden indoor rainstorm.
Also, drain your pipes by opening the lowest faucet in your house, like a basement spigot. Let the water run until it stops. This drains the system and prevents you from accidentally blasting your face with rusty shower water.
Must Read
Now, gather your tools. You’ll need a pipe cutter or hacksaw, adjustable wrench, some Teflon tape, and a couple of flexible copper or braided hoses. Oh, and a bucket. Because something always drips. Always.
Find Your “Sweet Spot”
Your water softener needs to live somewhere safe, like a garage or basement, near a drain. It can’t be outside in the snow (machines get grumpy). It also needs to be before your water heater, but after the main shutoff valve.
Think of it as a bouncer for your home’s plumbing: it kicks out the hard minerals before they can party inside your pipes. Make sure the spot is level. A wobbling softener is a sad softener.
Run a garden hose from the unit’s backwash port to your floor drain. If you don’t have a drain, get a laundry sink or a sump pump pit. Just don’t let the salty backwash ruin your neighbor’s prize petunias.
The Bypass Valve: Your Best Friend
Most softeners come with a bypass valve—a little lever that lets you cut the softener out of the loop for maintenance. Install this first. It screws directly onto the softener’s inlet and outlet ports.
The bypass valve is like a cheat code: when you want to water your lawn (plants hate salt water), you flip it, and boom—hard water flows through. Thank you, clever engineers!
If your kit doesn’t include a bypass, buy one separately. Seriously, you’ll thank me next time you need to clean the resin tank. Nobody wants to shut off their whole house just to change a filter.
Cut and Connect the Copper
You’ve got a spot. You’ve got a bypass valve. Now it’s time to cut into your main water line. Measure twice, cut once—unless you enjoy buying more pipe from the hardware store.
Use your pipe cutter to make a clean cut. Then attach two compression fittings or sweat copper fittings (soldering is for brave souls). Thread the flexible hoses from the fittings to your bypass valve.
 Installing A Water Softener , How To Install Water Softener System
Tighten everything with a wrench, but don’t Hulk-smash it. Overtightening can crack brass fittings, and then you’ll be crying into your bucket. Hand-tight plus a quarter turn is the sweet spot.
Don’t Forget the Drain Line
Connect a small, clear plastic tube from the softener’s “drain” port to the bucket or drain. This carries away the salty brine during regeneration. If the tube kinks, your basement will become a saline wading pool.
Secure the tube with a zip tie so it doesn’t flop out like a sick garden hose. A loose drain line is the leading cause of “why is my floor wet?” panic attacks.
Salt, the Magic Dust
Now, fill your brine tank with water softener salt. Not table salt! That’s for French fries, not pipes. Use pellets or crystals—any brand that says “water softener” on the bag.
Pour in about 40 pounds (or until the tank looks like a snowy mountain). Then add a couple of gallons of water to the tank. This dissolves the salt into brine, which regenerates the special resin beads inside.
Pro tip: Don’t let the salt get too low. If you do, your water gets hard again, and your soap will stop lathering. Suddenly, you’re a spaghetti-haired mess in the shower.
Plug It In and Program It
Most softeners are electric, so plug it into a grounded outlet. If you don’t have a outlet nearby, call an electrician. Extension cords are for Christmas lights, not high-current appliances.
Set the timer or digital controller. Input your water hardness level (check your city’s water report or buy a test strip). Set the regeneration time for 2 AM, when nobody is brushing their teeth.
Now, slowly turn your main water back on. You’ll hear gurgling and maybe a few pings. That’s normal. Check for leaks with a tissue—if the paper gets wet, you missed a connection. Tighten gently.
:max_bytes(150000):strip_icc()/installing-a-water-softener-2718669-FINAL-1-ee8de137dcf84b5db1e28f84a7dec11b.png) How to Install a Water Softener
How to Install a Water Softener
Let It Purge (Seriously, Wait)
Open a cold faucet, like the kitchen sink, and let it run for about 20 minutes. This purges air and flushes out any loose particles from the new filter media. The water might look milky at first—that’s just tiny bubbles, not a ghost.
After 20 minutes, close the faucet. The softener will automatically start its first regeneration cycle within a few hours. Don’t panic if it makes a whirring sound—it’s just having a little spa day.
Test your water with a soap test: lather up your hands. If you get tons of bubbles, you’re officially a water-softening wizard.
A Few Warnings (Because Life Is Icky)
Never use a torch near the plastic bypass valve—it melts faster than a popsicle in July. Also, if your water pressure is above 80 PSI, install a pressure-reducing valve first. High pressure is like a jet engine for your pipes.
And please, don’t drink the brine. I know it’s salty, but it’s not a margarita. It’s basically salty poison for your kidneys.
The Moment of Truth
Take a shower. Feel how your skin no longer squeaks like a dry rubber balloon? That’s soft water hugging your pores. Your dishes will sparkle, your coffee won’t taste like a mineral deposit, and your hair will behave—sort of.
You did it. You leveled up from “plumbing rookie” to “household hero.” Every time you fill your Brita pitcher, give yourself a little nod of approval. You are the master of calcium and magnesium.
Uplifting Conclusion
So go ahead—run a glass of that silky, soft water. Toast yourself. You’ve wrestled copper, ignored puddles, and emerged victorious with no leaks (or maybe just a few tiny ones you’ll fix tomorrow).
Remember: Life is too short for hard water and sour moods. Your home now feels cleaner, your skin softer, and your spirit just a little bit saltier—in the best way. Now go enjoy a long, bubbly shower. You’ve earned it, you magnificent plumbing artist.
