How To Install Ro Water System

So, you want to install an RO system. Welcome to the club of water snobs. It’s a geeky, glorious upgrade for your tap. Think of it as a tiny, aquatic laboratory living under y...
So, you want to install an RO system. Welcome to the club of water snobs. It’s a geeky, glorious upgrade for your tap. Think of it as a tiny, aquatic laboratory living under your sink.
What Is This Magic Box?
Reverse Osmosis sounds like a sci-fi spell. It’s actually just forcing water through a super-fine membrane. That membrane has holes so tiny, only water molecules get through. Everything else—lead, chlorine, weird tastes—gets left behind.
Your water becomes absurdly pure. It’s the same tech used to make kidney dialysis fluid. That’s right: your drinking water is now medical-grade. Drink up, you beautiful cyborg.
Must Read
Step 1: Assemble Your Army of Parts
Open the box. It’s like Christmas morning for plumbers. You’ll see: a white canister, colorful tubes, and a tiny tank that looks like a beanbag chair.
Quirky fact: That little tank stores the water while it slowly filters. Patience is key—it makes about a cup every two minutes. Slow and steady wins the thirst race.
Don’t panic at the bag of weird plastic fittings. They’re called “push-to-connect” connectors. They’re idiot-proof. Literally. Push the tube in, hear a click, and you’re done. No glue, no fire, no tears.
Step 2: Find Your Cold Water Line
Under your sink, look for the shiny pipe that isn’t hot. It’s usually the one on the right. Tap it with your knuckle—cold water feels like a secret handshake.
Now, install the saddle valve. This little device clamps onto the pipe and bites a tiny hole into it. It’s like a vampire for plumbing. Fun detail: The hole is smaller than a pinhole. You won’t even notice it when you’re done.
Turn the valve gently. Water will trickle out. Welcome to your new hobby: hobby plumbing.
Step 3: Hook Up the Color-Coded Maze
You’ll see four or five tubes. They match colors to the system’s ports. Blue is for water in. Red is for water out. Black is for waste water. Think of it as a rainbow of hydration.
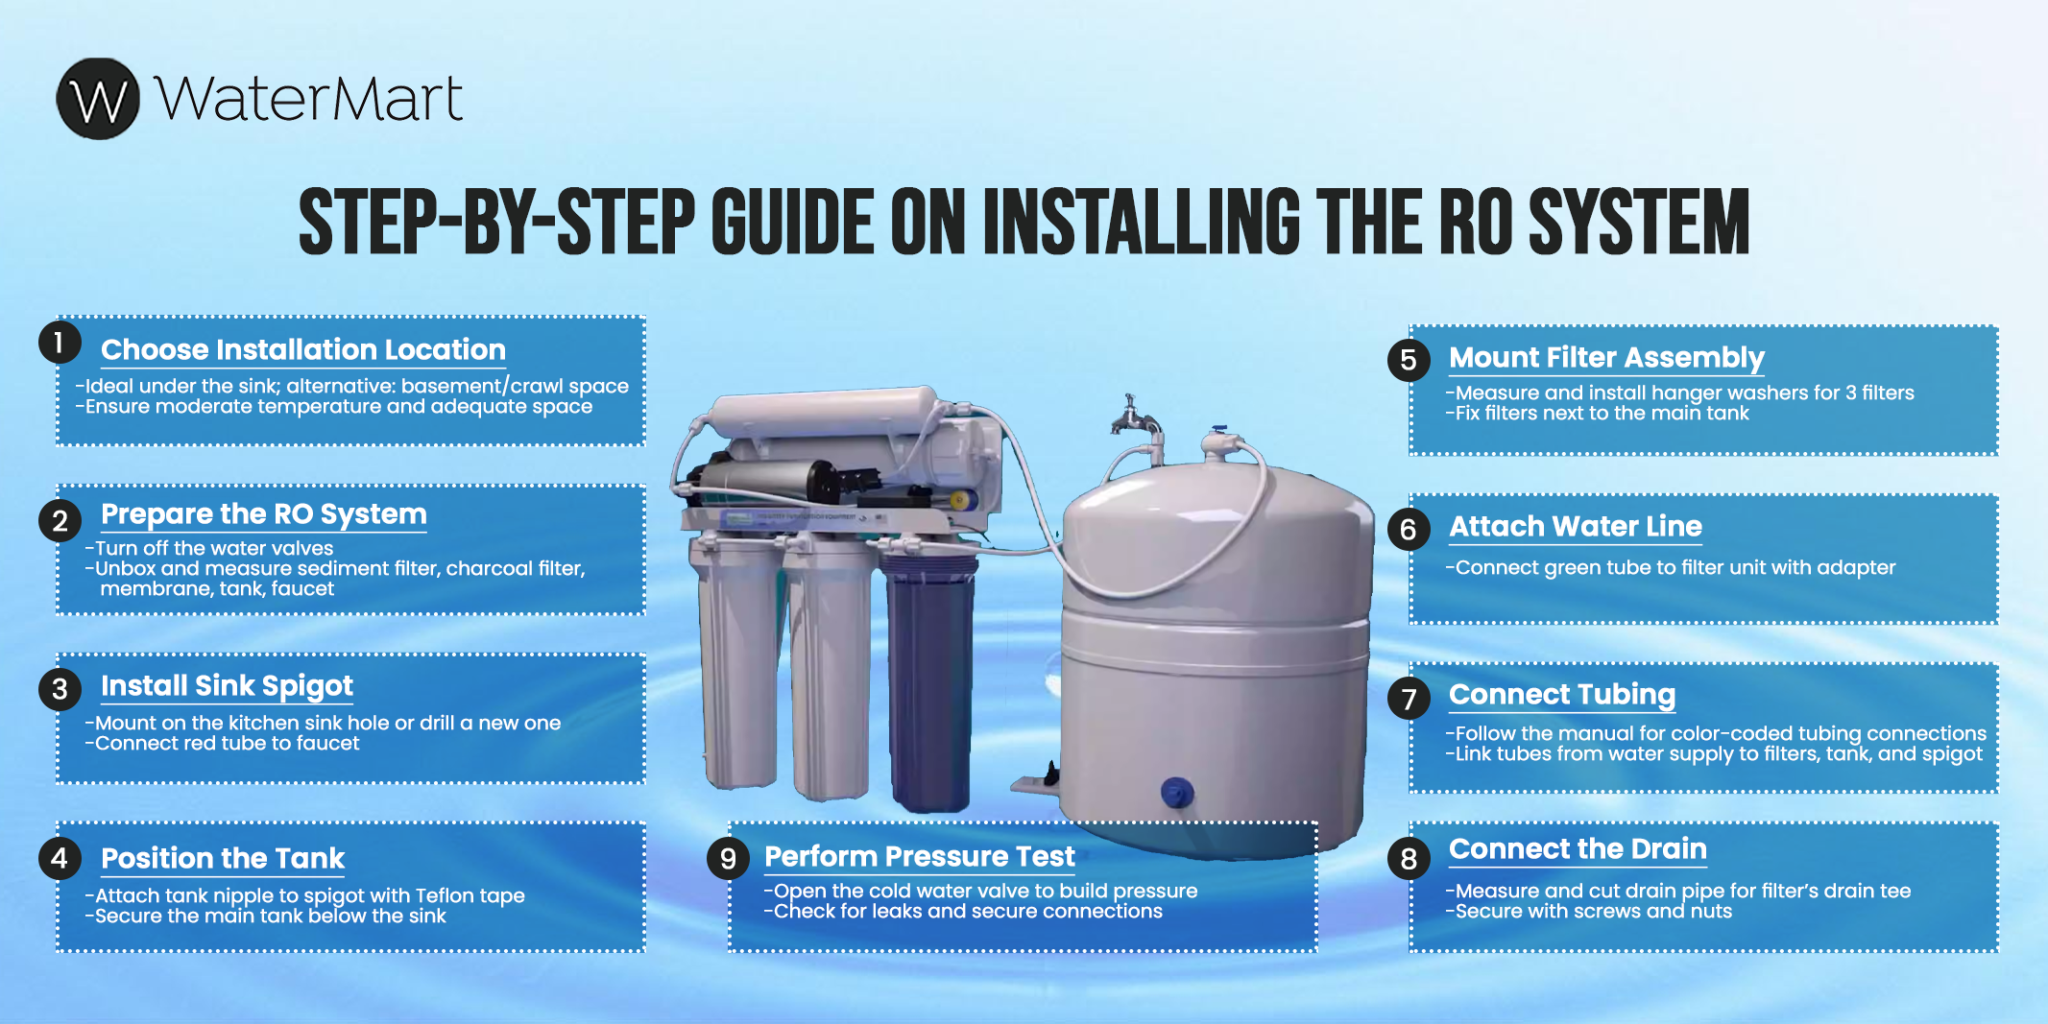
 Reverse Osmosis System Installation Diagram
Push each tube into its port until it stops. You’ll feel a satisfying thunk. That’s the sound of physics working in your favor.
One tube goes to your sink faucet. Another goes to the drain. The waste water tube? It goes into your drain pipe. Your sink is now a water recycling plant.
Step 4: The Drain Connection (The Gross Part)
You need to attach a small clamp to your sink’s drain pipe. This clamp holds a tube that dumps the rejected water. That “waste” water is actually cleaner than most tap water—it just has extra minerals. Quirky fact: You can use it to water your plants. They’ll think you’re a magical rain god.
Drill a tiny hole in the drain pipe (if it’s metal). If it’s plastic, use a special adapter. Either way, you’re essentially giving your pipes a piercing. Extreme home improvement.
Step 5: The Faucet of Awesomeness
Most RO kits come with a shiny new faucet. It looks like a mini chrome giraffe. You’ll mount it on your sink countertop. You might need to drill a hole into the counter—or use an existing soap dispenser hole.
If you drill, cover everything with tape to avoid cracking the sink. Trust me on this. I once chipped a granite countertop and my wife still brings it up (it’s been three years).
Connect the faucet tube to the system. It’s the last puzzle piece. Your kitchen now looks like a NASA mission control station.
Step 6: Wait... and Purge
Turn on the water. Then turn on the faucet. Nothing will happen. That’s normal. The system needs to fill up the tank first. Go make a sandwich.
 Step-by-Step Guide: Ro System Installation Diagram for Clean Drinking Water
After 30 minutes, you’ll hear a weird gurgle. That’s the membrane flushing itself. Let it run for ten minutes—the first batch of water tastes like plastic ghost. Do not drink it. Dump it down the drain. This is called “flushing the system.” It’s basically a baptism for your pipes.
Now, wait another hour. Fill up a glass. It will look eerily clear. It tastes like… nothing. That’s the point. Pure water is the blank canvas of beverages.
Why This Is Fun (Seriously)
You just turned your tap into a science project. Every time you drink, you’re sipping on something that removed 99% of impurities. Your coffee will taste smoother. Your ice cubes will be crystal clear (no cloudy core).
Quirky fact: RO water actually makes your tea taste worse because it lacks minerals. But your vodka sodas? Unreal. You’re now a mixologist with top-tier H2O.
Plus, you saved money. No more buying plastic bottles. You’re a sustainability superhero. Captain Hydration has arrived.
The Final Ritual
Check for leaks. If you see a single drop, tighten a fitting. One drop a day is fine (it’ll evaporate). A puddle means you messed up. Don’t panic—yank the tube, push it back in, and try again.
Congratulations. You’ve installed an RO system. You are now that person who asks friends, “Do you want filtered water?” with a smug grin. Own it. You earned it.
Now go drink a glass. It’s the purest thing you’ll ever put in your face.
