How To Plumb A Water Softener

So, you’ve decided to take on the brave, noble, and slightly plumbing-adjacent quest of installing a water softener. Congratulations! You’re about to give your home the gift o...
So, you’ve decided to take on the brave, noble, and slightly plumbing-adjacent quest of installing a water softener. Congratulations! You’re about to give your home the gift of silky hair, spotless glasses, and a dishwasher that doesn’t look like it fought a chalkboard. Don’t worry, I promise this is easier than explaining to your spouse why you spent $600 on a “shiny salt bucket.”
First things first: turn off the water supply to your whole house. Seriously, do it. If you skip this step, you’ll learn a new dance called the “wet-sock shuffle.” Locate your main shut-off valve (usually near your water meter or where the pipe enters your house) and give it a firm clockwise twist. You’re now in charge, Captain No-Water.
Gather Your Weapons (Tools & Materials)
You’ll need a few things: a water softener unit (obviously), flexible copper or PEX tubing, compression fittings, a pipe cutter, a wrench, a bucket, and Teflon tape. Oh, and a towel. Actually, bring three towels. Trust me on this.
Must Read
If you’re feeling fancy, grab a bypass valve. It’s like a secret escape hatch for your water—super handy if you ever need to bypass the softener for garden hoses or ice makers. Your future self will thank you by not crying during a drought.
Find the Perfect Spot
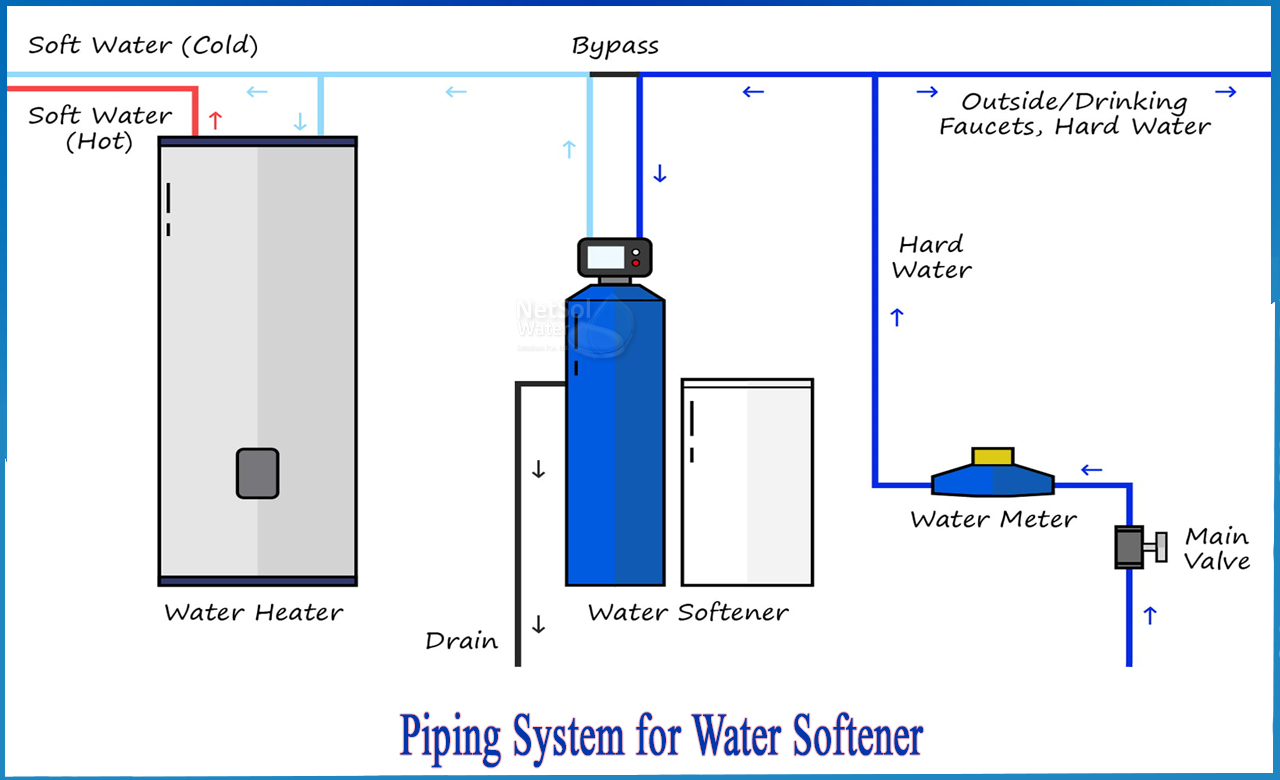
Your water softener needs a home. It should be near the main water line, before the water heater (soft water + hot water = happy pipes). Pick a dry, level spot with a nearby drain for the backwash cycle. A garage or basement is ideal. Just don’t put it in your living room, unless you’re going for a “industrial chic” vibe.
Make sure there’s an electrical outlet nearby, too. Most softeners plug in like a grumpy robot. If you don’t have one, you’ll need an electrician—or a very long extension cord that violates at least three building codes. Choose wisely.
Cut and Connect the Supply Line
Now, the fun part: cutting into your main water pipe. Use a pipe cutter to make a clean slice. Wear safety glasses—copper shards in your eyeball are not a good look. Once cut, attach a shut-off valve (or a bypass valve) to each end of the cut pipe. This lets you isolate the softener later.
Connect your flexible tubing from the shut-off valve to the “IN” port on the softener. Then run a second tube from the “OUT” port back to the other shut-off valve. Think of it as a water carpool lane: hard water goes in, soft water comes out, and everyone’s happy.
 How to Plumb a Water Softener | 8 Steps | Llona Plumbing
Don’t Forget the Drain Line
Most softeners have a small plastic tube for the backwash water. Run this to a floor drain, laundry sink, or a nearby standpipe. Secure it so it doesn’t flop around like a drunken noodle. If you use a standpipe, leave a 1-inch air gap to prevent sewer gas from back-siphoning—unless you enjoy your basement smelling like a detention center.
The Brine Line (Salt’s Superhighway)
The brine line connects the softener to your salt tank. It’s usually a thin, flexible tube that comes with the unit. Just push it into the designated fittings on both ends. No tools, no swearing. If your softener is a combo unit (all-in-one), you might skip this step. Lucky you.
Now, pour a bag of water softener salt into the brine tank. Not table salt—unless you want to pay $4 for a teaspoon of seasoning. Use pellets or crystals, and fill it about halfway. Your softener will eat this like a toddler eats crayons: slowly and messily.
Check for Leaks (The Bloody-Nose Test)
Slowly turn the main water supply back on. Listen for hissing and watch for drips. If you see water, tighten the fittings. If you see a geyser, panic, then turn the water off again and re-check your connections. It’s okay—plumbing is just organized crying.
Once everything is dry, plug in the softener and run a manual regeneration cycle. This flushes out any air and dirt. Your machine might make gurgling noises. That’s normal. It’s just burping after a big meal of hard water.
 Water Softener Plumbing Installation Diagram
Program Your Softener
Most modern softeners have a digital display that asks you questions like a pop quiz from a friendly science teacher. Set the water hardness level (check your local water report or buy a test strip). Then set the time, day, and regeneration schedule. If you mess up, just press “reset” and pretend you meant to do that.
If your softener is old-school with dial knobs, just twist them until the numbers match your water hardness. It’s like tuning a radio, but for fewer soap scum stains.
Final Tip: Add a Little Grace
Go ahead and run a faucet for a few minutes to flush out any air bubbles. Your water might look cloudy or fizzy at first. That’s just trapped air—not a ghost. Unless it turns green, in which case, call a plumber and a priest.
Test your water with a soap test: lather up your hands. If they feel slick and don’t leave a slimy film, you did it. You’re a plumbing hero. Treat yourself to a long, soft-water shower and a cookie.
And remember, every time you wash your car or fill a glass without a chalky ring, you can smile and whisper: “I did that.” You’ve conquered pipes, fittings, and the fear of flooding. Your water is soft. Your heart is strong. Go forth and spill zero drops of regret.
