How To Fit A Water Softener

Let’s be honest for a second: have you ever tried to wash your hands and felt like you were rubbing them with chalk? Or maybe you’ve noticed your shampoo just doesn’t lather t...
:max_bytes(150000):strip_icc()/installing-a-water-softener-2718669-FINAL-1-ee8de137dcf84b5db1e28f84a7dec11b.png)
Let’s be honest for a second: have you ever tried to wash your hands and felt like you were rubbing them with chalk? Or maybe you’ve noticed your shampoo just doesn’t lather the way it used to, no matter how much you pour into your palm. That, my friend, is the work of hard water, and it’s a silent bully lurking in your pipes.
Hard water is packed with calcium and magnesium. It leaves behind scaly white deposits on your faucets, makes your dishes look spotty, and can even shorten the life of your washing machine. Fitting a water softener isn’t just a chore—it’s like giving your whole house a spa day.
Why You Should Actually Care (And Smile About It)
Imagine stepping out of the shower and your skin feels like silk instead of a dry, itchy mess. That’s the difference soft water makes. You’ll also use less soap, less shampoo, and less detergent, which means more money in your pocket for things like, say, a nice cup of coffee.
Must Read
Your coffee maker will thank you, too. No more descaling every month with vinegar, because that white crust simply won’t form. It’s a small change that makes your daily routine feel a little bit more like a luxury.
Before You Start: The Not-So-Scary Prep Work
First, you need to know what you’re dealing with. Pick up a simple water test kit from your local hardware store or online. It’s just a little strip you dip in a glass of tap water—think of it like a mood ring for your plumbing.
Once you see the results, you’ll know exactly how “hard” your water is. Most softeners work for a wide range, but it’s good to have the number handy. You also need to figure out where your main water line comes into the house—usually near the water heater or where the outdoor hose connects.
The Easy-Going Step-by-Step Guide
Step 1: Pick Your Spot
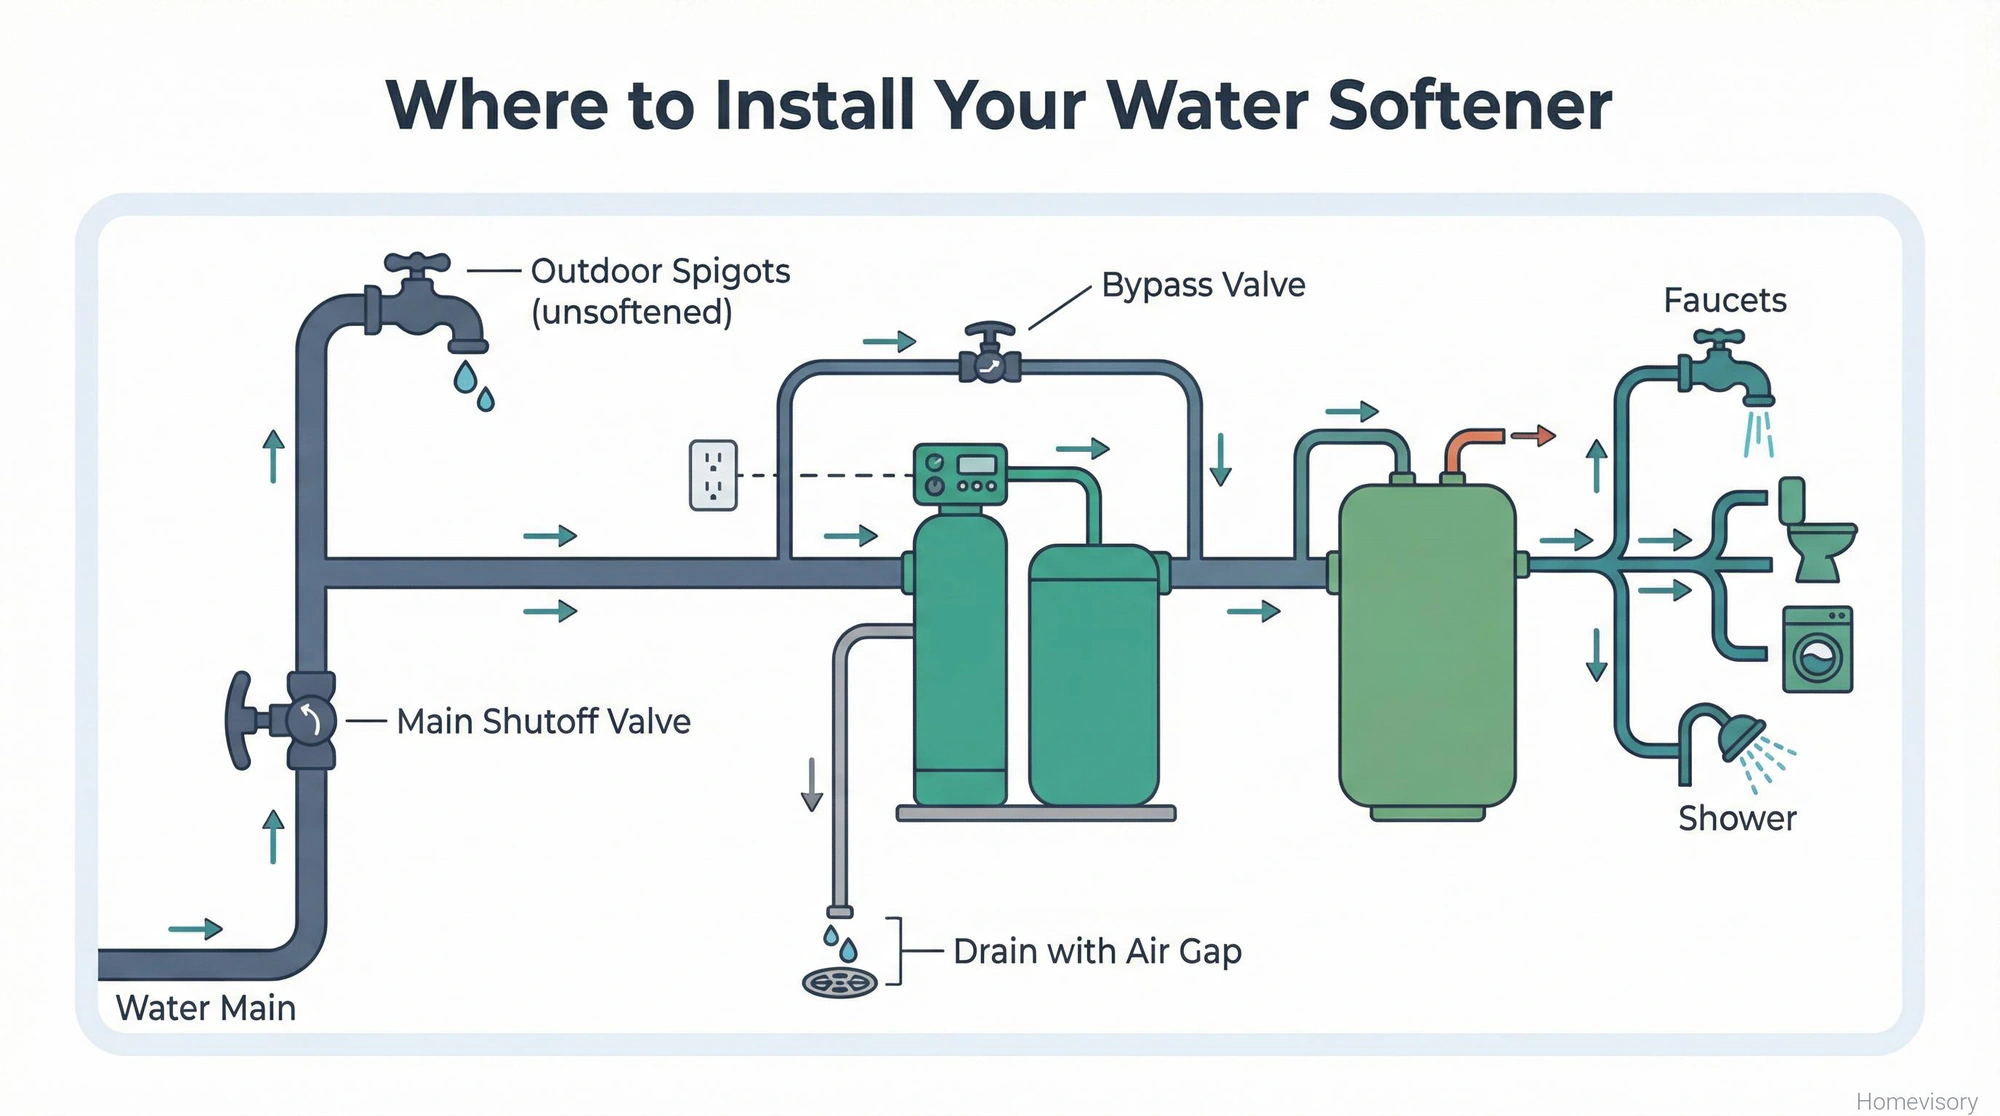
Your softener needs to be installed before the water heater, but after the main shut-off valve. Find a flat, dry spot on the floor, ideally near a drain. If you have a basement or utility closet, that’s your sweet spot.
Make sure there’s an electrical outlet nearby. These machines plug in like a toaster, so don’t stress about wiring. You’re not building a rocket—you’re just setting up a clever water filter.
 Installing A Water Softener , How To Install Water Softener System
Step 2: Turn Off the Water and Drain the Pipes
This is the part where you feel like a pro. Shut off the main water supply to your house. Then, open the lowest faucet in your home (like a basement sink or an outdoor spigot) to let any remaining water drain out.
Go ahead and flush a toilet or two to release pressure. It’s a bit messy, but very satisfying when you see the water stop. Just keep a towel handy—you’re not a plumber, you’re a hero in training.
Step 3: Cut the Pipe and Connect the Bypass Valve
Most softener kits come with a bypass valve, which is your best friend. It lets you route water around the softener if you ever need to work on it. Using a pipe cutter, snip the main water line where you want to install the softener.
Then, connect the bypass valve to your pipe. You’ll probably use compression fittings or “push-to-connect” fittings, which are as easy as clicking a Lego brick. If you can build a bookcase, you can do this.
Step 4: Attach the Softener and the Drain Line
Now, take your softener unit and connect the inlet and outlet hoses. Most systems are color-coded—blue for inlet, red for outlet—so you can’t mess it up too badly. Tighten the connections by hand, then gently with a wrench, but don’t go Hulk on them.
 How to Install a Water Softener: Sizing & Setup Guide
You’ll also need to run a small, flexible drain line from the softener to your floor drain or a sink drain. Think of it as a garden hose for your basement—it just carries away the salty rinse water. Secure it so it doesn’t wiggle loose and surprise you with a little puddle later.
Step 5: Add Salt and Power Up
Open the top of the softener and pour in softener salt pellets. You can buy giant bags at any hardware store. Fill it about halfway—like adding food to a fish tank, but less lovely.
Plug the machine in, and slowly turn the main water supply back on. Check for leaks at every connection. If you see a drip, tighten it just a smidge. Then, run the softener through its first regeneration cycle (check the manual—usually just pressing a button).
Enjoying the New Normal
After a few hours, your whole house will have soft water. Fill a glass and taste it—it’s usually a bit “smoother” than before. The first time you wash a load of laundry and see no white spots on your dark clothes, you’ll grin like a kid.
You’ll also notice less scaling on your shower head and longer-lasting appliances. Your dishwasher will run quieter, and your skin will stop feeling like sandpaper in the winter. It’s a small, weekend project that pays off every single day.
And hey, if you ever feel overwhelmed, remember: you can always hire a plumber. But doing it yourself? That’s a badge of honor you can wear proudly while sipping better-tasting tea. Go ahead—fit that softener. Your future self (and your coffeemaker) will thank you.
:max_bytes(150000):strip_icc()/installing-a-water-softener-2718669-FINAL-1-ee8de137dcf84b5db1e28f84a7dec11b.png&description=How+To+Fit+A+Water+Softener)