How To Add A Water Softener

Ever notice how your dishes come out of the dishwasher looking a bit cloudy, or how your soap just refuses to lather up? That’s not your imagination—that’s hard water doing it...
:max_bytes(150000):strip_icc()/installing-a-water-softener-2718669-FINAL-1-ee8de137dcf84b5db1e28f84a7dec11b.png)
Ever notice how your dishes come out of the dishwasher looking a bit cloudy, or how your soap just refuses to lather up? That’s not your imagination—that’s hard water doing its thing. It’s basically liquid chalk, leaving crusty deposits on everything it touches.
But here’s the cool part: you can fix it. Adding a water softener is like giving your whole house a spa day. Let’s walk through it, step by step, no pressure.
Why Bother? The Magic of Soft Water
Think of hard water as that friend who leaves a mess everywhere they go—mineral buildup in pipes, spotty glasses, and dry skin. Soft water, on the other hand, is the tidy guest who washes their plate and leaves the bathroom sparkling.
Must Read
It makes your soap work better, your hair feel silkier, and your appliances live longer. Is that worth a little DIY effort? You bet.
What You’ll Need (It’s Simpler Than You Think)
First, grab a water softener unit—they look like a futuristic trash can with a brain. You’ll also need a bypass valve, some copper or PVC pipe, a hacksaw, and a bit of patience.
Oh, and don’t forget the salt—specifically, water softener salt pellets. It’s not the same as table salt, so don’t raid your kitchen.
Step 1: Find the Sweet Spot
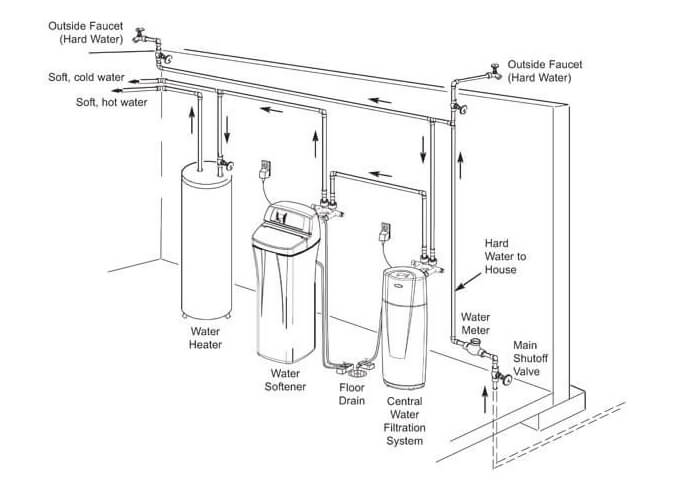
Where do you install this thing? Right at the main water line, before it branches off to your sinks and shower. Usually, that’s near your water heater, in a basement or garage.
You want a spot with good drainage, an electrical outlet nearby, and enough room to stand. Think of it like parking a mini fridge—easy access matters.
Step 2: Shut Off the Water (Seriously, Do This)
Turn off the main water valve. Then, open the lowest faucet in the house to drain any leftover water. This step is like pausing a video game—you can’t level up if you’re still in the action.
 How to Install a Water Softener | Whirlpool
If you skip this, you’ll end up with a very wet basement and a bad mood. Trust me on this one.
Step 3: Cut and Connect the Pipes
Use your hacksaw to cut a section of the main water pipe where the softener will sit. You’ll install a bypass valve here—it’s a little lever that lets you redirect water around the softener if you ever need to service it.
Then, connect the softener’s inlet and outlet ports to the pipe using flexible hoses or copper fittings. It’s like playing with plumbing LEGOs, but less colorful.
Step 4: Wire It Up and Add Salt
Most modern softeners plug into a standard wall outlet. They’re smart little boxes—they even tell you when to add more salt. No guesswork.
Pour the salt pellets into the brine tank until it’s about half full. Think of it as filling a bird feeder, but for minerals instead of seeds.
Step 5: Turn It On and Flush
Slowly open the main water valve. Check for any drips at the connections—if you see a leak, tighten the fittings just a smidge. Then, set your softener to “regenerate” manually (the manual will explain, but it’s basically a rinse cycle).
 How To Install A Water Softener System at Lilly Hurdle blog
Let it run for a few minutes, then crack open a faucet inside the house. You should see clearer, smoother water flowing. Pretty cool, right?
The Fun Part: What Happens Next?
Within a week, you’ll notice your dishes sparkle without scrubbing. Your skin won’t feel like sandpaper after a shower, and your laundry will feel fluffier.
Your water heater will thank you, too—it’ll last years longer without mineral sludge building up inside. That’s like giving your appliances a tiny retirement fund.
Any Downsides? (A Few, But Chill)
Yes, you’ll need to buy salt every month or two. And if you drink tap water, it’ll taste a little different—sodium is added during softening (a tiny amount, but still).
If that bugs you, just install a separate reverse-osmosis filter at your kitchen sink. Problem solved, like ordering a pizza with a side salad.
Final Thoughts: You Got This
Installing a water softener isn’t rocket science—it’s more like assembling a bookshelf with water involved. It’s a weekend project that pays off in less cleaning, softer skin, and longer-lasting pipes.
So, why not give it a shot? Your future self, with their spotless dishes and silky hair, will definitely thank you.
:max_bytes(150000):strip_icc()/installing-a-water-softener-2718669-FINAL-1-ee8de137dcf84b5db1e28f84a7dec11b.png&description=How+To+Add+A+Water+Softener)