How To Filter Well Water

So, you’ve got a well. Maybe you just moved into a charming old house with its own water supply, or you’re dreaming of ditching that monthly water bill. It’s a fantastic, inde...
So, you’ve got a well. Maybe you just moved into a charming old house with its own water supply, or you’re dreaming of ditching that monthly water bill. It’s a fantastic, independent feeling—like having your own secret spring.
But here’s the thing: that water is a wild card. It comes straight from the ground, carrying all sorts of minerals, sediment, and sometimes, unwelcome guests like bacteria. You wouldn’t drink a river without checking it first, right? Same logic applies here.
The cool part? You can totally take control of this. Filtering well water isn't some complicated science project for experts; it’s more like building a custom playlist for your home. Let’s break down why it’s awesome and how you can get it done.
Must Read
Why Bother? The "Earth Smoothie" Problem
Think of unfiltered well water as an Earth Smoothie. It’s full of natural flavor, sure—but also grit, iron, and maybe a little bit of sulfur (hello, rotten egg smell). You probably don’t want that in your morning coffee.
The biggest reason is simple: health and taste. You want water that’s clear, delicious, and doesn’t leave orange stains on your sink. It also protects your expensive appliances, like your water heater and washing machine, from getting clogged up with mineral sludge.
And honestly, there’s a deep satisfaction in knowing exactly what’s in your water. It’s a little bit of science and a little bit of magic, all happening in your basement.
Step 1: Play Detective with a Water Test
Before you buy anything, you have to know what you’re dealing with. Don’t skip this step—it’s like trying to fix a car without knowing if the engine is on fire. Get a professional test from a lab.
You’re checking for nasties like bacteria, nitrates, and heavy metals. But you’re also looking for the cool stuff: iron (which makes water taste like a penny), manganese (black stains), and hard water minerals (calcium and magnesium).
Once you have that report, it’s like having a treasure map. You’ll know exactly which filter system is your golden ticket.
 How to Change a Well Water Filter (with Pictures) - wikiHow
Step 2: The Filter Superstars (and Their Jobs)
Now for the fun part: picking your team. Different filters tackle different problems. Think of it as assembling a superhero squad for your pipes.
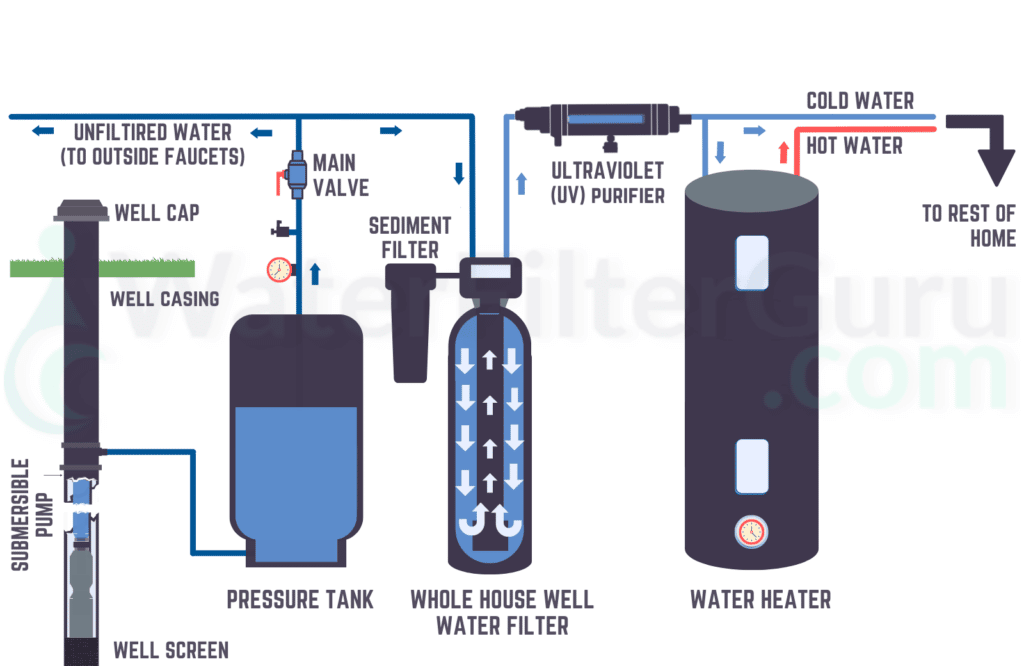
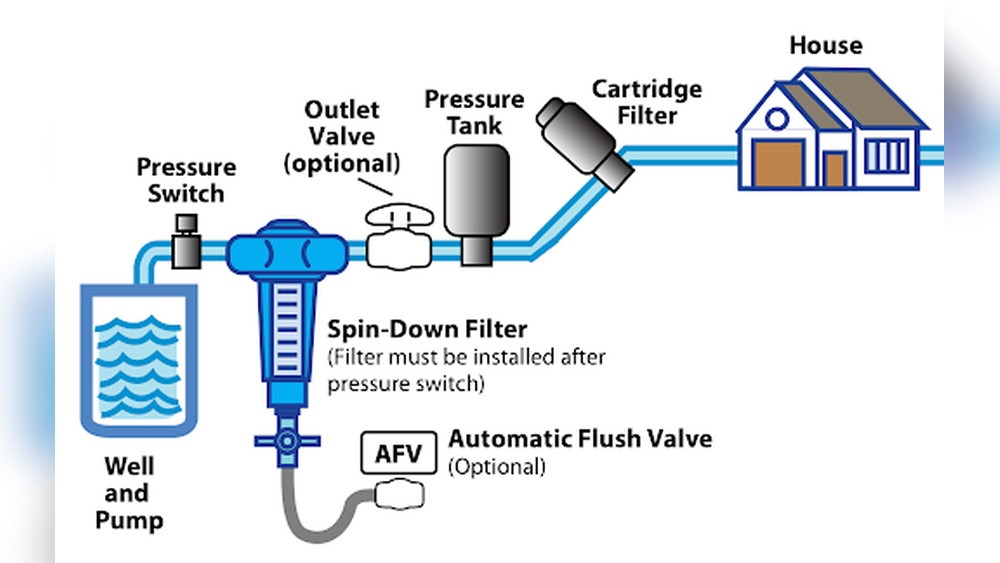
The Sediment Filter – The Bouncer
This is your first line of defense. It catches the big stuff: sand, silt, grit, and rust flakes. It’s the burly guy at the club door saying, “Not on my watch.”
You usually see this as a simple, spin-on cartridge. It’s cheap, easy to change, and it protects all the other fancy filters downstream. Without it, your expensive carbon filter would get clogged in a week.
The Carbon Filter – The Flavor Chef
This is where the taste magic happens. Activated carbon works like a sponge, grabbing chlorine (if you use it), pesticides, and weird odors. It makes that earthy smoothie taste like pure mountain spring water.
It’s the unsung hero of your kitchen. You’ll notice the difference in your ice cubes and tea—suddenly, they don’t have that weird “well funk” anymore.
The Water Softener – The Mineral Tamer
If your test shows hard water (white scale on faucets, dry skin), you need a softener. It swaps out calcium and magnesium for sodium or potassium. It’s like a gentle wizard that makes your soap lather better and your hair feel silky.
Pro tip: if you’re on a low-sodium diet, don’t worry. The amount added is tiny—less than a slice of bread. You can even use potassium chloride instead.
 How To Filter Well Water: Easy Steps For Pure, Safe Drinking - RO System
The UV Filter – The Disinfectant Ray
This is the coolest one. A UV light zaps bacteria, viruses, and cysts (like giardia) with pure radiation. It’s like a mini sunbeam inside your pipe, sterilizing everything instantly.
It’s silent, chemical-free, and incredibly effective. If your well tested positive for coliform bacteria, this is your best friend. It turns your water into a safe zone without a hint of chemical taste.
Step 3: The Order Matters (It’s Not Random)
You can’t just toss these filters in any order. It’s like making a sandwich—you put the lettuce on top so it doesn’t get soggy. The correct flow is: Sediment → Softener → Carbon → UV.
Why? Sediment first to protect everything. Softener next to stop scale from building up on the carbon. Carbon last to polish the taste. UV at the very end so the water is perfectly clear and disinfected. Simple, right?
The Payoff: Your Own Personal Aquifer
Once it’s all set up, you’ll feel like a water shaman. You’ve turned a chaotic underground stream into a crystal-clear, delicious resource. You’ll never buy bottled water again.
It’s a bit of work upfront—testing, buying, installing—but the payoff is enormous. You get total independence from the city system. And honestly, isn’t there something deeply satisfying about knowing you’re the one in charge of your own water?
So go ahead. Get that test, pick your filters, and start filtering. Your well water is waiting to become the best version of itself.
