Reverse Osmosis Water System Installation Diagram

So, there I was, last Tuesday, staring at a tangle of plastic tubing under my kitchen sink like it was an alien life form. My brand-new reverse osmosis system had arrived, and...
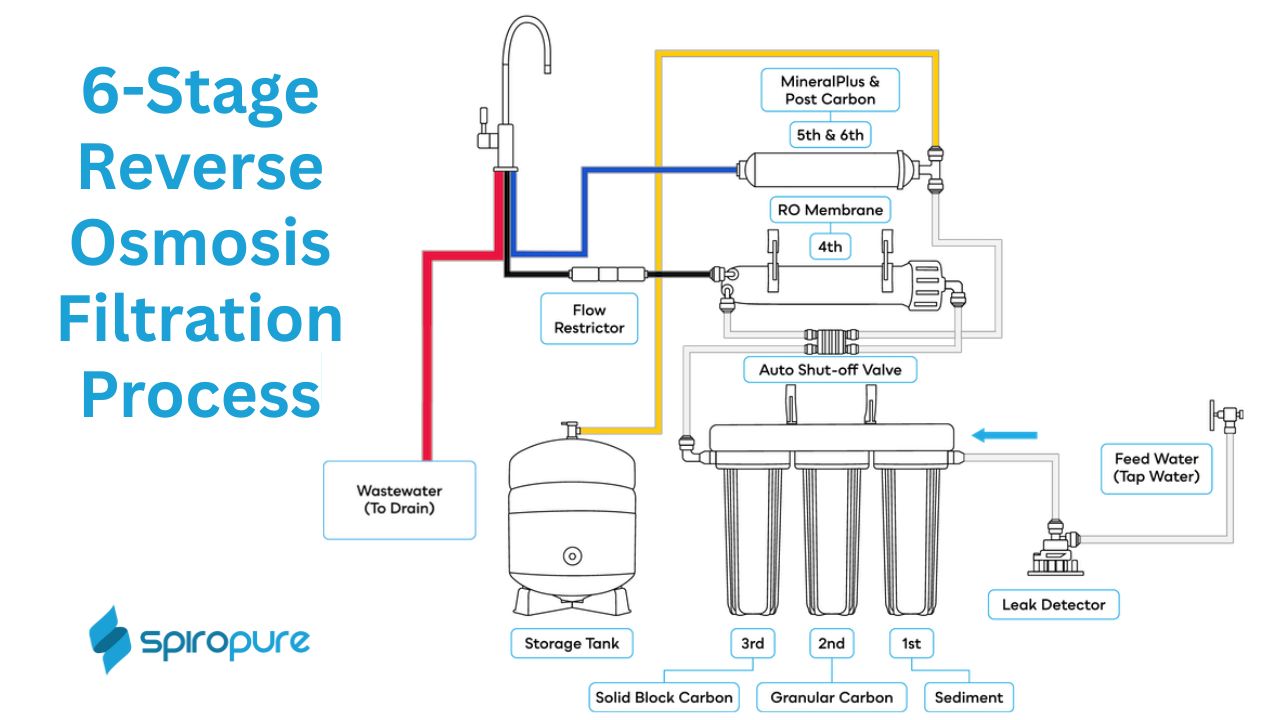
So, there I was, last Tuesday, staring at a tangle of plastic tubing under my kitchen sink like it was an alien life form. My brand-new reverse osmosis system had arrived, and the instruction manual was written in a language that felt 20% English, 80% angry hieroglyphics. I thought, “How hard can it be? It’s just water going in and water coming out.” Oh, sweet summer child, I was so wrong—and three flooded cabinet doors later, I finally understood that a reverse osmosis water system installation diagram isn’t just a suggestion; it’s your only lifeline.
Think of that diagram as the treasure map for your plumbing. Without it, you’re just a confused pirate poking at pipes with a wrench. And trust me, you don’t want to be that pirate. Let’s break down this mystical chart so you can install your system without crying into a puddle of filtered water.
The Heart of the Beast: The Reverse Osmosis Membrane
At the center of every diagram, you’ll see a little tank or a cylindrical cartridge labeled the RO membrane. This is the star of the show—the thing that does the actual magic. It’s a semi-permeable membrane that shoves water molecules through while screaming, “Get outta here, lead, chlorine, and microplastics!”
Must Read
Most diagrams will show three arrows leaving this stage: one for filtered water (the good stuff), one for waste water (the stuff that goes down the drain), and one for pre-filtered water coming in. Memorize these arrows. They are your north star.
The Pre-Filter Party (Not Gonna Be Fun)
Before water even touches the membrane, it has to go through a sediment filter and a carbon filter. Your diagram will show these as separate little cylinders, often linked with red or blue tubing. This is the “guard dog” stage—it catches big junk like sand and rust so your precious membrane doesn’t get clogged in a week.
Here’s the dirty secret: if you skip this step or connect the hoses backwards (guilty as charged), you’ll destroy the membrane. And a destroyed membrane costs about as much as a nice dinner out. Don’t be like me. Follow the arrows.
The Storage Tank: Your Water’s Cozy Home
On the diagram, you’ll see a big round blob typically labeled “Storage Tank” or just “Tank”. This is where the filtered water hides until you need it. It’s connected to the membrane with a skinny blue tube. That tube is your “water highway.”
Here’s the ironic part: the tank isn’t full of just water. It has an air bladder inside that pushes the water out when you open the faucet. If you don’t pressurize the tank before installation (the diagram will show a tiny Schrader valve—like a bike tire valve), you’ll get a sad, drippy trickle. And you’ll be Googling “why is my RO system slow” at 2 AM. I speak from experience.
The Drain Saddle: The Most Annoying Little Clip
Every diagram has a small part labeled “Drain Saddle” or “Drain Clamp.” It’s that little metal or plastic clamp that attaches to your sink drain pipe. This is where the waste water—the “concentrate”—gets dumped. And let me tell you, installing this thing is the most fiddly, knuckle-busting part of the whole job.
 Reverse Osmosis System Installation: 7 Easy Steps
The diagram usually shows it attached to the top or side of the drain pipe. Don’t put it on the bottom, or you’ll get a permanent drip that sounds like a leaking faucet for the rest of your life. You’ve been warned.
The Faucet: Where the Magic Ends (and Your Thirst Begins)
At the top of your diagram, you’ll see a pretty little dedicated faucet. This goes through a hole in your sink or countertop. If you don’t have a hole, the diagram shows a weird little drill bit symbol. That’s your cue to summon your inner DIY warrior and make one.
Connecting the faucet is usually simple: a blue tube from the tank goes to the faucet. But the diagram will show you a tiny faucet valve that shuts off the flow. Don’t forget this valve, or your first glass of water will require you to crawl under the sink and twist a knob like a cave monster.
The Flow Restrictor: The Unsung Hero
Look carefully at the diagram. You might see a small “flow restrictor”—often just a little brass or plastic fitting near the drain line. This little guy is crucial. It makes sure the water spends enough time inside the membrane to actually get filtered.
If you leave it out (because you thought it was “optional”), your water will taste like tap water, and your membrane will die of boredom. The diagram knows. Trust the diagram.
Conclusion (or, How I Learned to Stop Worrying and Love the Diagram)
Now, take a deep breath. Look at that reverse osmosis system installation diagram again. It’s not a puzzle; it’s a script. Every line, every arrow, every little “T-connector” is telling you a story about where the water should go and what not to screw up.
My final piece of advice? Label your hoses with tape and a marker before you disconnect anything. Trust me, once you’ve got a spaghetti mess of identical blue and red tubes, even the diagram can’t save your sanity. And if you get stuck? Well, there’s always a YouTube video of a guy in a garage who sounds even more desperate than you. Good luck, and may your water taste like mountain springs and victory.
