How To Install Reverse Osmosis Water System

So, you’ve decided to become a water connoisseur? That’s awesome! You’re about to turn your tap water from “meh” into “mmwah*.” A reverse osmosis (RO) system sounds like rocke...

So, you’ve decided to become a water connoisseur? That’s awesome! You’re about to turn your tap water from “meh” into “mmwah*.” A reverse osmosis (RO) system sounds like rocket science, but I promise, it’s more like assembling slightly complicated LEGOs—with water.
First, let’s talk why you’d bother. Tap water can be a cocktail of chlorine, lead, and mystery minerals. An RO system is like a bouncer for your sink, letting only pure H2O through. Plus, you’ll save money on bottled water and save the planet from plastic—you eco-warrior, you!
Step 1: Gather Your Gear (And Your Patience)
Your kit should come with a tank, a filter housing, and enough tubing to wrap a small giraffe. Don’t panic if it looks like a deconstructed spaceship—every piece has a job. Read the entire manual first. Yes, I know it’s boring, but skipping it is like baking a cake without reading the recipe. Spoiler: you’ll end up with flour in your hair and a salty mess.
Must Read
You’ll also need a drill, an adjustable wrench, and maybe a friend who’s good at swearing politely. Pro tip: clear your afternoon schedule. You’re not just installing a filter; you’re becoming a plumber-guru.
Step 2: Find the Perfect Spot
Your RO system needs a home under your sink. Clear out the chaos—old sponges, that mysterious jar of pickles from 2019. You need space for the tank (it’s huge, like a water balloon that graduated) and the filter unit. Measure twice, drill once—or just guess and hope for the best. (Kidding! Measure twice.)
If you have a garbage disposal, you’ll need a special adapter for the drain line. Don’t panic—it’s included in most kits, but if not, a quick trip to the hardware store is your only detour. Hardware store employees love projects like yours; they’ll high-five you in the plumbing aisle.
Step 3: Connect the Feed Water Valve
This is where you turn off the cold water under the sink. Find the valve, twist it clockwise until it stops—like closing a stubborn jar of pickles. Then, open your faucet to release pressure. Water will dribble out, just like when you accidentally sneeze while drinking. No biggie.
Next, attach the feed water valve to the cold water line. This little gadget taps into the pipe like a secret agent. Tighten it with your wrench, but don’t Hulk-smash it—you just need a snug fit. If water sprays everywhere later, you’ll look like a wet cat, so be gentle.
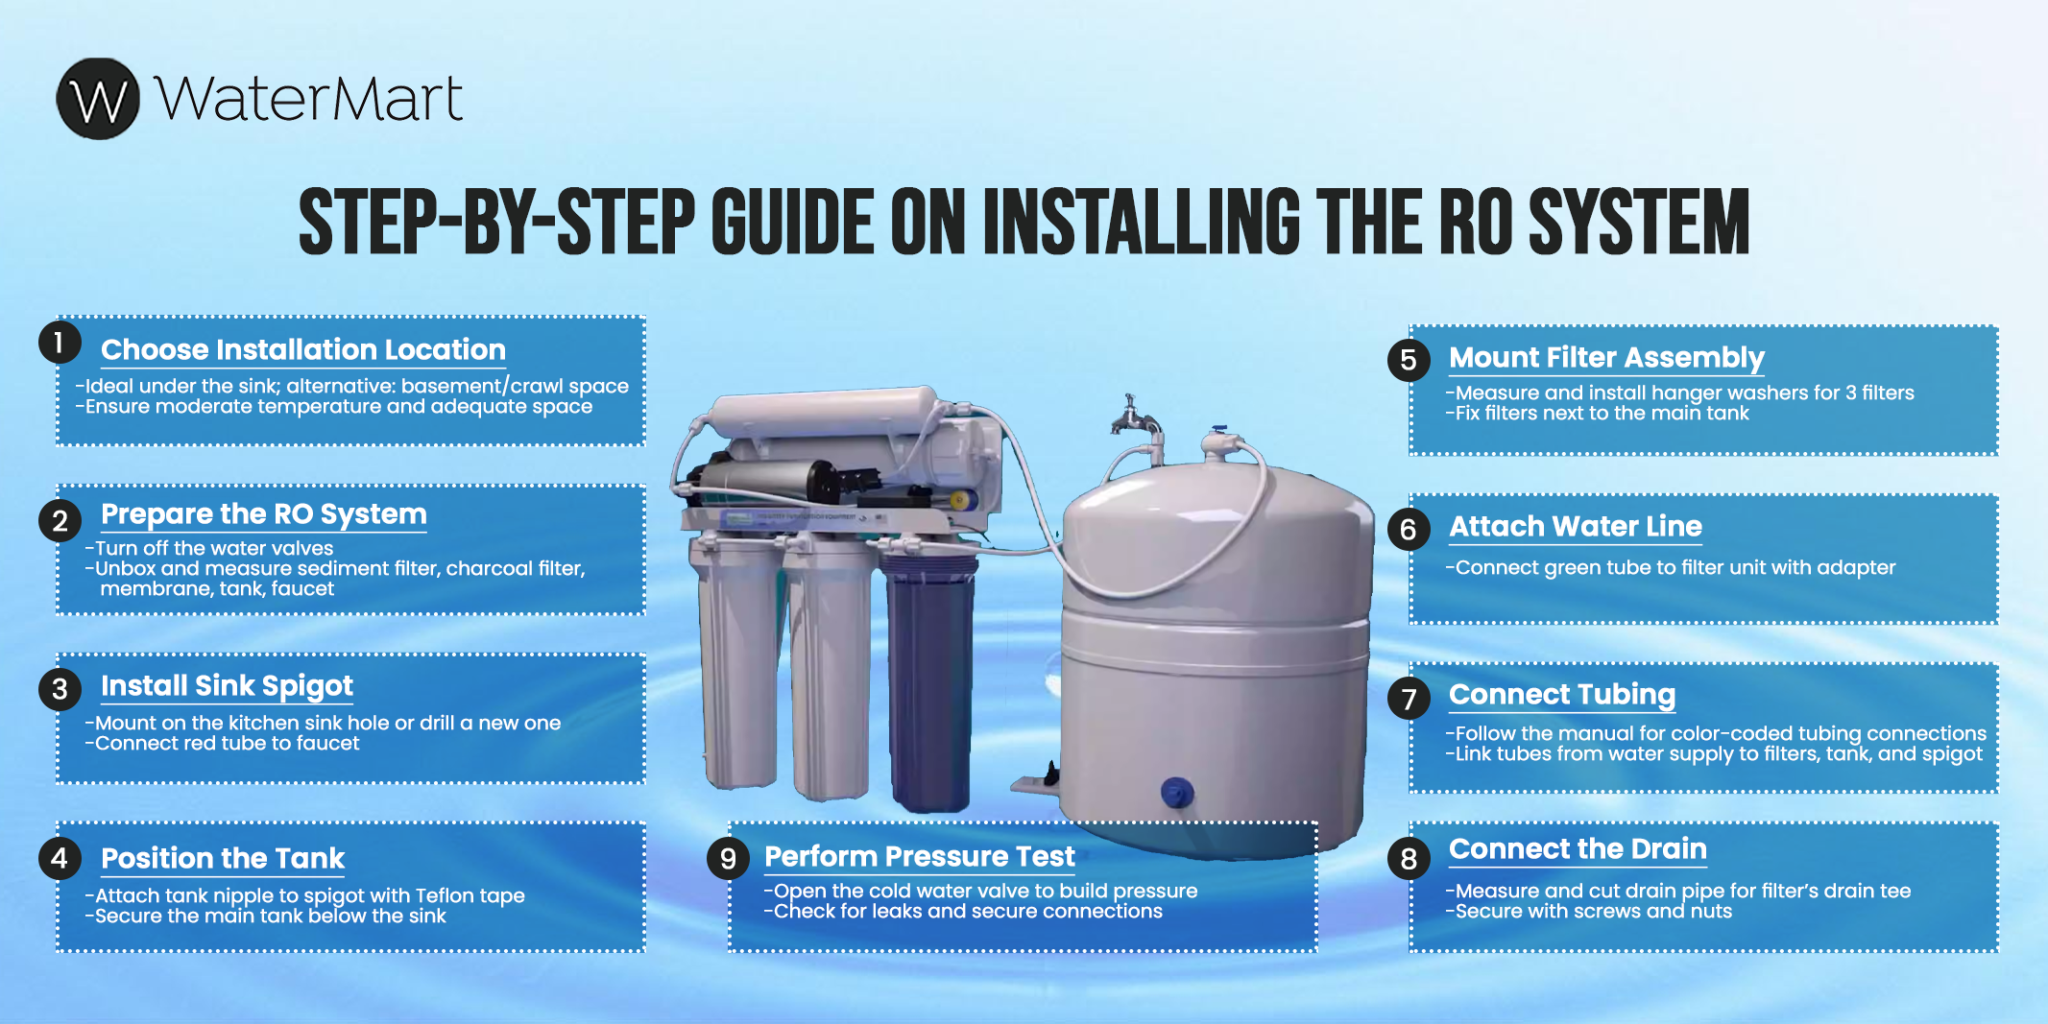 How to Install a Reverse Osmosis Water Filtration System?
Step 4: Install the Faucet (The Star of the Show)
You probably have a soap dispenser hole on your sink. If not, you’ll need to drill one. Put on safety glasses—not because you’re cool, but because flying metal shards in your eye is not a good look. Drill slowly, like you’re slicing a bagel, and place a bowl underneath to catch debris. (Or you’ll be vacuuming for hours.)
Thread the faucet through the hole and tighten the nut beneath. It’s like putting a crown on a queen—except that queen gives you crispy, refreshing water. Give yourself a tiny round of applause. You’ve earned it.
Step 5: Tube Town—Connect Everything
Now for the spaghetti portion of the program. You’ll have color-coded tubes: blue for feed water, red for drain, black for storage tank. Follow the diagram like it’s a treasure map. Push each tube firmly into its fitting until it clicks—if it doesn’t click, it’s not in. No click = future flood.
Connect the drain line to your sink’s drain pipe. You’ll need to use a saddle valve or a clamp-on fitting. Just drill a tiny hole in the drain pipe (if you haven’t already), and secure the tube. I promise, your sink won’t explode—it’s very sturdy, like your grandma’s fruitcake.
Step 6: The Tank Connection
Your storage tank is the waterbank. It stores clean water until you’re thirsty. Connect the black tube from the tank to the system’s tank port. Before hooking it up, inflate the tank to 7–8 psi with a bike pump. If you forget, your water will dribble out like a tired toddler. Nobody wants that.
Hand-tighten the tank valve—don’t use tools or you’ll crack it. That’s a $50 mistake you just avoided. You’re welcome.
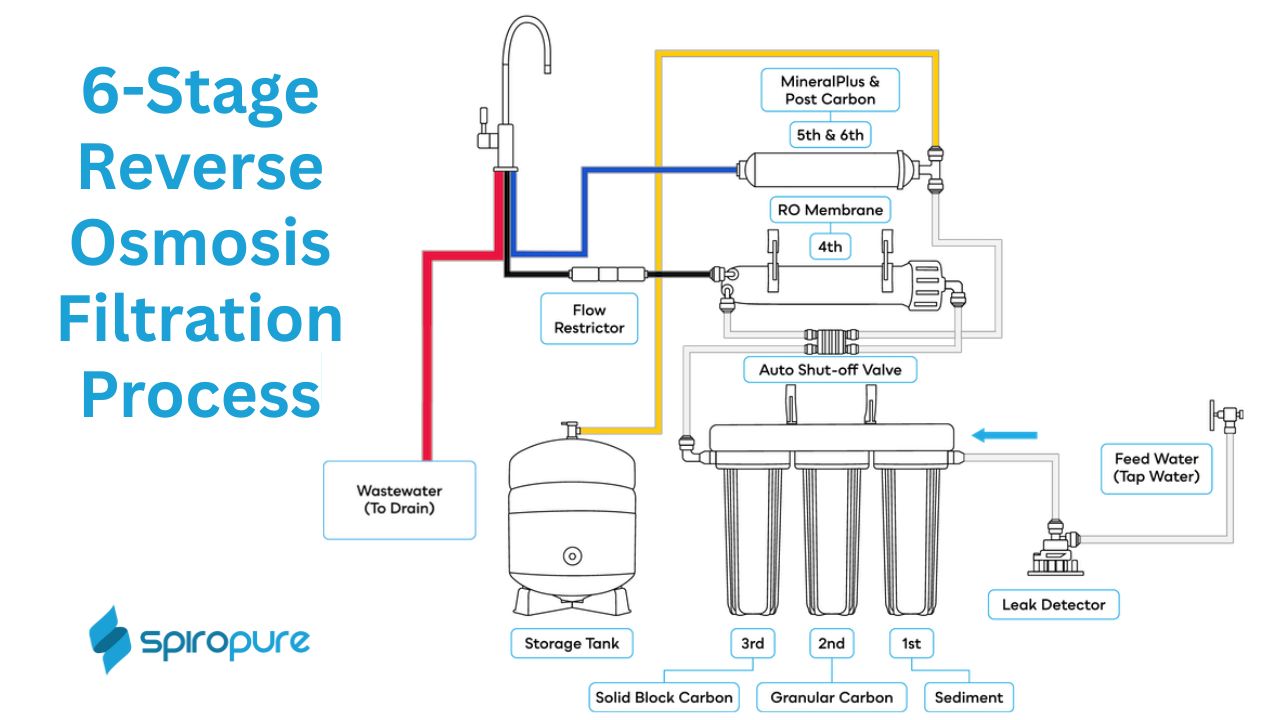 How to Install Reverse Osmosis System | All Filters Guide
Step 7: The Big Flush
This is the fun, messy part. Turn the feed water valve back on slowly. Then, open your new faucet—but don’t drink from it yet! Let the water run for at least 24 hours to flush out carbon dust from the new filters. Seriously, it looks like dirty tea, and you don’t want that in your morning coffee.
During the flush, check for leaks. Use a paper towel and wipe every connection. If you see a drip, tighten it gently. If you see a geyser, scream for a bucket. (Or scream for your buddy.) Leaks are normal—they’re the system’s way of saying, “I’m alive!”
Step 8: Patience, Young Grasshopper
RO systems are slow. They produce water drop by drop, like a gentle nature documentary. You’ll wait a few hours for the tank to fill completely. Use this time to admire your handiwork, take a nap, or binge-watch one episode of your favorite show. Then fill the tank once, dump that water (it’s still cleaning itself), and let it fill again.
After 24 hours, your water will taste amazing. Do a celebratory taste test: pour a glass, hold it up to the light, and look for clarity. If it’s clear, you’re a winner. If it’s cloudy, give it another flush. (Cloudiness is usually just tiny air bubbles—like soda, but fancy.)
Uplifting Conclusion
You did it. You installed a reverse osmosis system! You’re not just a person with a fancy sink—you’re a water wizard. Every sip you take from now on will taste like victory, mountain springs, and a hint of your own cleverness. No more plastic bottles cluttering your life, no more longing for that crisp, filtered flavor from the expensive brand. You’ve brought the spa to your very own kitchen.
And here’s the best part: every time you refill your glass, you’ll remember the afternoon you conquered wrenches, tubes, and the one terrifying leak that turned out to be nothing. You laughed, you learned, and you made your home a little bit more wonderful. So raise that glass of pure, glorious water—to you, to perseverance, and to the fact that you now have the best water in the neighborhood. Cheers, my friend. You deserve every drop.
