How To Install A Whole House Water Softener

Let’s be honest for a second. You probably don’t think about your water at all until you try to wash your hands and the soap just… refuses to lather. Or when you run your hand...
:max_bytes(150000):strip_icc()/installing-a-water-softener-2718669-FINAL-1-ee8de137dcf84b5db1e28f84a7dec11b.png)
Let’s be honest for a second. You probably don’t think about your water at all until you try to wash your hands and the soap just… refuses to lather. Or when you run your hand through your hair, and it feels like straw.
That, my friend, is the magic of hard water. It’s like that uninvited guest who leaves crusty white rings on your coffee mugs and clogs up your shower head for fun. You might not realize it, but it’s slowly waging war on your plumbing, your appliances, and your skin.
So, how do you fight back? You install a whole house water softener. Don’t worry, you don’t need to be a master plumber to do this. Think of it as a fun weekend project that pays you back in silky-smooth showers forever.
Must Read
Why You Should Actually Care
Imagine your morning coffee. With hard water, it tastes a little… flat. The minerals in the water mess with the flavor. But with soft water? That first sip is a revelation.
Or picture this: your favorite jeans come out of the wash feeling scratchy. Soft water lets your detergent do its actual job. Your clothes stay softer and your colors pop longer.
And your skin? Stop blaming your lotion. Hard water leaves a film of minerals on your skin that dries it out. Soft water rinses clean. You’ll feel like you just stepped out of a spa—every single day.
Before You Start: The Shopping Trip
First, you need to figure out what kind of water you have. Grab a water test kit from the hardware store. It takes five minutes, and it’s the only way to know how much grit you are fighting.
Next, buy the right softener. Look for one that matches the grain capacity for your household size. A family of four needs a bigger tank than a single coffee-drinker. Trust me, don’t guess on this.
Finally, bring home the basics: a softener, a bypass valve, some copper or PEX tubing, and a roll of Teflon tape. You’ll also want a bucket, a pipe cutter, and a heat gun if you’re using PEX.
Pick Your Spot
Your softener needs to go where the main water line enters your house. Usually, that’s in the basement, garage, or a utility closet. It needs to be before the water heater, but after the outdoor spigots.
Why? So your garden hoses don’t get softened water—plants actually prefer the hard stuff. Strange, but true. Your roses want that mineral chaos.
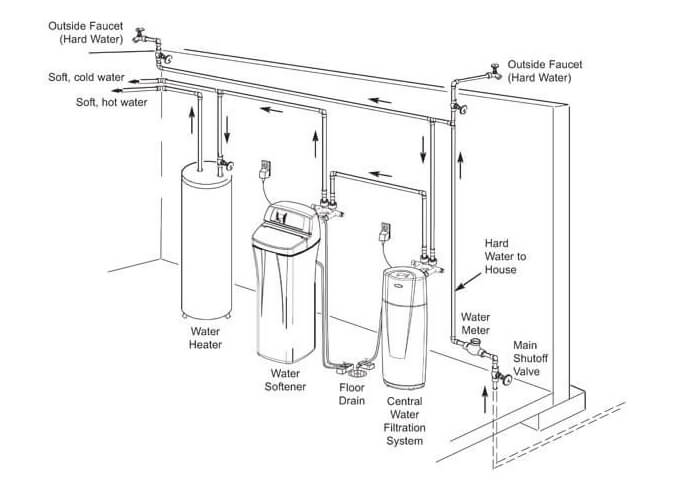 Water Filter Plumbing Diagram
Make sure you have a nearby drain (like a utility sink or a floor drain) and an electrical outlet. The unit needs power to run its regeneration cycle.
The Real Work (Don’t Panic)
Now, turn off the main water supply. Open a faucet downstairs to release pressure. Water will drip, so keep that bucket handy. You will get a little wet. That’s okay; it builds character.
Cut the main water pipe in your chosen spot. Measure twice, cut once. This is not the moment to be a cowboy. You’re connecting the “IN” port of the softener to the water line coming from the street.
Install the bypass valve first. This little gadget is a lifesaver if you ever need to service the unit. Trust me, you will love this valve the moment you need to move the unit to sweep the floor.
Connect the pipes. If you use PEX, you simply crimp the rings. If you use copper, you’ll sweat the joints. Sweating copper is like making art with fire. It’s scary the first time, but incredibly satisfying when you see the solder flow.
Plumbing the Drain Line
Your softener needs to flush out the nasty stuff it collects. That’s the drain line. Run a small flexible tube from the control valve to your drain.
You need an air gap here. This means the tube doesn’t touch the drain water. It just hangs over the sink or drops into a standpipe. This is not optional. It stops contaminated water from siphoning back into your clean drinking water.
Run the brine tank overflow tube to the same drain. This just catches any accidental water if the tank overflows. It’s a simple plastic tube, but it saves you from a very wet floor.
 How To Install A Water Softener System at Lilly Hurdle blog
The Final Steps
Put the salt in the brine tank. Yes, just like a giant, heavy bag of salt pellets. Pour them in. You cannot put too much, but do not fill it to the absolute brim. Leave some room for the water.
Turn the water back on, but do it slowly. A fast rush of water can damage the valve. Open the bypass valve halfway, wait for the hissing to stop, then open it fully.
Check every connection for drips. Run your hand under each joint. A pinhole leak will tickle your finger. Tighten things gently—brass fittings crack if you are too aggressive.
Set the Timer
Now, program the control head. This is the brain of the operation. Set it to regenerate at 2 AM. Everyone is asleep, and the water pressure is highest.
If you have an iron problem, set it to regenerate more often. Most units have a dial or digital display. Read the manual. Yes, read the manual. It takes ten minutes and saves you from calling a plumber.
Finally, run the softener through a manual regeneration cycle. It makes a few gurgling noises, then quiets down. That sound is the sound of victory.
Your New Life
Take your first soft water shower. The water feels slippery. Soap rinses off in half the time. Your skin doesn’t squeak—it just feels clean.
Your kettle will never look scaly again. The glass shower door? No more white spots. You will start leaving the dishes off the drying rack because they actually dry sparkly.
You did it. You installed a whole house water softener. Now you can walk into your kitchen, pour a glass of water, and grin at the crisp, clean taste. You earned this.
:max_bytes(150000):strip_icc()/installing-a-water-softener-2718669-FINAL-1-ee8de137dcf84b5db1e28f84a7dec11b.png&description=How+To+Install+A+Whole+House+Water+Softener)