How To Add Water Softener To Water Heater

Last Saturday, I had a full-blown argument with my Keurig. It was spitting out coffee that tasted like someone had dissolved a chalkboard eraser in it. I knew it wasn't the be...
Last Saturday, I had a full-blown argument with my Keurig. It was spitting out coffee that tasted like someone had dissolved a chalkboard eraser in it. I knew it wasn't the beans—it was the water. My whole house has that hard, mineral-rich stuff that leaves white crust on everything, from the shower head to the kettle. And then I looked at my water heater, silently sitting in the basement, probably caked with limestone gunk, working twice as hard for half the hot water.
You see, that water heater is your home's unsung hero. It heats water for your laundry, your dishes, and that lukewarm shower you take at 6 AM. But when hard water flows through it, it doesn't just affect your coffee; it destroys the heater’s efficiency. The minerals—calcium and magnesium—precipitate out and form a thick layer of scale at the bottom of the tank, like a concrete blanket smothering the heating element.
So, can you add a water softener directly to the water heater? Short answer: No, you can't dump a bag of salt into the tank itself (please don’t—that’s a recipe for a plumbing disaster). But you can and should install a whole-house water softener before the water reaches the heater. Let me walk you through the "how," because it's actually easier than you think, and way less messy than trying to flush out a dead water heater.
Must Read
Step One: Know Your Enemy (and Your Tools)
First, you need to figure out how hard your water actually is. You can buy a simple test strip at a hardware store, or let your scale-encrusted faucets be your guide. If the white buildup is thick enough to write your name in, you’ve got a problem. Water softeners work by swapping those hard minerals for sodium or potassium through a process called ion exchange.
Your main weapon is a whole-house water softener system. It usually comes as a tank (the resin bed) plus a brine tank (for the salt pellets). You’ll also need some basic plumbing skills, like cutting copper pipe and using a torch or compression fittings. Side note: if the word "solder" makes you nervous, buy a SharkBite fitting—they’re a life saver for weekend warriors like us.
Step Two: Find the Perfect Spot
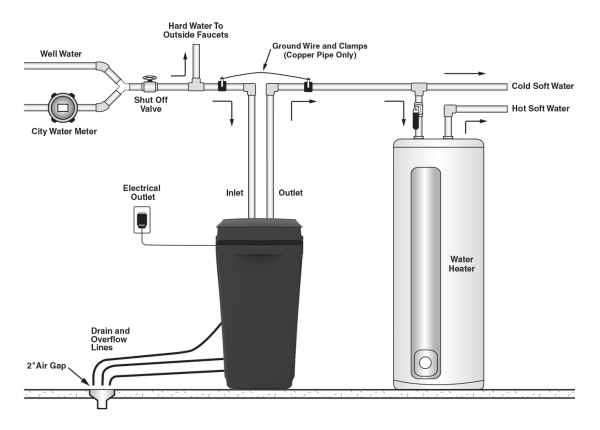
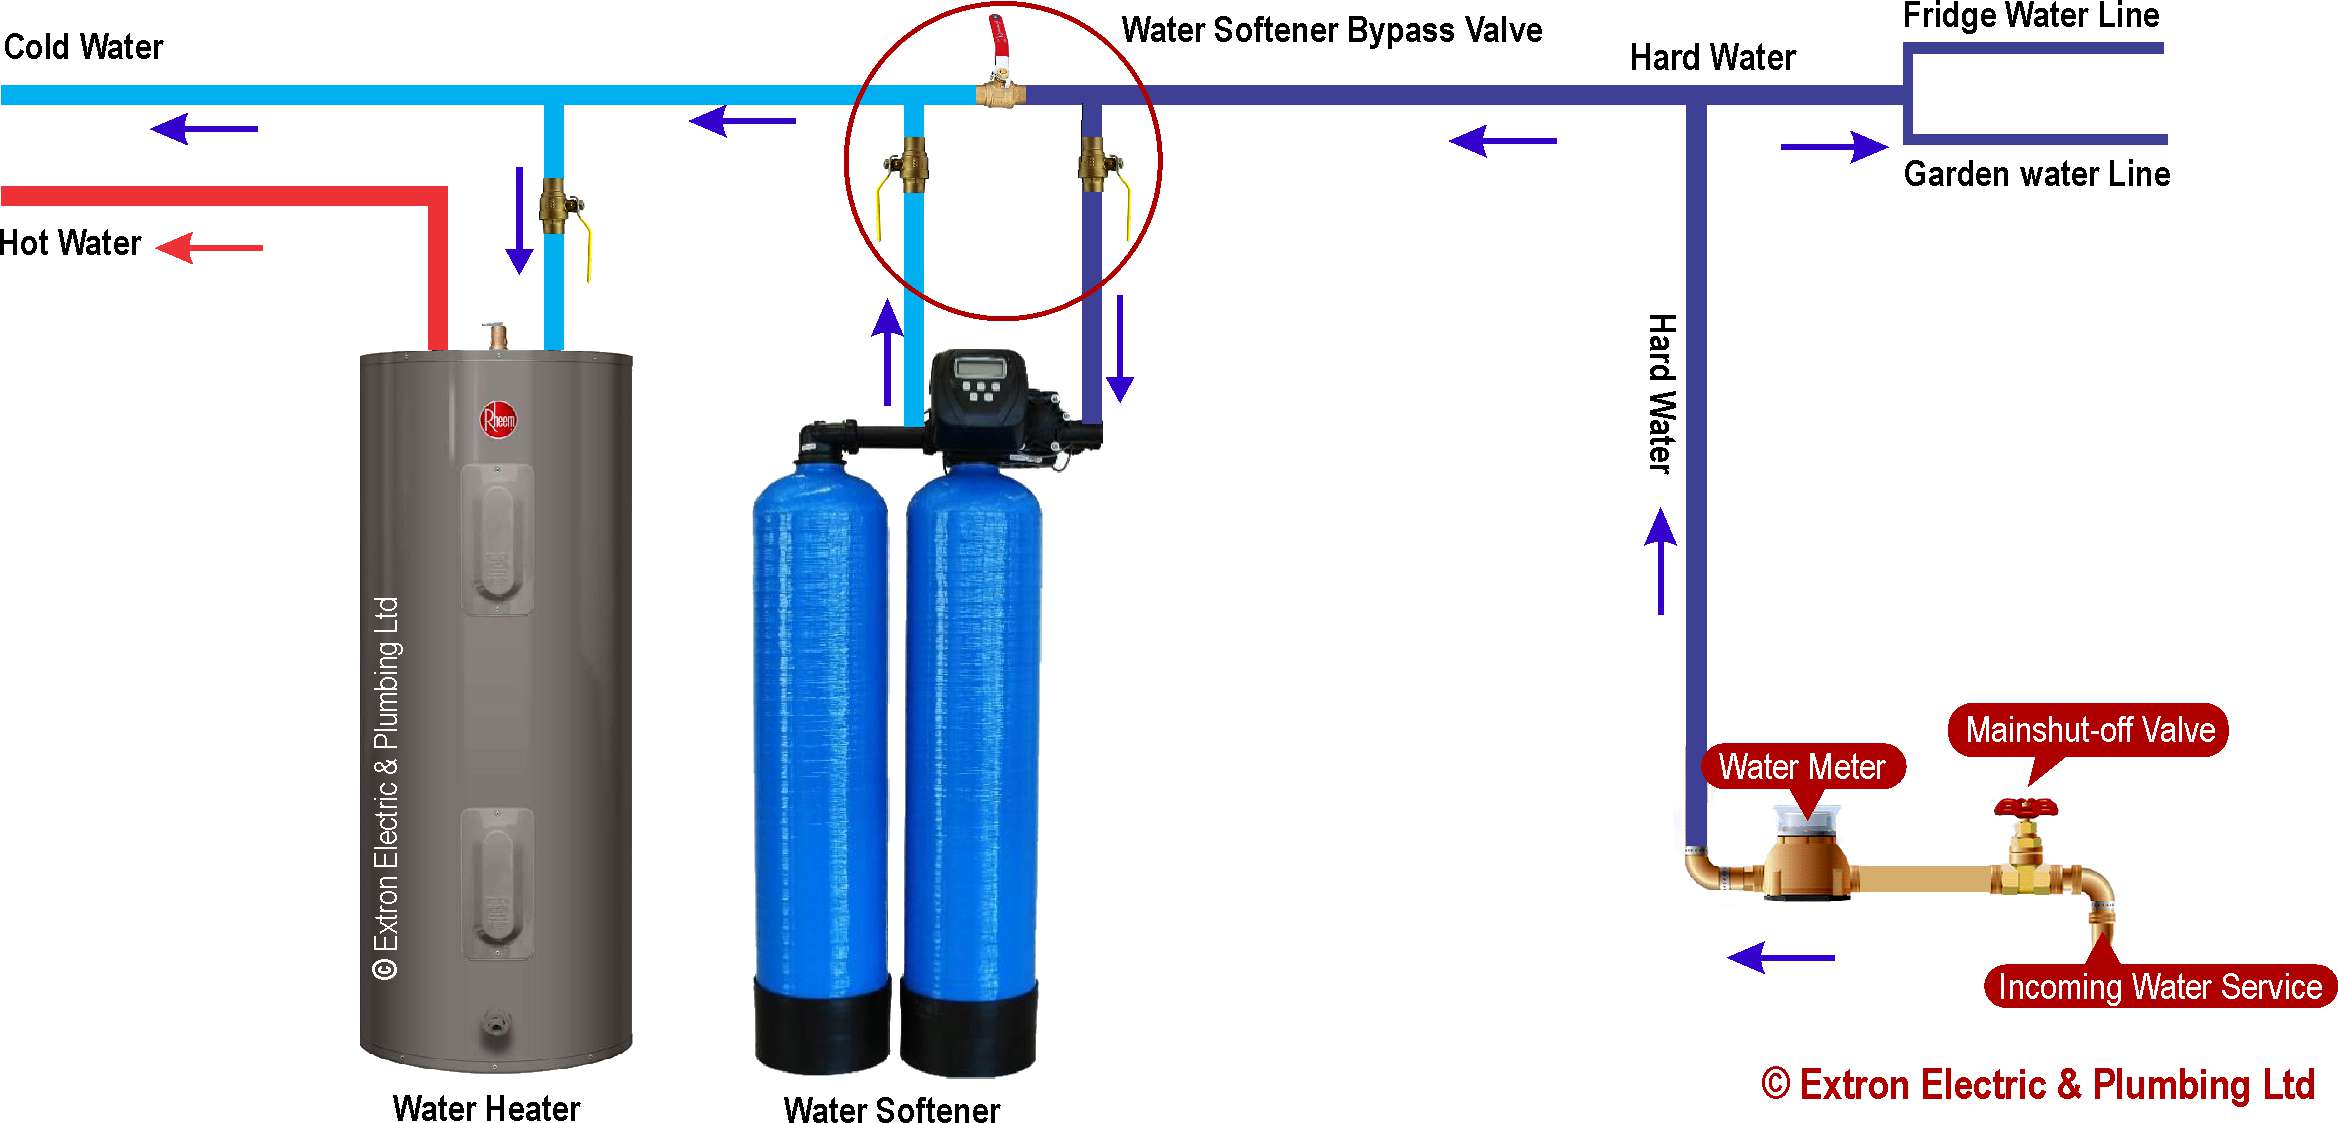
You need to install the softener before the water heater, but after the main shut-off valve. Think of it like a gatekeeper: the water hits the softener first, gets scrubbed clean, and then flows gently into your water heater. The ideal location is near your main water line, often in the basement or garage, with access to a drain (for the backwash cycle).
 Water Softener installation – Electric | Plumbing
Don’t install the softener too close to the water heater. You need at least 10 feet of pipe between them to prevent hot water from backing up into the softener’s resin, which can damage it. Trust me, I learned this the hard way after my first attempt resulted in a lukewarm mess and a very expensive repair manual.
Step Three: The Plumbing Magic
Now, turn off your main water supply and drain your pipes by opening a faucet downstairs. You’re going to cut a section out of the cold water supply line—the one heading to your water heater. Install a bypass valve (most softener kits include one) so you can isolate the softener for maintenance without cutting water to the whole house. Always install a bypass valve—future you will be grateful.
Connect the softener’s inlet to the pipe coming from the street, and the outlet to the pipe heading to the heater. Use brass or stainless steel connections to avoid corrosion. I used those fancy flexible hoses from the store—they make the job look professional even if your pipe cutting is a little crooked.
Step Four: The Salty Finish
Fill the brine tank with water softener salt—the big pellets, not the rock salt for icy driveways. Rock salt contains mud and other junk that will clog your system. Then, set the softener’s timer. Most modern units have a digital panel; program it to regenerate at 2 AM when nobody’s using water. If you have a manual one, just turn the dial until the time matches.
:max_bytes(150000):strip_icc()/installing-a-water-softener-2718669-FINAL-1-ee8de137dcf84b5db1e28f84a7dec11b.png) How to Install a Water Softener
How to Install a Water Softener
After everything is plumbed, slowly turn your main water back on. Check for leaks at every joint—a tiny drip can become a waterfall in a week. Let the softener run through a manual regeneration cycle to flush out any air or dust. You’ll see the brine tank bubble and gurgle, which is oddly satisfying, like watching a fish tank filter prime itself.
What to Expect (And a Tiny Warning)
Within a day, you’ll notice your water feels slippery—that’s the absence of minerals. Your coffee will taste clean. Your water heater will work more efficiently, saving you money on electricity or gas. Your soap will lather like a mad scientist’s experiment. But here’s the irony: soft water can make your mineral buildup in the heater worse if you’ve already got a layer of it? No—actually, soft water prevents new scale from forming, but it can loosen old scale that’s already there. That loose gunk can clog your faucets. So flush your water heater tank (using the drain valve) a week after installation to get rid of any dislodged debris.
And one more thing: if you have a tankless water heater, the stakes are even higher. Tankless units have tiny heat exchanger passages that scale up fast. You must install a softener or a descaling system to keep them alive. I didn’t, and my neighbor’s tankless died in two years. He now makes coffee with bottled water and sighs dramatically every time he sees his expensive repair bill. Don’t be that neighbor.
So go on, give your water heater the royal treatment. It’s not just about saving energy—it’s about reclaiming your morning coffee from the tyranny of limestone. And if you mess up the plumbing? Just call a plumber. I did, and I lied to them about who did the first part. They knew. They always know.
