How To Water Softener Installation

So, you’ve got hard water, huh? That chalky white gunk on your faucets, the soap that refuses to lather, and your dishes coming out looking like they’ve been kissed by a sad c...
:max_bytes(150000):strip_icc()/installing-a-water-softener-2718669-FINAL-1-ee8de137dcf84b5db1e28f84a7dec11b.png)
So, you’ve got hard water, huh? That chalky white gunk on your faucets, the soap that refuses to lather, and your dishes coming out looking like they’ve been kissed by a sad cloud. It’s not the end of the world, but it’s definitely annoying.
Let’s talk about something that sounds like a plumbing chore but is actually kind of cool: installing a water softener. I promise it’s less intimidating than assembling that IKEA bookshelf you’ve been avoiding.
Think of it like giving your home a giant Brita filter, but for the whole house. You’re not just treating a symptom; you’re fixing the root of the problem—the mineral-rich water that’s been plotting against your pipes and skin.
Must Read
Why Bother? The Magic of “Soft” Water
First off, why is this worth your Saturday afternoon? Hard water is basically water that’s carrying little mineral hitchhikers (calcium and magnesium). They clog everything and leave a crusty mess.
Soft water, on the other hand, feels like liquid silk on your hands. Your soap will sud up like a barista’s latte, your hair will stop feeling like straw, and your skin might just start glowing.
Plus, your appliances will stop throwing tantrums. A water softener is basically a bodyguard for your water heater, washing machine, and dishwasher, making them last years longer. Isn’t that a better investment than another streaming subscription?
The Big Reveal: It’s Not Rocket Science
Here’s the chill truth: water softener installation is a DIY-friendly project for anyone who can turn off a water valve and use a wrench. Most systems come with a “bypass valve,” which is your get-out-of-jail-free card if you mess up.
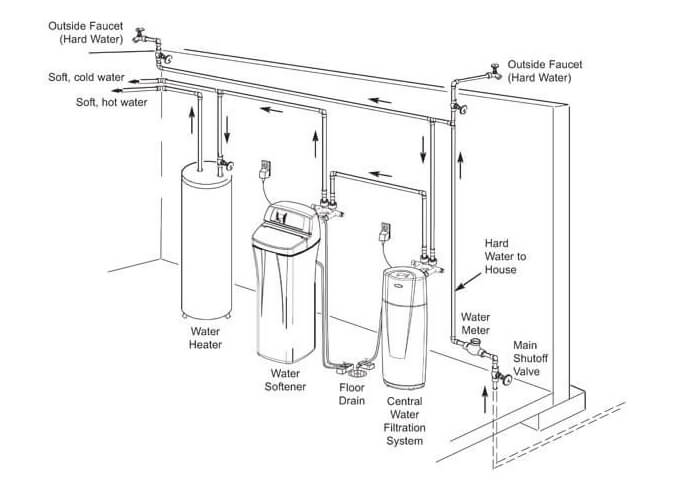
The core idea is simple. You cut into your home’s main water line (usually right after it enters your house) and connect the softener. Then, you run a small drain line for the salty backwash—think of it as the softener’s gentle sweat session where it flushes out the minerals it caught.
You’ll also need a tube for the brine tank, where you dump salt pellets. Yes, salt. It’s like you’re giving your water a mineral-combing treatment using ion exchange, but you don’t need to know the chemistry to enjoy the results.
Tools? You Already Have Most of Them
You’ll need a pipe cutter (or a hacksaw), a couple of adjustable wrenches, and some Teflon tape. That’s it. No welding, no electrical work unless you’re fancy and want a timer instead of a manual valve.
 How to Install a Water Softener | Whirlpool
If your home has copper pipes, you’ll need a couple of compression fittings or SharkBite connectors, which snap on like Lego bricks. Seriously, it’s almost too easy.
And here’s a fun comparison: installing a water softener is like changing a car tire. It feels big and scary until you actually do it, and then you wonder why you didn’t do it sooner.
The Step-by-Step Chill-Out Guide
Step 1: Turn off the main water supply to your house. Panic is normal, but don’t—just flip the valve.
Step 2: Find a spot for the unit. It needs to be near a drain (like a floor drain or washing machine standpipe) and an electrical outlet. Bonus points if it’s in a dry, cool basement or garage.
Step 3: Cut the pipe and install a “bypass loop.” This is just a clever U-shaped pipe that lets you route water through the softener or skip it entirely when you’re refilling salt. It’s like a train switch.
Step 4: Connect the inlet and outlet—the arrows on the unit don’t lie. Use each connection as a firm handshake, not a death grip.
Step 5: Attach the drain line for the backwash. Usually, it’s just a hose that tucks into a drain. Test it with a bucket of water to make sure it flows.
 How To Install A Water Softener System at Lilly Hurdle blog
Step 6: Fill the brine tank with softener salt pellets. Then, open the water supply slowly, check for leaks, and let the system do its initial dance (called regeneration). You’ll hear a gentle rush of water—that’s the sound of victory.
What Could Go Wrong? (Not Much)
If you see a drip, just tighten the fitting a quarter turn. Leaks are like annoying little mosquitoes—easy to swat if you catch them early.
Worried about salt bridging (where the salt hardens into a solid block)? Just break it up with a broom handle every few months. Or buy pellets instead of crystals—problem solved.
And if you’re renting or living in a tight space? Consider a portable, cartridge-based softener that connects to your shower or kitchen faucet. It’s like buying a single rose instead of a whole garden—still beautiful.
The Moment of Glory
After installation, run the soft water into a glass. It should look crystal clear and feel slippery to the touch. That’s the softness you paid for.
Wash your hands with it. Notice how the soap feels different—like lather that actually wants to be friends with your skin, not fight it.
Your future self will thank you every time you step out of the shower feeling silky, or when your coffee maker stops clogging every three weeks. Honestly, it’s one of those upgrades you didn’t know you needed until you feel it. So, grab that wrench, and go make your water chill out. You’ve got this.
:max_bytes(150000):strip_icc()/installing-a-water-softener-2718669-FINAL-1-ee8de137dcf84b5db1e28f84a7dec11b.png&description=How+To+Water+Softener+Installation)