How To Instal Water Softener

Have you ever noticed that weird, chalky film on your dishes, or how your soap just doesn’t lather up like it used to? That, my friend, is the silent signature of hard water....
:max_bytes(150000):strip_icc()/installing-a-water-softener-2718669-FINAL-1-ee8de137dcf84b5db1e28f84a7dec11b.png)
Have you ever noticed that weird, chalky film on your dishes, or how your soap just doesn’t lather up like it used to? That, my friend, is the silent signature of hard water. It’s packed with minerals like calcium and magnesium, and while they won’t hurt you, they can be a real nuisance for your pipes and appliances. Installing a water softener is like giving your home’s plumbing a spa day—it strips away the grit and leaves everything feeling silky smooth.
So, why should you care about installing one? Well, besides saving your coffee maker from a chalky apocalypse, softened water makes your skin feel less like parchment paper and your hair way shinier. It’s not just a home upgrade; it’s a lifestyle shift. Think of it as putting your house on a low-sodium diet—except the salt is going into the softener, not your food.
Before You Dive In: The Prep Work
You don’t need to be a master plumber to pull this off, but you do need a little bit of curiosity and some elbow grease. First, figure out where your main water line enters the house. It’s usually in the basement or near the water heater—follow the big copper pipe. This is where you’ll be interrupting the flow, like a traffic cop directing water to a new lane.
Must Read
Next, shut off the main water supply. This step is non-negotiable, unless you enjoy indoor swimming pools. Turn on a faucet somewhere low in the house to drain any remaining water in the pipes. This relieves pressure and makes the job 100% less stressful. You’ve got this—just breathe.
Gather Your Gear
You’ll need a few basic tools: a pipe cutter or a hacksaw, a couple of adjustable wrenches, some Teflon tape, and the softener unit itself, along with a bypass valve (usually included). Don’t forget a bucket and some old towels—because water always finds a way to surprise you. It’s a bit like assembling a complex jigsaw puzzle, but the pieces are metal and the picture is luxuriously soft showers.
The Installation: Where the Magic Happens
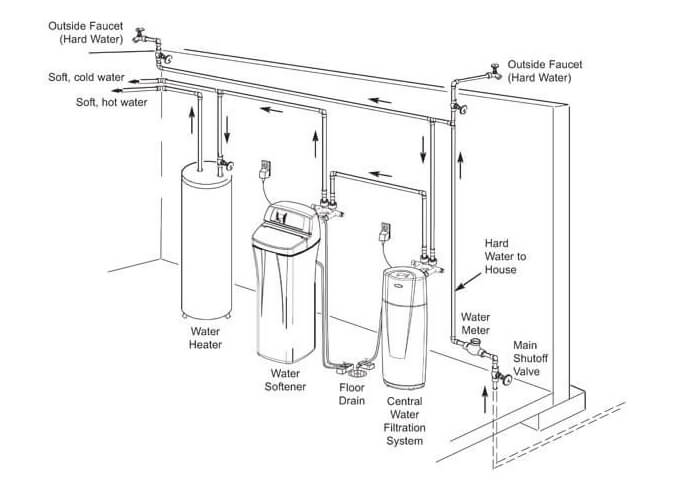
Now, find a spot near the water main where you can place the softener—close to the incoming line, but after the outdoor spigots. You don’t want to waste softened water on the garden hose. Connect the bypass valve to the softener’s inlet and outlet ports first; it’ll let you isolate the unit later for servicing. Wrap the threads with Teflon tape (three to five wraps, like a little scarf for the fitting) to prevent leaks.
 How to Install a Water Softener | Whirlpool
Cut into the water line at your chosen spot. This is the moment of no return! Slide the compression fittings or solder on your adapters, then connect the softener’s inlet pipe (usually marked) to the incoming water. Tighten everything gently but firmly—you’re not trying to crush a soda can. Double-check that the outlet pipe leads back into your home’s plumbing. Pro tip: Most units have arrows on the bypass valve; make sure they point with the flow of water, not against it.
Hooking Up the Drain Line
Water softeners need to flush away the minerals they collect, so you need a drain line. Find a floor drain, a laundry sink, or a standpipe nearby. Connect a flexible plastic tube from the softener’s drain port to that drain. Use a hose clamp to secure it tight—if it slips, you’ll have a mini waterfall in your basement. Keep the drain line as straight as possible; sharp bends can choke the flow. It’s like giving the system a clear slide to release its built-up gunk.
Salt, Pipes, and a Little TLC
Before you turn the water back on, add the salt. That’s right—you’re the salt fairy now. Fill the brine tank with water softener pellets (not table salt, which has additives). Then, slowly reopen the main water valve and check for leaks at every joint. Keep a towel handy and a calm mindset—a small drip is fixable; a gusher is a story for later.
 How To Install A Water Softener System at Lilly Hurdle blog
Finally, put the system into bypass mode for a few minutes, then slowly return it to service. This purges any air from the pipes. Run a cold faucet until the water runs clear—you’ll probably hear a few sputters and burps. That’s normal; it’s just the system waking up. Let it run for about 15 minutes, then do the hand test: wash your hands with the softened water and notice how they feel slick and smooth.
Why It’s Actually Cool
Installing a water softener isn’t just about fixing hard water; it’s about taking control of your home’s ecosystem. You’re reducing scale buildup in your water heater (which can save energy), you’re extending the life of your appliances, and you’re getting cleaner laundry. It’s a silent victory—one you’ll feel every time you take a shower. Plus, that feeling of “slippery water” is actually your soap working better, not leaving residue behind. Pretty neat, huh?
So go ahead—give it a shot. Even if you’re a bit nervous, the payoff is huge. You’ll never look at a glass of tap water the same way again. Happy softening!
:max_bytes(150000):strip_icc()/installing-a-water-softener-2718669-FINAL-1-ee8de137dcf84b5db1e28f84a7dec11b.png&description=How+To+Instal+Water+Softener)