Installing A Reverse Osmosis Water Filter

Let’s be honest: tap water is the unsung hero of modern life, but it often tastes like it’s been filtered through a gym sock. You’ve probably heard about reverse osmosis (RO)...

Let’s be honest: tap water is the unsung hero of modern life, but it often tastes like it’s been filtered through a gym sock. You’ve probably heard about reverse osmosis (RO) systems from that friend who won’t stop talking about their alkaline water pitcher. Installing one sounds like a job for a plumber named Bob, but it’s actually a weekend project that makes you feel like a home-improvement wizard.
The first step? Understanding the beast. Reverse osmosis uses pressure to push water through a semipermeable membrane, stripping out everything from lead to chlorine to that faint, tragic taste of calcium. It’s like giving your water a very expensive spa day, minus the cucumber slices.
Tools, Parts, and a Little Patience
Your kit will arrive looking like a physicist’s fever dream: white tubes, a blue canister, and a tiny spigot that looks like it belongs in a dollhouse. Lay everything out on the kitchen floor and breathe. The manual will be terrifying, but YouTube is your best friend here—search for your brand and a guy named Dave will walk you through it.
Must Read
Pro tip: Clear out the cabinet under your sink. That bottle of bleach from 2018 and the mystery sponge must go. You need room for a few cylinders (pre-filters, the membrane, and a carbon post-filter) that look like a science experiment gone right.
The Drilling Dance (Yes, You Really Need a Hole)
Most RO systems require a hole in your countertop or sink for the dedicated faucet. If the thought of drilling makes you sweat, you can use an air gap faucet that fits into an existing sprayer hole—a trick that feels like cheating. Check your sink’s deck first; you might have a spare hole hiding under a soap dispenser plug.
Fun fact: The first RO systems were used to desalinate seawater for submarines in the 1950s. So when you drill that hole, you’re basically captain of your own kitchen submersible. Wear safety goggles. You want to look cool, not lose an eye.
The Connecting (Or: Color-Coded Chaos)
Now comes the plumbing, which is mostly pushing colored tubes onto barbed fittings until they click. Yellow for the feed water line, red for waste, blue for your fancy new H₂O. It’s like adult LEGOs, except if you mess up, you flood your floor instead of building a castle.
Don’t overtighten the plastic connectors—hand-tight is the mantra. A drip here is normal; a geyser is your fault. Keep a towel nearby and channel your inner zen master. Most systems come with a saddle valve that clamps onto your cold water pipe, which sounds medieval but is surprisingly elegant.
The Waiting Game: Flush That Membrane
Once everything is snug, turn on the water supply and check for leaks like you’re inspecting a crime scene. Then, prepare for the ultimate test of patience: you must let the system flush for 24 hours before you can drink. This expels the preservative used to keep the membrane fresh. Yes, it’s water. No, you can’t drink it yet.
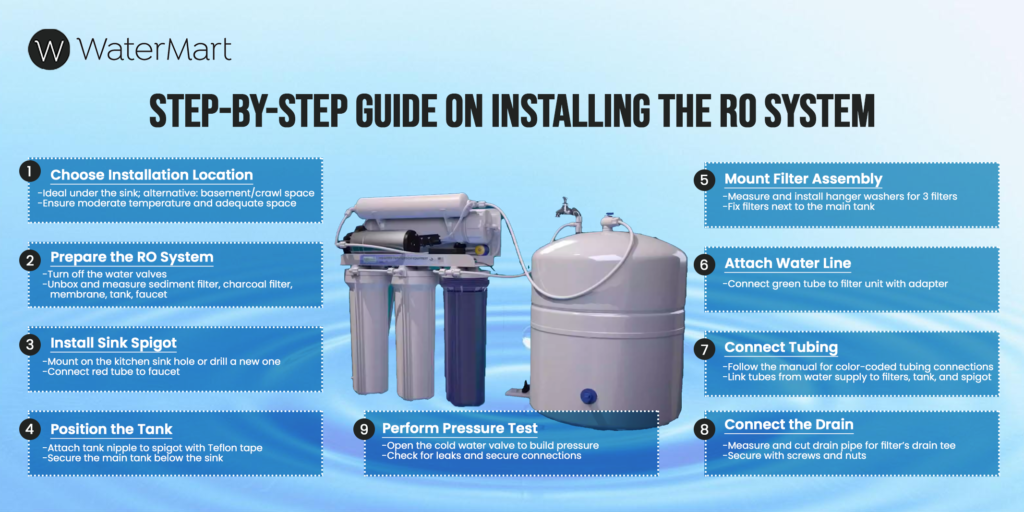 How to Install a Reverse Osmosis Water Filtration System?
Practical tip: Do the install on a Saturday morning. That way, by Sunday brunch, you’ll have cold, crisp, restaurant-quality water. Your morning coffee will thank you. The mineral removal stops that bitter, chalky taste from hard water—your espresso shots will suddenly taste like they were made in Milan.
The Taste Test: A Revelation
The first glass of RO water is a moment of pure clarity. It’s so clean it almost feels like you’re drinking the concept of water. You’ll start noticing how much better your iced tea tastes—and how your kettle no longer scales over like a prehistoric fossil. This is peak domestic bliss.
Fun fact: Many upscale restaurants use RO systems for their coffee and cocktails. You’ve just upgraded your kitchen to Michelin-star standards, but your rent stayed the same. Take a bow.
Maintenance: Don’t Be a Filter Slacker
Here’s the catch: RO systems don’t run themselves. You’ll need to change the pre-filters every six months and the membrane every two to three years. Mark it on your phone calendar with a notification that says “Drink the good stuff.” The replacement filters are cheap—think $30 to $50—so it’s not a budget breaker.
A quick check: If your water starts tasting like a swimming pool again, your membrane has a hole. That’s rare, but it happens. Just swap it out and move on. You’re a pro now.
Final Reflection: Small Luxuries, Big Difference
After you’ve installed your RO system, you’ll realize something subtle has shifted. Filling a water bottle becomes a moment of quiet pride. You’re not just drinking water—you’re drinking the result of a Saturday morning well spent, a bit of drilling courage, and an intimate understanding of your sink’s plumbing layout.
Life is full of small, annoying tasks that turn into tiny victories. Installing a reverse osmosis filter is one of them. Every sip is a reminder: you can learn a new skill, you can fix things yourself, and you absolutely deserve water that tastes like it came from a cloud. Cheers. Now, go pour yourself a glass.
