How To Install Reverse Osmosis Water Filtration System

So, you’re finally ditching the plastic jugs and diving into the world of reverse osmosis? Good for you. I’m not gonna lie—installing an RO system feels a little intimidating...
So, you’re finally ditching the plastic jugs and diving into the world of reverse osmosis? Good for you.
I’m not gonna lie—installing an RO system feels a little intimidating at first. But honestly? It’s way easier than assembling IKEA furniture.
Let me walk you through it like we’re standing at my kitchen sink, coffee in hand, making questionable jokes about plumbing.
Must Read
First, What You Actually Need
You’ll get a box full of plastic tubes, canisters, and a shiny faucet. Don’t panic. It looks like a science experiment, but it’s just glorified Lego for adults.
Grab a screwdriver, a drill (if you’re brave), and some Teflon tape. And maybe a towel. Definitely a towel.
Read the manual once. Then read it again while making a funny voice. It helps, I swear.
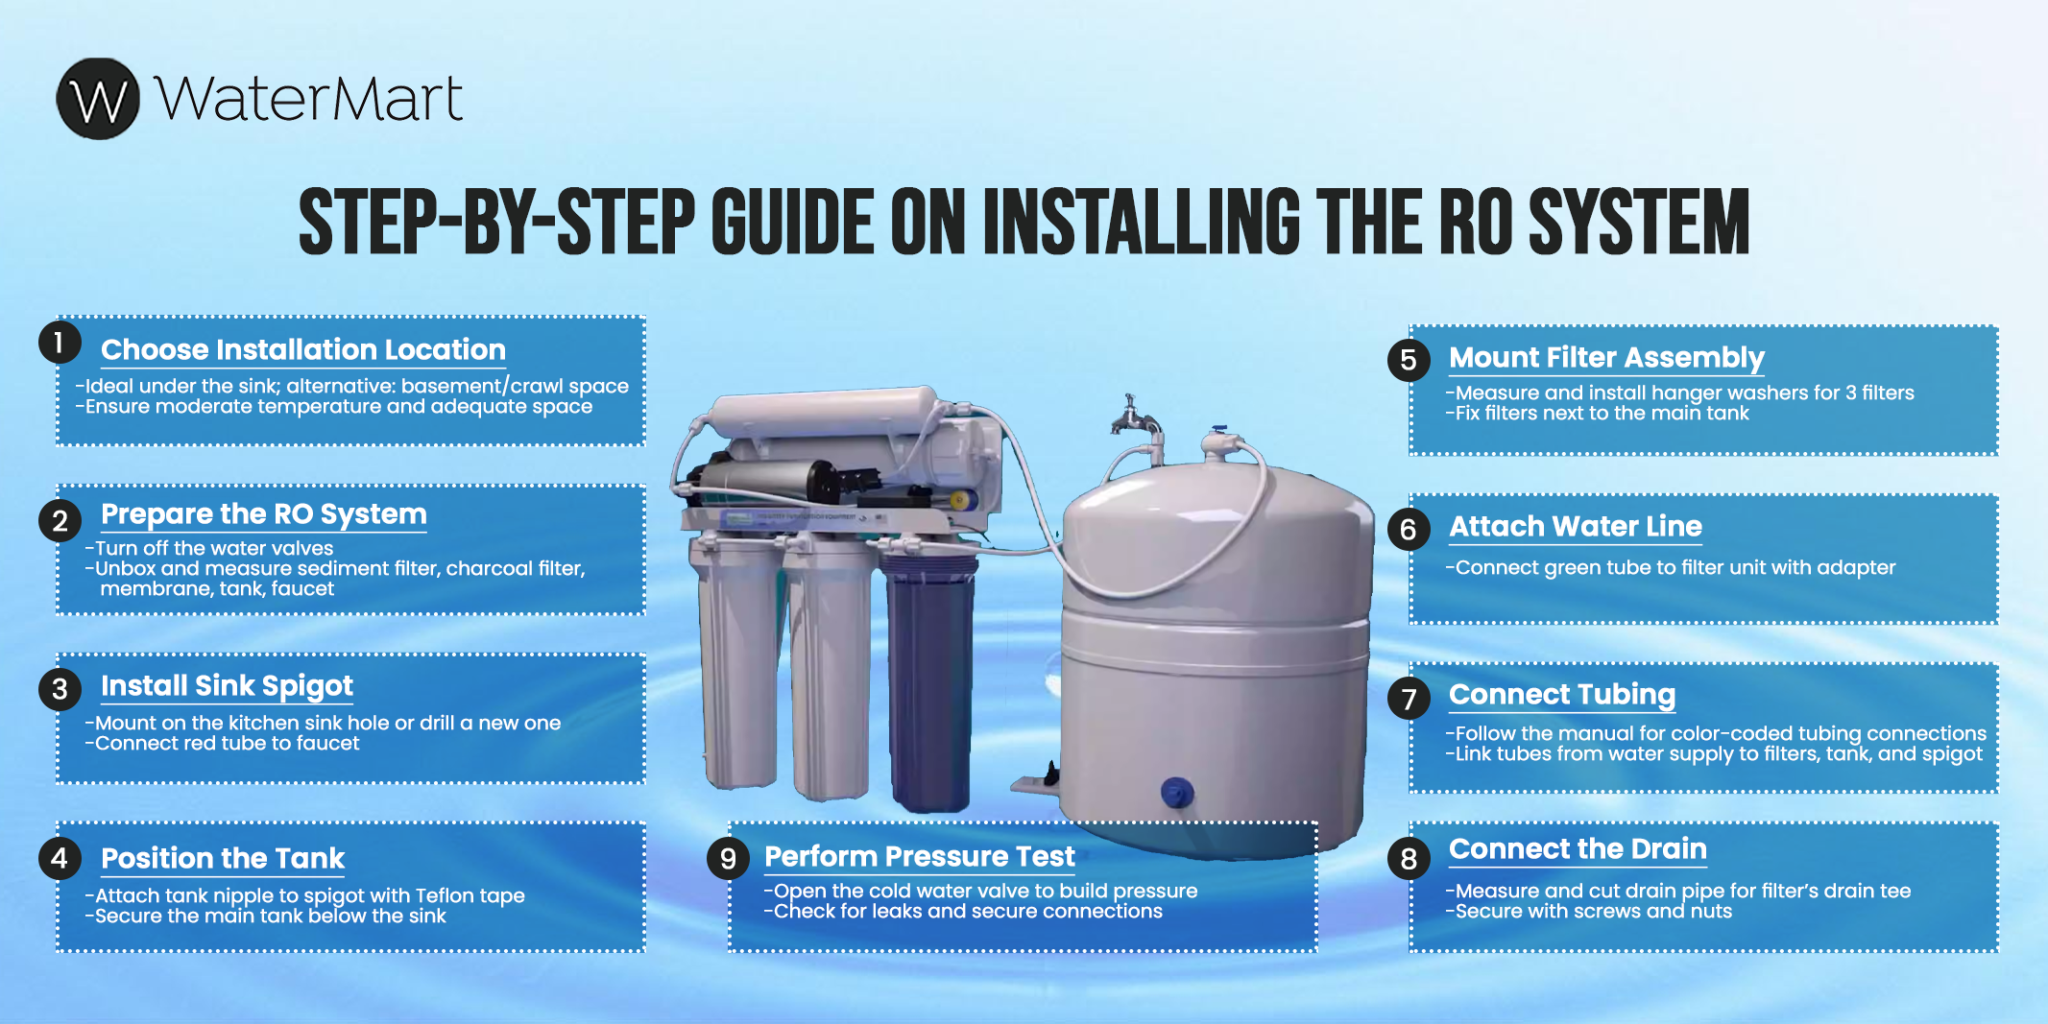
Step 1: Pick Your Spot Like It’s a Real Estate Decision
Under the kitchen sink is prime real estate. But make sure you have enough room for the three or four canisters—they’re greedy about vertical space.
Clear out your cleaning supplies, the leaky spray bottle you keep forgetting about, and that mysterious jar of pickles from 2019.
If you’re lucky, there’s a knockout hole in the sink cabinet for the tubes. If not… well, DIY time.
Step 2: The Cold Water Line—Don’t Mess This Up
Turn off the cold water supply under the sink. Hot water will melt the RO system’s insides. We don’t want a puddle and a crime scene.
Unscrew the cold water line from the shut-off valve. You’ll see a little plastic adapter in your kit. Thread that onto the valve first.
Wrap the threads with Teflon tape. Three or four wraps. Not a mummy, just a polite scarf.
Screw the supply line back onto the adapter. Hand-tight is fine. Overtightening is how you call a plumber at 2 a.m.
 Reverse Osmosis System Installation: 7 Easy Steps
Step 3: Connect the Drain—This Gets Silly
You need to route a tiny drain tube to your sink’s P-trap. The kit includes a drain saddle, which is a plastic clamp that looks like a medieval torture device.
Drill a ¼-inch hole in the drain pipe. Aim carefully. Miss and you’re patching plastic at midnight.
attach the saddle, clamp it down, and slide the tube in. The water flows down, not up. Physics, baby.
Step 4: The Faucet—Your Fancy New Friend
This is the part where you pretend you’re a real tradesperson. You’ll drill a hole in your countertop or sink deck. Measure twice, drill once. Or cry twice, which is less fun.
If your sink already has a soap dispenser hole, steal it. Nobody uses those anyway.
Feed the faucet’s water line down through the hole, tighten the lock nut from below, and you’re done. It feels illegally easy.
Step 5: The Tube Tango
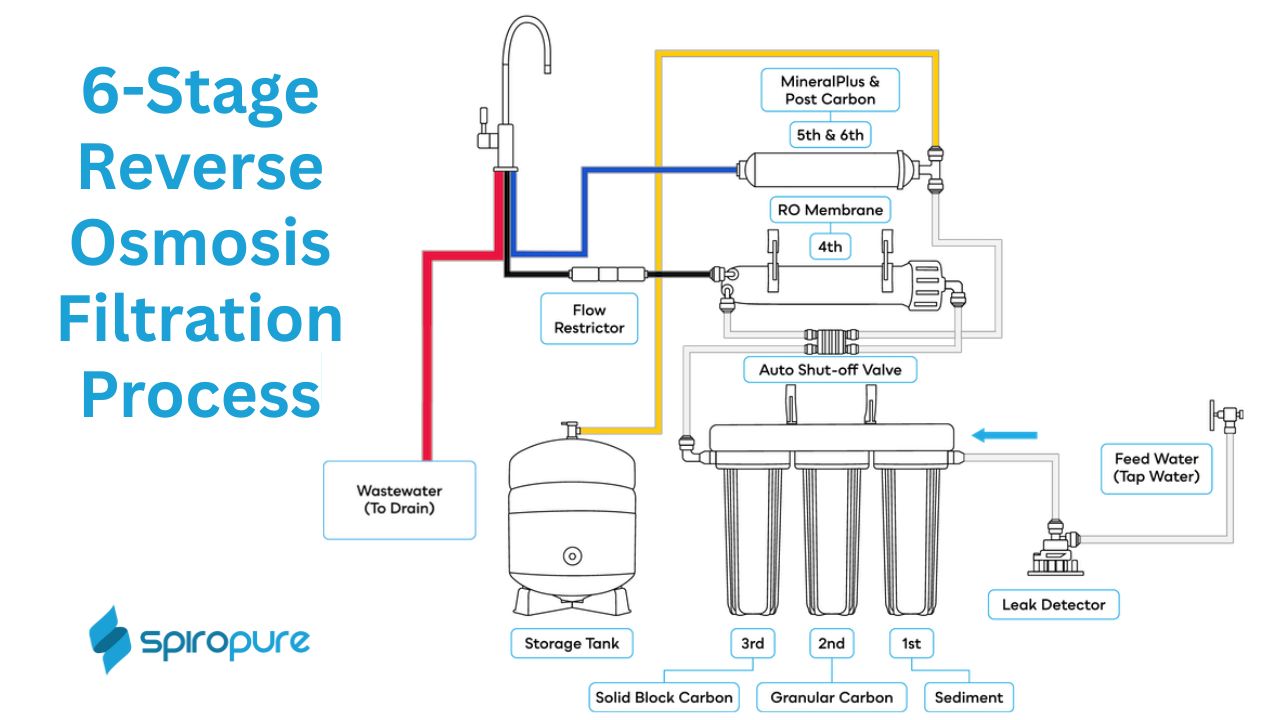
Now the fun part: connecting all the colored tubes. Usually they’re color-coded, but don’t trust that. Label them yourself.
Push the tubes into the push-fit connectors. Don’t be shy—shove them in until they stop. They click like a cheap car door. If it’s stuck, you’re doing it right.
There’s usually a sequence: cold water line to the sediment filter, then to carbon, then to the membrane, then to the storage tank. Your manual has a diagram. Frame it if you must.
Step 6: The Tank—It Holds the Good Stuff
The storage tank looks like a propane cylinder for a backyard grill. It’s heavy, so don’t drop it on your toe. You will consider it.
 How to Install a Reverse Osmosis Water Filtration System?
Connect the blue tube from the tank to the system’s output. The valve on the tank should be off until you’re ready to test.
Wait—did you turn on the water supply? No? Go do that. Slowly. Check for drips under the sink. If it’s dry, do a victory dance.
Step 7: Flush the System—Patience, Grasshopper
Open the faucet and let water run for at least 10 minutes. The first water will look like cloudy milk. That’s tiny air bubbles, not alien slime. Relax.
Shut the faucet and open the tank valve. Wait 2 hours for the tank to fill. Go watch a movie. Or scroll Reddit. Your call.
When you first drink that water, you’ll taste pure, crisp nothing. It’s weirdly amazing. You’ll want to drink an entire gallon and feel superior about saving the planet.
Some Hard-Earned Wisdom
Change the filters every 6–12 months. Write the date on the canister with a sharpie. Future you will thank past you.
If you hear gurgling noises, that’s not a ghost—it’s the system purging waste water. It’s fine. Or is it?
Buy a water tds meter online. Test the output. When it reads near zero, you’ll feel like a mad scientist who actually won.
Final Verdict: You Did It, You Beautiful Dummy
Installing an RO system is one of those rare DIY projects that actually works on the first try. Unless you forget to turn off the water. Then it’s a cry.
But when that first glass of perfect water hits your lips? You’ll forget the hassle. You’ll text your friends, “I am a plumbing god.”
Now go pour yourself a crisp, guilt-free glass. And maybe check under the sink one more time. Just in case.
