How To Connect Water Softener To Main Water Line

Alright, picture this: you’ve just bought a water softener. You’re ready to banish that crusty limescale from your coffee maker and make your hair feel like silk. But then you...

Alright, picture this: you’ve just bought a water softener. You’re ready to banish that crusty limescale from your coffee maker and make your hair feel like silk. But then you stare at your main water line, and it stares back. Don’t panic. We’re going to tackle this like we’re swapping stories over a latte—no power tools required, just a little grit and a lot of dumb luck.
First, the “Are You Sure?” Checklist
Before you even think about touching a pipe, turn off the main water supply. I mean it. Go find that valve near your water meter and twist it closed. If you skip this step, you’ll be swimming in your basement. Trust me.
Next, drain the water from your pipes. Open a faucet downstairs (or the lowest one in your house) and let it run until nothing comes out. This is your “calm before the storm” moment. Grab a bucket, because you’re about to get a little damp.
Must Read
Gather Your Gear (Like a DIY Superhero)
You’ll need a few things: a pipe cutter (or a hacksaw if you’re feeling old-school), some copper or PEX tubing, and a special bypass valve kit. Most softeners come with one—don’t lose it. Also grab a propane torch if you’re soldering, or a push-fit connector if you hate fire. Your call, but I vote “less fire.”
Oh, and remember Teflon tape. Lots of it. It’s like the duct tape of plumbing—solve 90% of your leaks with a few wraps. And grab a towel. You’ll thank me when you spill water down your arm.
Find Your Main Water Line & Make the Cut
Walk to where the water comes into your house. Usually it’s a thick pipe near the water heater or in a crawlspace. That’s your main line. You’re going to cut into it, which sounds terrifying, but it’s just a straight line. Breathe.
Mark a spot about 12 to 18 inches after the main shut-off valve. Why there? Because if something goes wrong (it won’t, but shh), you can still turn off the water. Now measure twice, cut once. Use your pipe cutter to make a clean slice. Pro tip: Don’t cut your finger off—focus, friend.
 Water Softener Plumbing Installation Diagram
Now you have a gap in your main line. Congratulations, you’ve already won half the battle. The other half is not creating a geyser in your living room.
Install the Bypass Valve (Your New Best Friend)
Take that bypass valve from the kit. It’s usually a three-way thingy with a lever. You’ll attach it to both ends of your cut pipe. If you’re using compression fittings, just hand-tighten them—then give it an extra quarter turn with a wrench. Don’t overdo it. You’re not trying to break a walnut.
If you’re soldering (brave soul), clean the pipe ends with sandpaper, apply flux, and heat it up. Shove the valve into the joint. Wait for the solder to melt, then let it cool. Don’t touch the metal. It’s lava. Use that towel.
Connect the Softener to the Valve
This is the fun part. You’ll see two ports on your softener: an inlet and an outlet. The inlet is where water comes in from the main line. The outlet goes to your house. They’re usually labeled, but if not, guess—you’ve got a 50/50 shot.
Run a flexible hose (or copper pipe) from the bypass valve’s “out to softener” port to the inlet. Then run another hose from the softener’s outlet back to the “in to house” port on the bypass valve. Tighten everything. Use a wrench, but channel your inner gentle giant—no cracking.
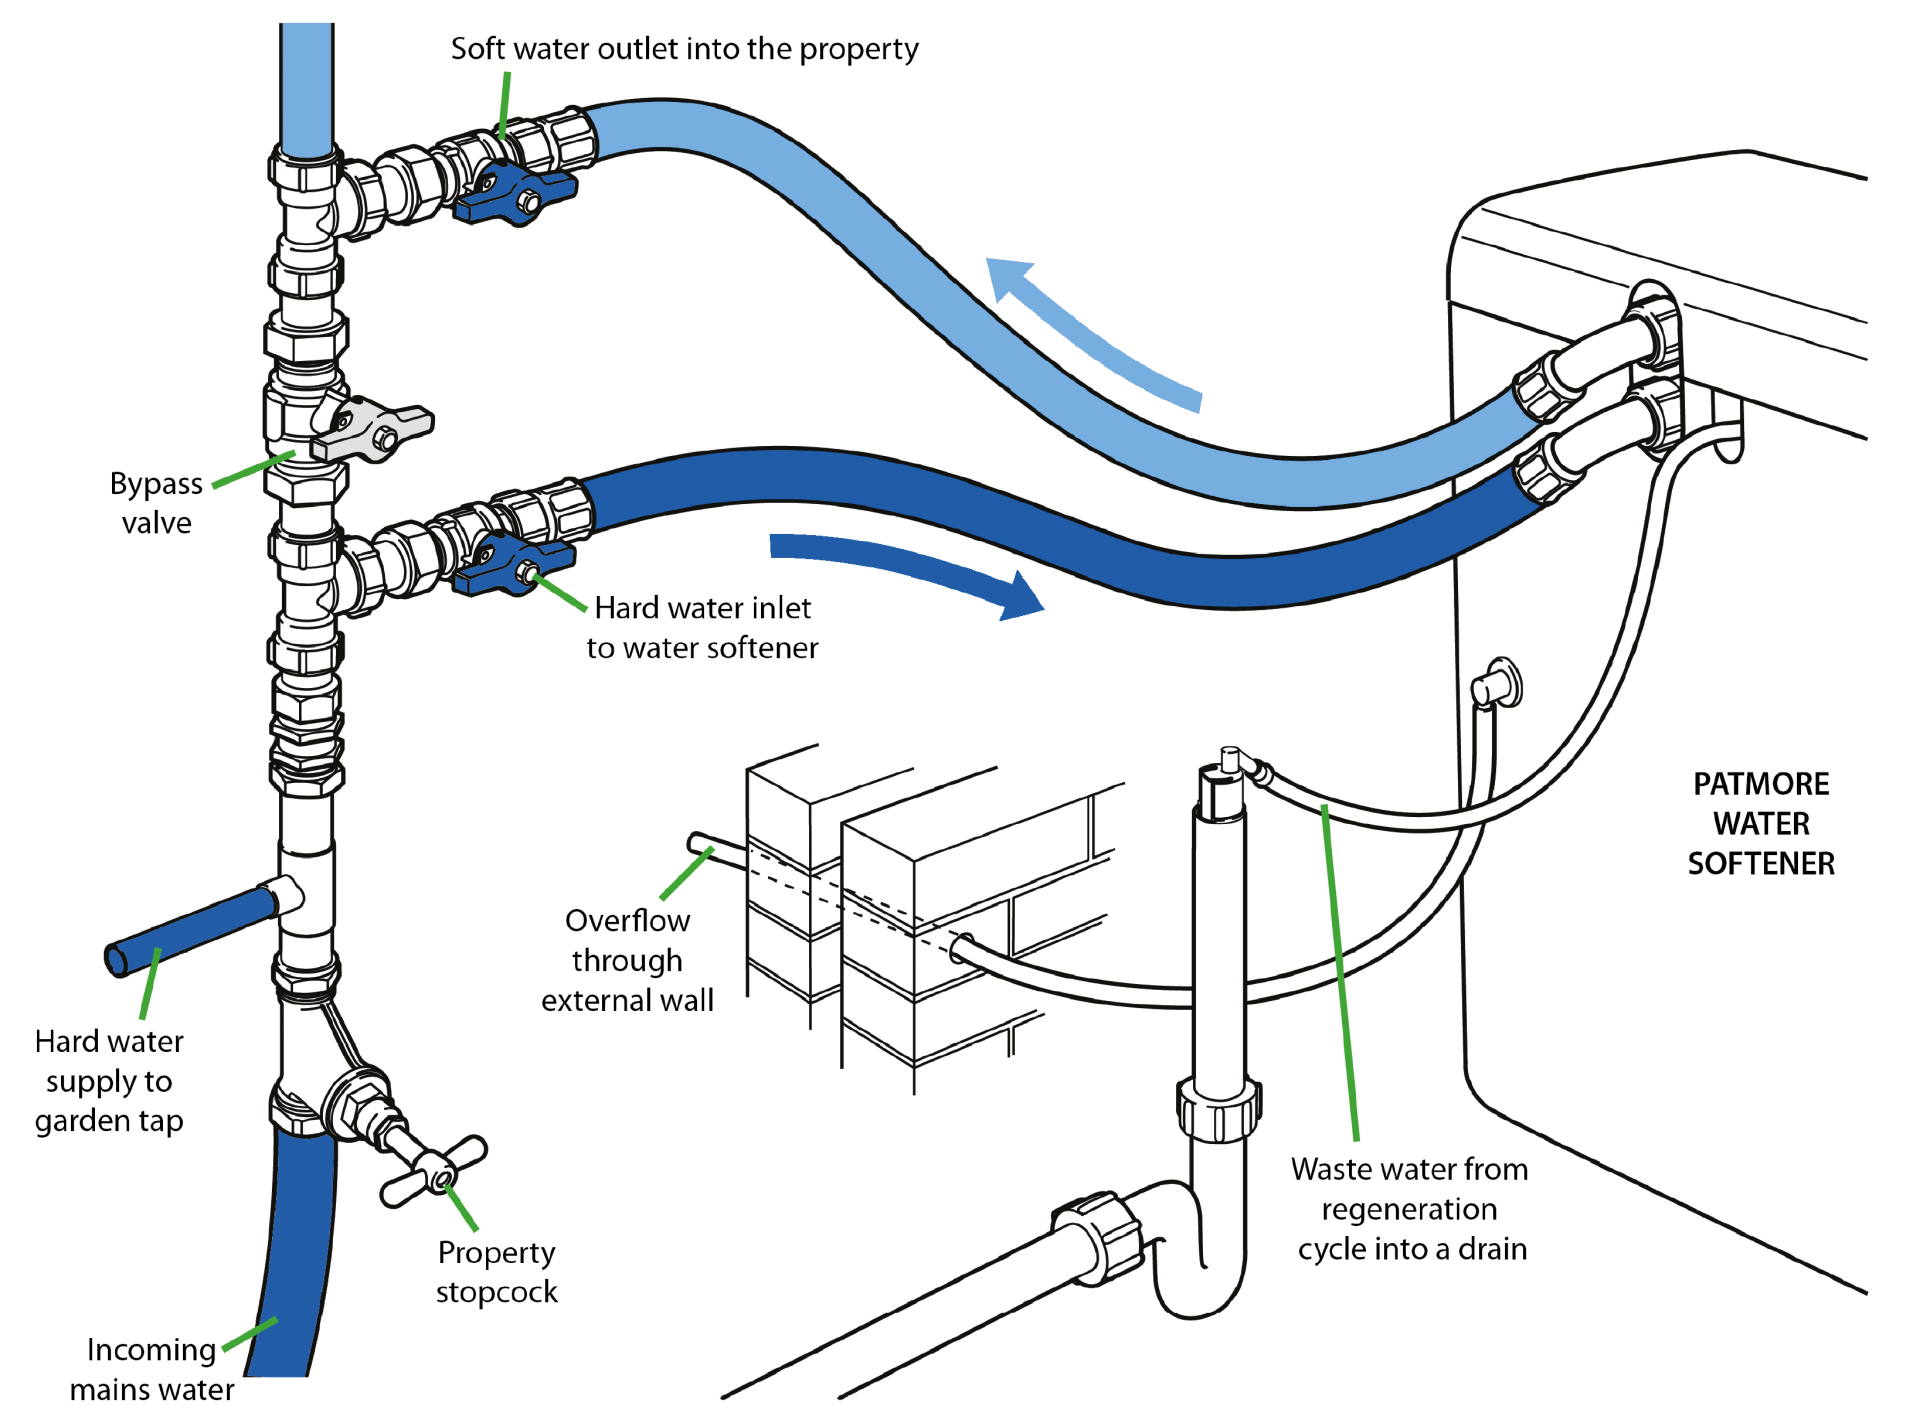 Typical Water Softener Installation Diagram at Phyllis Spain blog
Add the Drain Line (Don’t Skip This)
Most softeners have a little fitting for a drain hose. This flushes out the salt brine and gunk. Run a 1/2-inch hose from that fitting to a floor drain, a washing machine standpipe, or just outside your house. Yes, it’s ugly. Yes, you need it.
Secure the drain hose with a zip tie or clamp. If it pops off, you’ll have a surprise indoor kiddie pool. Not the fun kind.
Fire It Up (Almost There!)
Slowly turn your main water valve back on. Listen for hissing, dripping, or sudden screams. If you hear any, shut it off and tighten the connections. It’s normal to see a tiny drip—just give it a snuggle with the wrench.
Now program your softener. Fill the brine tank with salt. Run a regeneration cycle (check your manual). Then open a faucet and let the water run for five minutes. You’ll know it’s working when the water tastes less like a cave and more like a cloud. You did it.
Pour yourself a celebratory drink—preferably not from the hose. And if you see a puddle an hour later? That’s just your water softener saying “thanks for the coffee chat.” Tighten it again. You’re a plumber now. Congratulations.
