How To Install Reverse Osmosis Water Filter

So, the other day I’m at my buddy Mark’s place, right? He pours me a glass of water from the tap, and I take a sip. It tastes like a swimming pool that got into a fight with a...
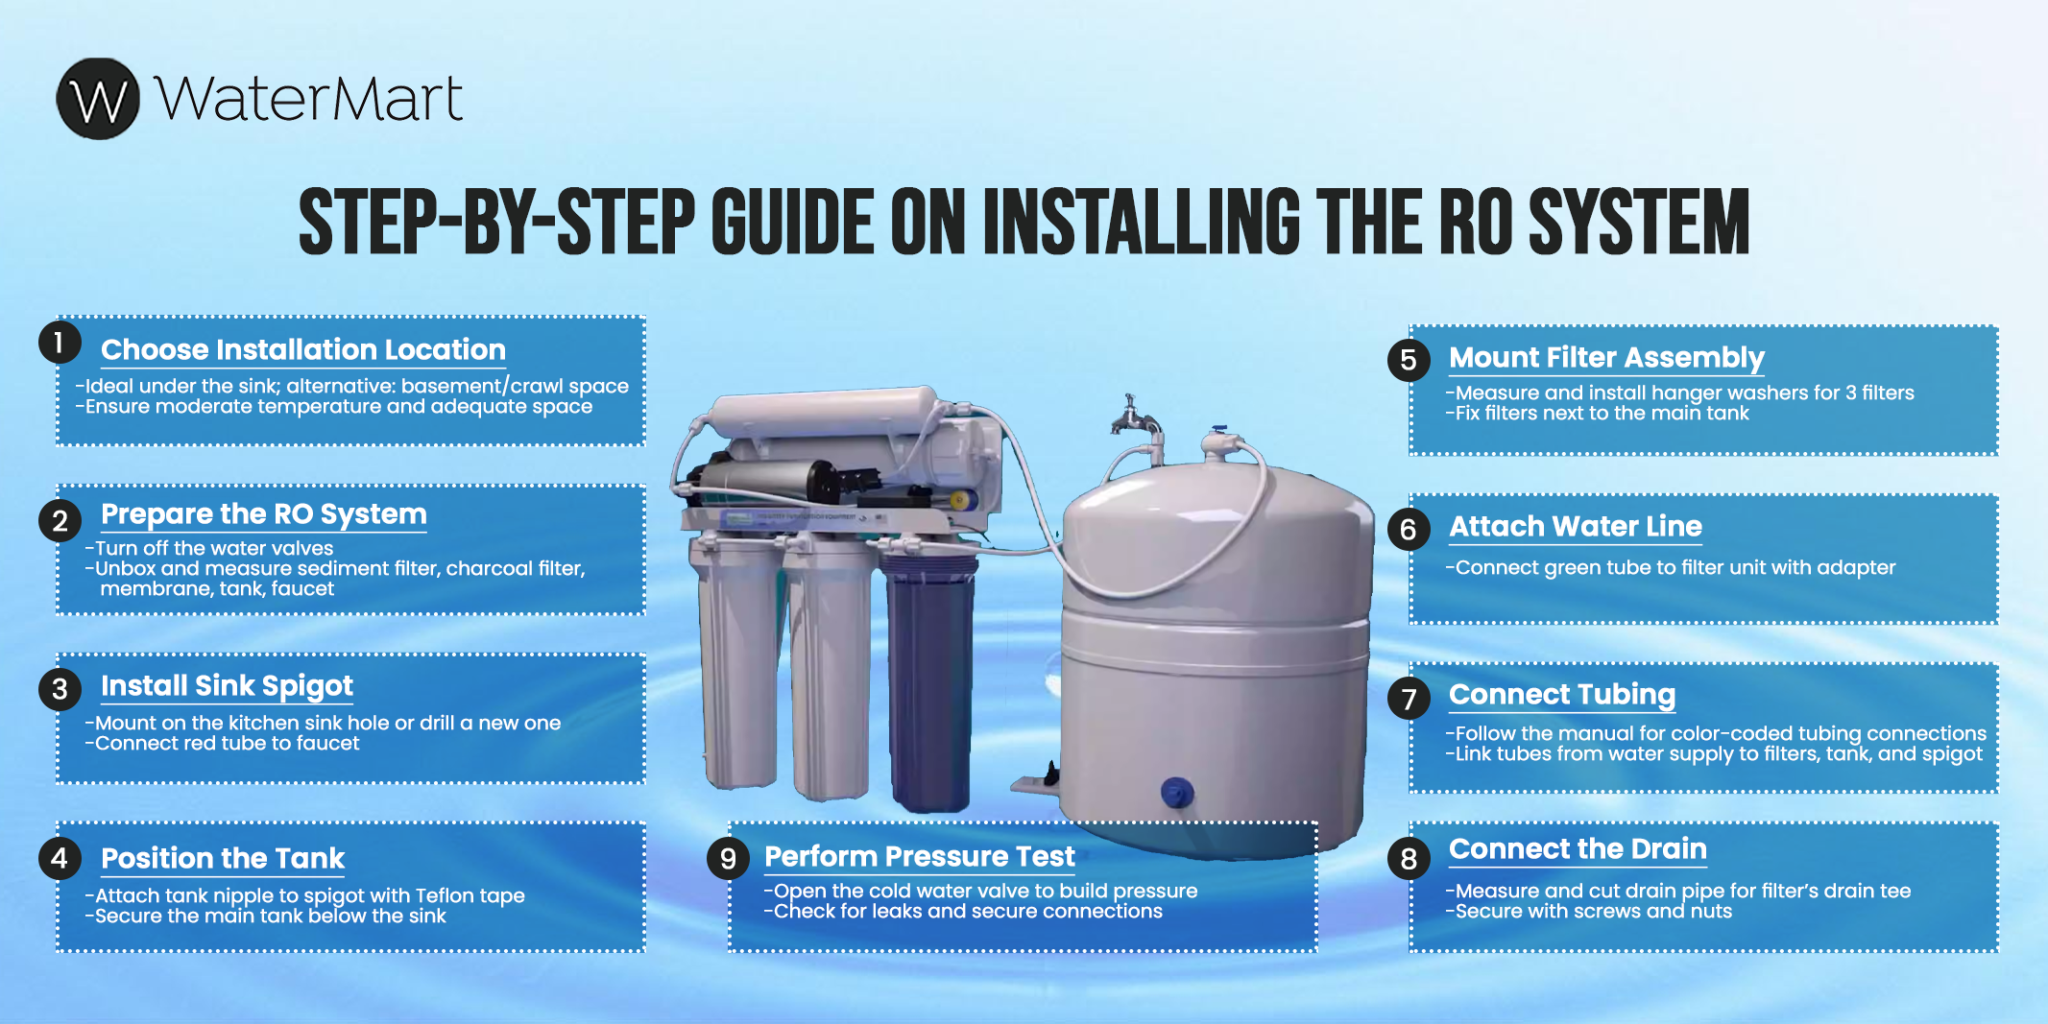
So, the other day I’m at my buddy Mark’s place, right? He pours me a glass of water from the tap, and I take a sip. It tastes like a swimming pool that got into a fight with a rusty pipe. I spit it out—politely, of course—and he just shrugs. “That’s why I buy the 24-packs,” he says.
I looked at his kitchen, cluttered with plastic bottles, and thought, No, my friend. There’s a better way. That’s when I decided to write this little guide for you. Because honestly, you deserve water that doesn’t make you question your life choices.
Why You Should Even Bother
First off, let’s be real: installing a reverse osmosis (RO) filter isn’t rocket science, but it’s also not “hang a picture frame” easy. It’s somewhere in between—like assembling IKEA furniture, but without the mysterious missing screw.
Must Read
You want clean water without the plastic waste or the monthly hassle of hauling jugs from the store. Reverse osmosis is basically the overachiever of water filters. It uses pressure to push water through a super-fancy membrane that catches almost everything: lead, chlorine, fluoride, even that weird taste your landlord’s pipes are leaching.
And yes, you can do this yourself. I promise. You just need a little patience, a few tools, and the ability to curse under your breath without your neighbors calling the cops.
What You’ll Need (The Shopping List)
Before you start, gather your gear. The RO system kit usually comes with: the main filter unit (with canisters), a storage tank (looks like a propane tank, but don’t grill with it), a faucet for your sink, and a bunch of tubes and fittings.
You’ll also need an adjustable wrench, a drill (if your counter isn’t pre-drilled), a bucket, and hopefully a friend who’s good at Tetris—because fitting all this under your sink is a spatial puzzle. Pro tip: clear out all the cleaning supplies and that one pan you never use before you start.
Step 1: Find the Right Spot Under the Sink
Open up the cabinet and stare at the plumbing. Don’t panic. The chaos is normal. You’ll see the cold water line (usually the one with the metal braid), the drain pipe (the big plastic one), and a whole lot of dust bunnies.
Turn off the water supply to the cold water line. There’s a little valve under the sink—turn it clockwise until it stops. Then open the kitchen faucet to relieve pressure and let any water left in the line drain into a bucket. Trust me, you don’t want to skip this step unless you enjoy unexpected showers.
 Install A Reverse Osmosis Water Filter Can Reverse Osmosis Filter Be
Step 2: Connect to the Cold Water Line
This is where you become a plumber for about ten minutes. Unscrew the cold water supply line from the shut-off valve. You’ll see a little brass or plastic fitting. Screw the adapter (included in your kit) onto the valve. It looks like a small T-junction.
Then reattach your original supply line to the adapter. One end goes to the valve, the other goes to your RO system’s input tube. Tighten everything with your wrench—but don’t Hulk-out on it. You can crack plastic fittings if you over-torque them, and then you’ll cry.
Step 3: The Drain Line Connection (The Tricky Bit)
This part makes people nervous, but it’s not brain surgery. You need to attach a small tube from the RO system to your sink’s drain pipe. Most kits come with a saddle valve or a clamp that taps into the drain.
Find a spot on the vertical section of the drain pipe above the P-trap. Drill a small hole (if your kit requires it) or use the self-piercing saddle valve they provide. Clamp it on, and push the RO drain tube into the fitting. Side note: if you’re drilling, place a paper towel under the hole to catch any nasty drain water. You’re welcome.
Step 4: Install the Faucet (The Moment of Truth)
If you have a pre-drilled hole in your sink (for soap or a sprayer), you can use that. Otherwise, you’ll need to drill a hole in the countertop or sink edge. Measure three times, drill once. Or call a friend with a steady hand.
Feed the faucet’s tubing down through the hole, then connect it to the RO system’s output port. Screw the faucet in place from above and below. It should feel solid, not wobbly. If it wobbles, you’ll have a mini water fountain every time you turn it on—which is only funny once.
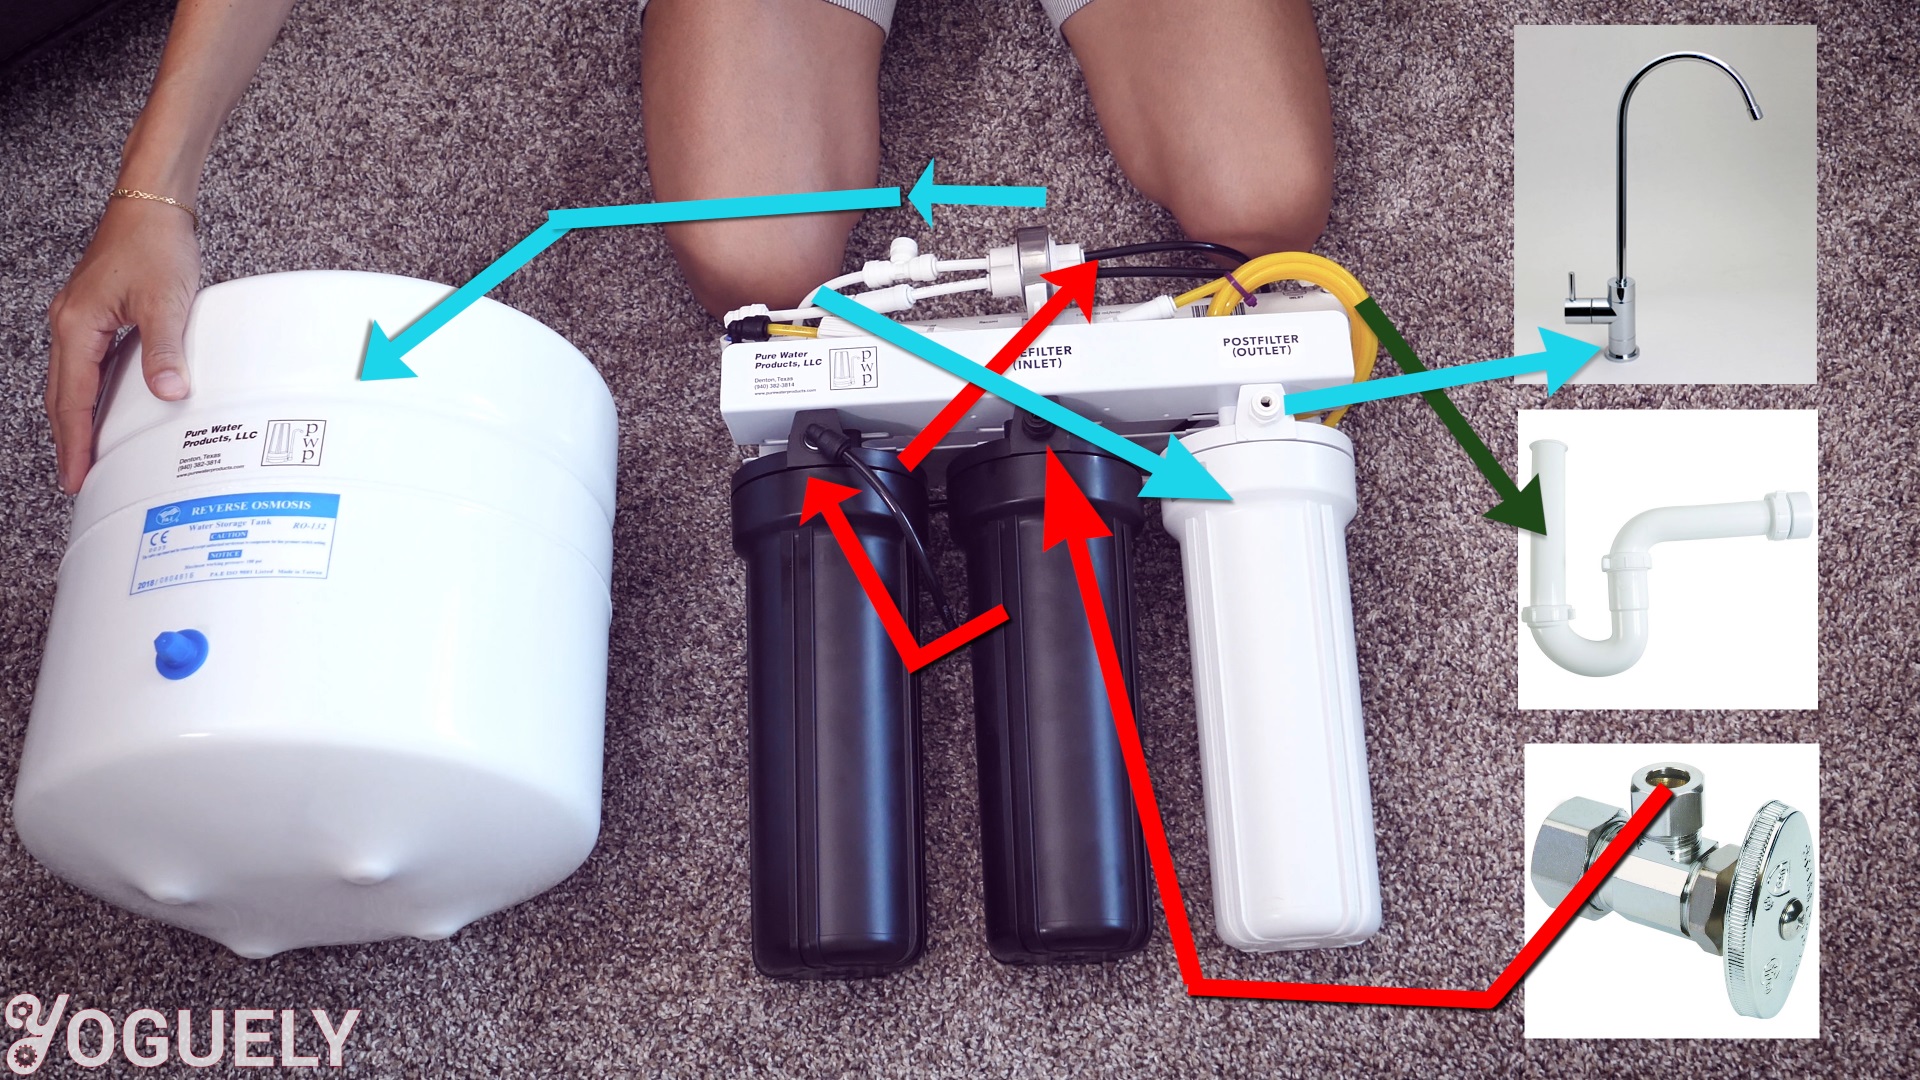 How to Install Reverse Osmosis Water Filter System Under the Sink (Step
Step 5: Connect the Tank and FliMinator (Just Kidding, No FliMinator)
Now connect the storage tank. Its tube goes to the “tank” port on your RO system. Wrap a bit of Teflon tape around the threads to prevent leaks. Hand-tighten only—the tank is plastic and can strip easily.
Then, remove the filter canisters from their packaging. You’ll usually have a sediment filter, a carbon block, and the RO membrane. Important: some filters have a protective plastic wrap on them. Remove that. I’ve seen people leave it on and wonder why their water still tastes like pond scum.
Step 6: The First Flush—Patience, Grasshopper
Turn the water supply back on slowly. Check every connection for drips. You will see a tiny stream of water go to the drain—that’s normal, it’s flushing out the system. Let the tank fill for about two hours. Yes, two hours. Go watch a movie, walk your dog, or scroll through Pinterest for bathroom remodel ideas.
Once the tank is full, open the new faucet. The water will probably be cloudy or have a weird taste. That’s okay. Run it through three full tank cycles (fill, drain, fill again) before you drink. This purges any preservatives from the new filters.
Final Thoughts (And a Little Brag)
After two days of paranoid checking, I called Mark and invited him over. I poured him a glass from my new RO faucet. He took a sip, blinked, and said, “Is this bottled water?” I just smiled and pointed to my plastic-free cabinet.
You’ll feel the same pride. The water will taste crisp, like mountain spring water—minus the bear risk. And every time you skip buying a pack of bottles, you’ll feel a tiny burst of eco-warrior joy. So go ahead, get your hands dirty. Your tap water is begging for an upgrade.
