How To Make Reverse Osmosis Water

So, you want to make reverse osmosis water. You’ve heard it’s the purest stuff on Earth, the liquid equivalent of a zen garden. Maybe you’re tired of your tap water tasting li...
So, you want to make reverse osmosis water. You’ve heard it’s the purest stuff on Earth, the liquid equivalent of a zen garden. Maybe you’re tired of your tap water tasting like a swimming pool’s angry cousin. Or perhaps you just want to impress your houseplants with water so clean it makes them cry tears of joy. Whatever your reason, buckle up: we’re about to turn your kitchen into a miniature science lab, but with way less chance of an explosion.
First, let’s get one thing straight: reverse osmosis sounds like a fancy biology term from a textbook you never read. It’s actually simpler than you think. Imagine a very picky bouncer at a club (the semi-permeable membrane). Only the coolest, smallest molecules—like water—get in. Everything else—salts, minerals, bacteria, even that weird taste from old pipes—gets kicked to the curb. It's the ultimate water snob.
Here’s the surprising fact that will make you sound smart at parties: reverse osmosis was originally invented for desalinating seawater. That’s right, the same tech that turns ocean water into drinking water for submarines and arid cities is now under your sink. Your tap water doesn’t stand a chance. It’s like using a flamethrower to toast a marshmallow, but I respect the commitment.
Must Read
The Gear: Your Water’s New Best Friends
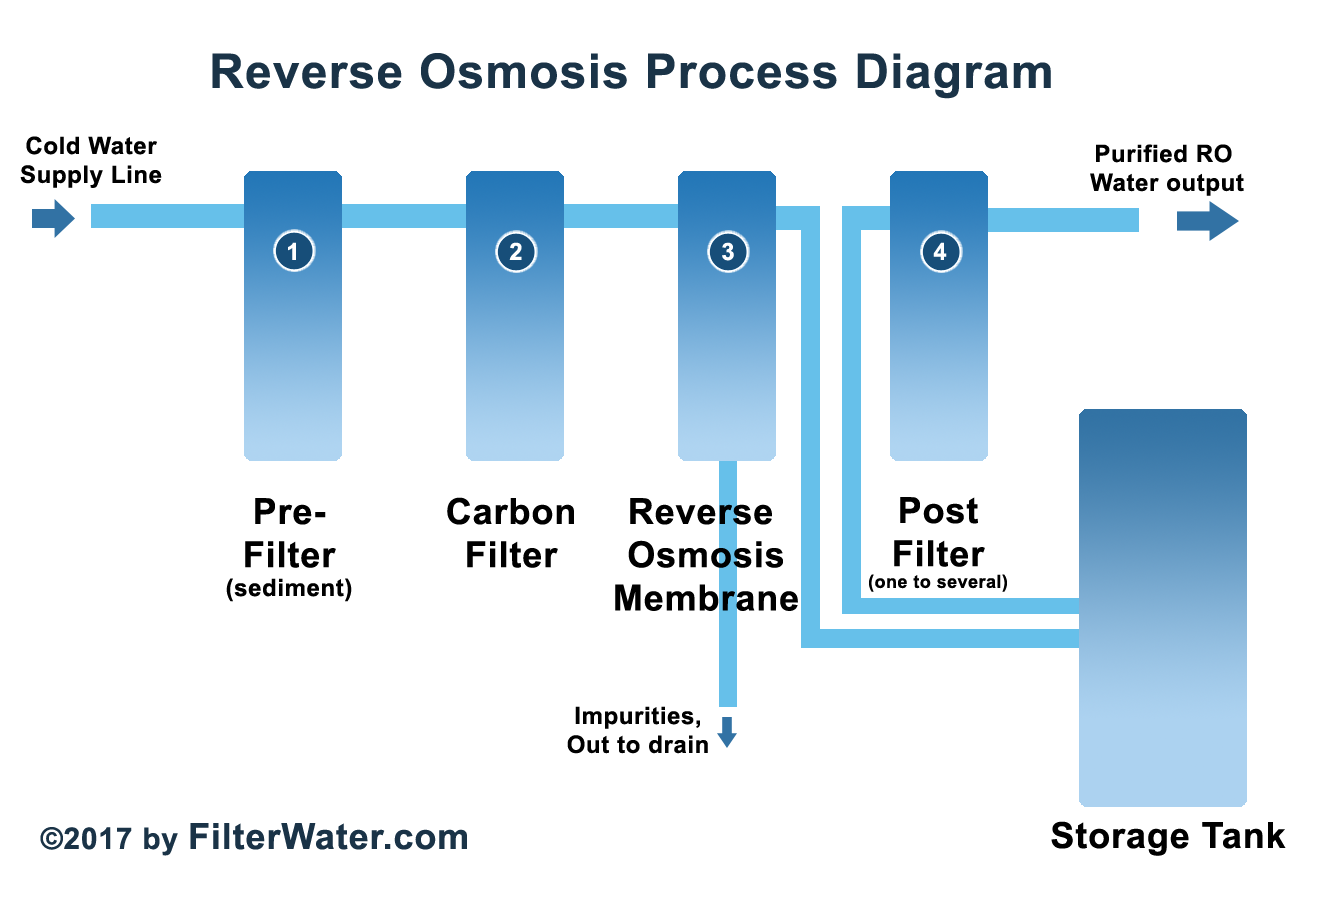
To make this magic happen, you need a reverse osmosis system. These aren’t expensive—you can snag a good one for the price of a fancy dinner out. The setup usually includes a sediment filter (catches sand and grit), a carbon filter (traps chlorine and that swimming pool taste), and the star of the show: the membrane. The membrane is the heart of the operation, a tightly rolled sheet of plastic with pores so tiny, a water molecule has to say “please” and “thank you” to get through.
You’ll also need a storage tank. Because reverse osmosis is slow. Like, “watching grass grow” slow. The water trickles through the membrane drop by drop, so the tank holds about two to four gallons of ready-to-drink glory. Don’t worry, you won’t die of thirst while you wait—unless you’re a very impatient hummingbird.
Step 1: The Installation (or “How to Befriend Your Plumbing”)
Installing a RO system is like assembling IKEA furniture, but with water. It’s not hard, but you will say a few colorful words under your breath. Most systems connect to your existing cold water line under the sink with a saddle valve. This little clamp pierces the pipe—gently, like a vampire with manners. Then you feed a tube to the first filter, then to the next, then to the membrane housing.
 What Is A Reverse Osmosis System And How Does It Work?
Pro tip: label everything. The tubes all look the same, and swapping them will give you water that tastes like old socks. There’s a drain line too—it flushes the rejected water (called “brine”) down the drain. You’re basically running a tiny, efficient water-wasting operation, but don’t feel guilty. The rejected water is still cleaner than most municipal supplies.
Step 2: The Flush (or “First Sips Are Weird”)
Once installed, you must flush the system. This means letting it run for a few hours, then dumping the first batch of water. Why? Because the membrane is coated with a preservative that tastes like a chemistry experiment. Also, the new filters might have a bit of loose carbon dust. Drink that, and you’ll feel like you’ve licked a charcoal grill. Be patient. Let the water flow until it runs clear and tastes like a mountain stream pretending to be boring.
The Waiting Game
After flushing, open the faucet and wait. And wait. The tank fills slowly, like a tortoise on a coffee break. But when it’s full, you’ll hear a gentle gurgle of victory. Your water is now pure. Like, scary pure. Pure enough that it will actually leach minerals from your body if you drink gallons of it. This is a joke, but also a fact: RO water is so pure, some health nuts add minerals back in. You know what? Just eat a banana. Problem solved.
 Why Reverse Osmosis is the Better Choice for Clean Water – Go Lime
Step 3: The Taste Test (and Your New Snobbery)
Pour yourself a glass. Take a sip. Notice the silence. There’s no chlorine tang, no metallic aftertaste, no faint hint of the neighbor’s laundry detergent. It’s the taste of nothing—and that is the whole point. Reverse osmosis water is the invisible ballet dancer of beverages. It makes coffee taste like angels whispering, and whiskey taste like a hug from a Scottish grandpa.
But here’s the kicker: regular maintenance. Change the sediment and carbon filters every six months, and the membrane every two to three years. Forget this, and your system will slowly turn into a swamp. You’ll start sipping water that tastes like a forgotten rain boot. Not fun.
The Verdict: Is It Worth It?
Absolutely. Making reverse osmosis water at home is like having a secret superpower. You become the water tycoon of your household. Guests will marvel at the clarity of your ice cubes. Your cat will look at you with newfound respect. Plus, you save money on bottled water and help the planet by not buying plastic. Win-win-win, baby.
Just be warned: once you go RO, you can never go back. Tap water will taste like a public pool after a chlorine party. You’ll start judging restaurants by their ice. You might even consider installing a system in your car. That’s fine. Embrace the purity. You have earned it, you beautiful, hydrated genius.
