How To Reverse Osmosis Water

So, you’ve heard about Reverse Osmosis water, and now you want to know how to reverse osmosis water. First off, don’t panic—you’re not actually reversing the act of osmosis, w...
So, you’ve heard about Reverse Osmosis water, and now you want to know how to reverse osmosis water. First off, don’t panic—you’re not actually reversing the act of osmosis, which would be like un-baking a cake. You’re just learning about a super cool filtration process. Let’s be real: the name sounds like a science experiment that escaped from a lab, but I promise it’s simpler than your last relationship.
What Even Is Reverse Osmosis?
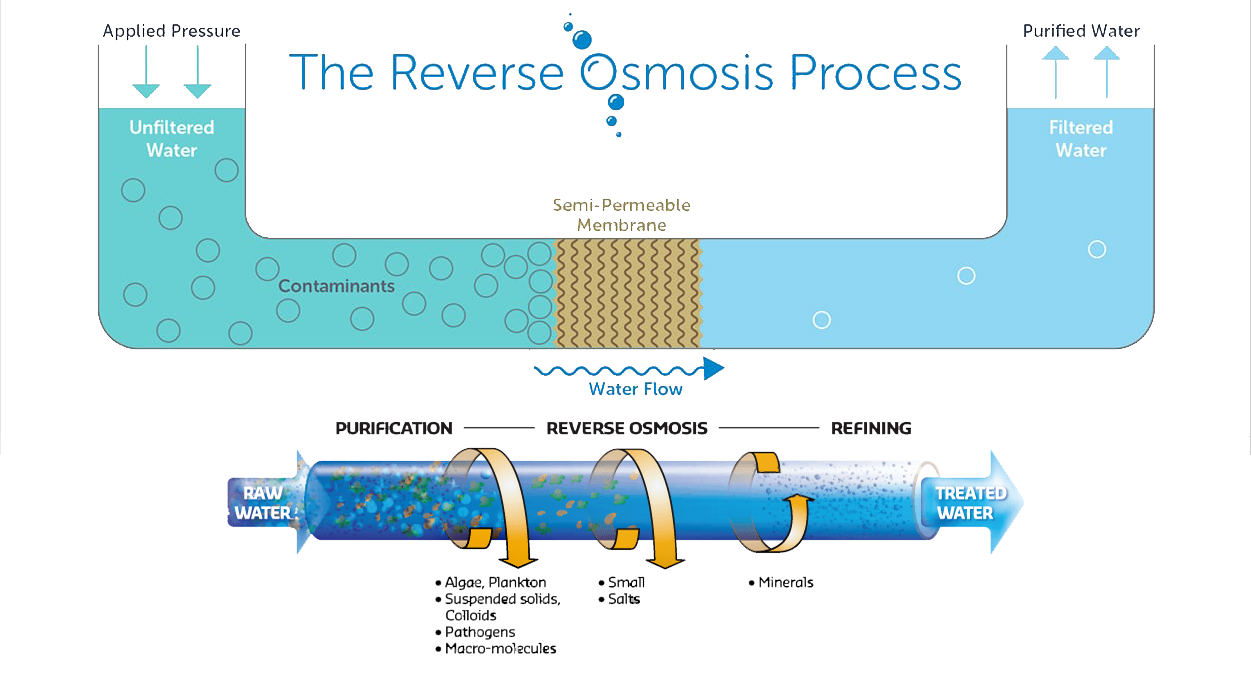
Picture this: you’ve got a party with two rooms—one is super salty and dirty, the other is pure and clean. Normally, nature wants to balance things out, so the dirty water tries to crash the clean party through a semi-permeable membrane. That’s osmosis.
Reverse Osmosis (or RO, for those of us who are lazy) is when you tell nature, “No way, buddy!” and force the water the opposite direction using pressure. You push the dirty water through a super-fine membrane that acts like a bouncer at an exclusive club, only letting H₂O molecules through and kicking out everything else—like lead, chlorine, bacteria, and your regrets. It’s the VIP pass your tap water always wanted.
Must Read
What You’ll Need (Your RO Toolkit)
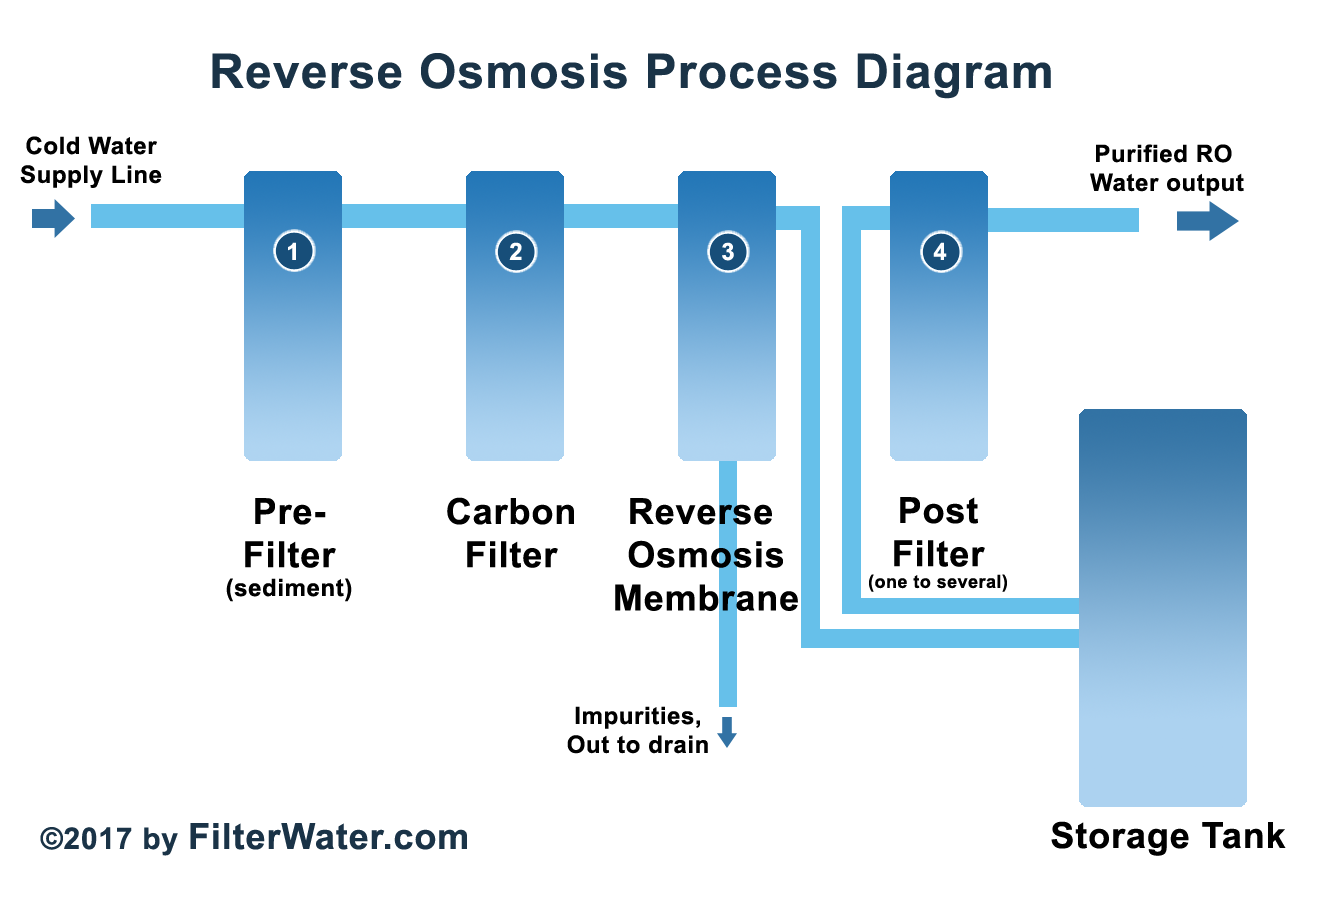
To actually do reverse osmosis at home, you don’t need a degree in chemistry or a secret government lab. You need a reverse osmosis system, which is basically a fancy collection of filters and a tank that looks like it belongs on a spaceship. You can buy one for under $200—or, you know, make friends with someone who has one. I won’t judge.
The main parts are: a sediment filter (catches sand and grit, like a doorman for dirt), a carbon filter (removes chlorine taste, because nobody wants pool water in their coffee), the RO membrane (the star of the show), and a storage tank. It’s like a nerdy water band, and each member does their part.
Step 1: Feed It Water (But Not Too Fast)
First, you connect your RO system to your cold water line. Do not connect it to the hot water line unless you want to make reverse osmosis soup. Hot water can damage the membrane, and then you’ll just have expensive, lukewarm sadness.
Turn on the water supply, and let the system do its thing. It goes through the sediment filter first, which catches big particles like a bouncer catching a fake ID. Bouncer says, “You’re not getting in, gravel.”
Step 2: The Carbon Filter Cleanse
Next, water flows through a carbon filter, which is like a spa day for your H₂O. It removes chlorine and bad tastes, leaving the water feeling refreshed and emotionally ready for the membrane. Water goes in tasting like a swimming pool, comes out tasting like a mountain spring—okay, maybe a fancy mountain spring.
 How to Remineralize Reverse Osmosis Water?
At this point, the water is cleaner but still has dissolved solids like calcium and arsenic. Don’t worry—the membrane is about to get real mean.
Step 3: The Membrane Showdown
Now, water hits the RO membrane. This is the heart of the system—a thin, tightly-wound sheet that looks like a roll of wrapping paper you’ll never use. It has pores so small that only water molecules can squeeze through. Imagine trying to pass a beach ball through a keyhole—that’s what contaminants feel like.
The membrane rejects about 95-99% of impurities. It’s basically the Simon Cowell of water filters—harsh, but effective. The clean water goes to a storage tank, while the rejected gunk (called “brine”) gets flushed down the drain. The brine is the water’s way of saying, “Fine, I’ll leave. But I’m taking my calcium with me.”
Wait, There’s a Catch? (Of Course)
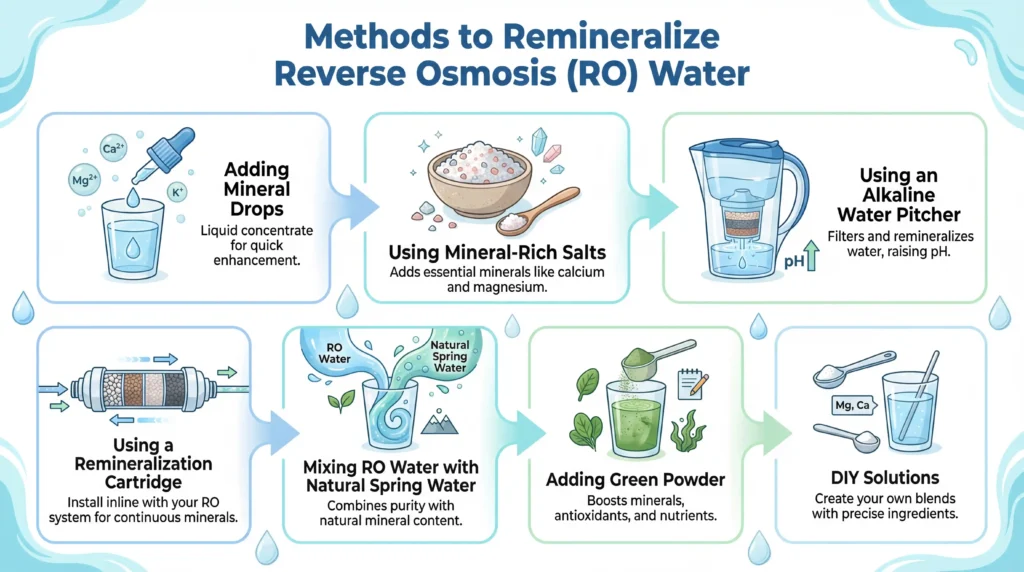
Reverse osmosis water is incredibly pure, but it’s also a little… lonely. Because it removes everything, including beneficial minerals like magnesium and calcium. Drinking pure RO water is like eating a perfectly plain potato—safe, but boring.
Some people add a remineralization filter afterward, which puts the good stuff back in. It’s like the water equivalent of giving your plain potato a pat of butter and a pinch of salt. You can also just eat a balanced diet—your body doesn’t care where the minerals come from, as long as you don’t microwave cheese on the counter.
 What Is Reverse Osmosis And How Does It Work
How To Actually Use This Knowledge
So, how do you “reverse osmosis” water in real life? Buy a system, install it under your sink, and forget about it. Most systems last for years and require you to change filters every 6-12 months. That’s it. You don’t have to chant any spells or sacrifice a lemon.
Here’s a pro tip: flush the membrane before you drink the first batch. New membranes have a preservative that tastes like a science lab. Let it run for a few minutes, or you’ll think you invented “toilet water tea.” Ask me how I know.
The Fun Part: Why You Should Do It
You’ll get water that tastes crispier than a fresh celery stick and cleaner than your aunt’s living room. Your coffee will taste better, your ice cubes will be crystal clear, and your plants might throw a tiny party in their pots.
Plus, you’ll never have to buy bottled water again—saving money and saving the planet from plastic. You become Captain Planet, but with better hydration. “Water power… activated.”
Uplifting Conclusion
Reverse Osmosis isn’t just a process; it’s a metaphor for life. We all have a little sediment (stress), some chlorine (bad vibes), and dissolved solids (past mistakes). But with a little pressure and the right filter, we can push through and become something pure.
You don’t need to be perfect—just like RO water, you’re allowed to add back the good stuff later. So go ahead, install that system, pour yourself a glass, and take a sip of clarity. You’ve got this. And if you mess up the installation? Just drink tap water and laugh about it. It’s still wet, and you’re still awesome. Cheers!
