How To Install An Ro System

So, you’ve decided to join the clean-water revolution. Welcome to the club, where every sip tastes like victory (and maybe a little bit of mountain spring). Installing a rever...
So, you’ve decided to join the clean-water revolution. Welcome to the club, where every sip tastes like victory (and maybe a little bit of mountain spring). Installing a reverse osmosis (RO) system sounds like rocket science, but I promise, it’s more like adult LEGOs with water pipes. Roll up your sleeves, grab a towel, and let’s get you some seriously crisp H2O.
What You’ll Need (Besides Patience)
First, gather your tools. You’ll need an adjustable wrench, a drill (if you’re brave), and a bucket to catch any "oops" moments. Your RO kit should come with a fancy faucet, a bunch of colorful tubes, and a few filter housings that look like tiny spaceships.
Pro tip: read the manual once. Then read it again while holding a coffee. Your future self will thank you when you don’t hook the drain line to the drinking water port. Trust me.
Must Read
Step 1: Find Your Castle’s Weak Spot
Pick a spot under your sink that isn’t a black hole of old sponges and mystery bottles. You need room for the main filter unit, the storage tank, and a little elbow grease. Clear the clutter and put on some music—this is a dance party now.
Turn off the cold water valve! I cannot stress this enough. Nothing kills a vibe like a geyser in your kitchen. Open the faucet to relieve pressure, then disconnect the cold water supply line. Keep that nut—you’ll need it later.
Step 2: The Saddle Valve Tango
This is the part where you install the saddle valve (the tiny metal thing that taps into your water line). It sounds scary, but it’s just a clamp that screws on. Tighten it gently—think of it as giving your pipe a polite hug, not a WWE chokehold.
Now, drill a tiny hole through the valve’s center into the pipe. If you hear a squeak, that’s the pipe crying. You’re doing it right. Turn the handle to let water flow through the little tube—celebrate with a victory dance.
The Drain Line: Where Old Water Goes to Retire
Your RO system needs to spit out waste water. Find the sink’s drain pipe and install the included drain saddle. It’s a clamp with a hole that connects a tube. Drill a small hole in the drain pipe, attach the saddle, and secure it with a screwdriver.
Pro tip: Do not drop the screw into the garbage disposal. I’ve done that. It’s a loud, embarrassing lesson. Use a magnet or a steady hand.
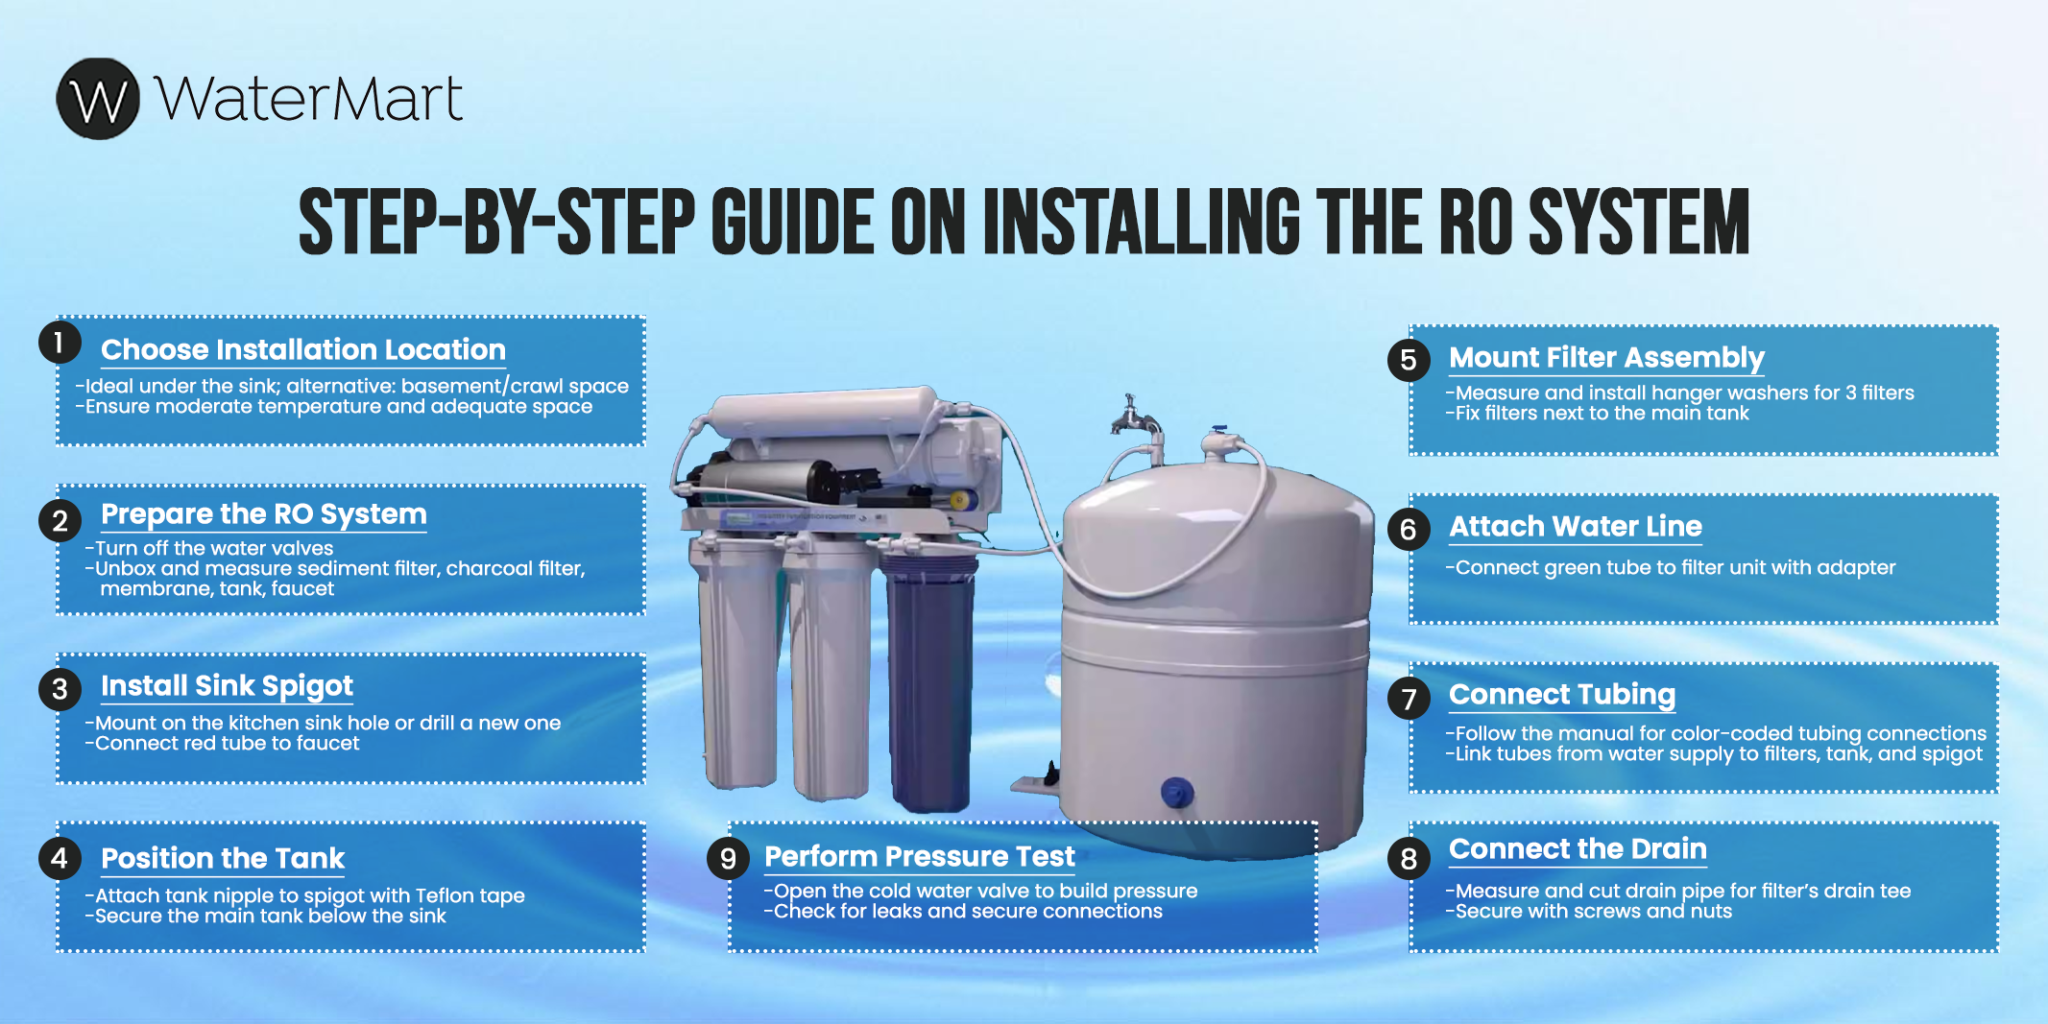
 Reverse Osmosis System Installation Diagram
Step 3: Tubing Tetris
You’ll see a bunch of colored tubes—red, blue, yellow, black. They connect the faucet, the filters, the tank, and the drain. Each tube has a matching color port. It’s literal color-by-numbers, so even your cat could do it (if it had thumbs).
Push each tube in firmly until it clicks. Give it a gentle tug to confirm it’s locked. If it slides out, you didn’t push hard enough. No shame—cuss a little, try again. I believe in you.
Connecting the Faucet (The Crown Jewel)
Your new RO faucet needs a hole in the sink or counter. If you have an empty soap dispenser hole, great! If not, pray to the DIY gods and use the drill. Measure twice, drill once, and maybe wear goggles—it’s not a fashion statement, it’s safety.
Feed the faucet’s tube down through the hole, and tighten the mounting nut from below. Hand-tighten it first—don’t be a hero with the wrench. You’ll need a fairytale amount of upward dexterity, but you’ve got this.
Step 4: The Moment of Truth (Turn On the Water)
Slowly open the cold water valve under the sink. Check for leaks! A drop of water is a drop of drama. Tighten any dripping connections with a quarter-turn—think of it as tuning a guitar, but for plumbing.
Now, open the new RO faucet. It might sputter and cough like a car starting in winter. That’s normal! Let it run for a few minutes to flush out the carbon dust. This water looks scary, but it’s just filter farts. Don’t drink it yet.
The Tank Fills (Go Make a Sandwich)
Your storage tank will take an hour or two to fill completely. Patience is a virtue, especially when you’re thirsty. Go fold laundry, binge one episode of your favorite show, or argue with a plant about its watering schedule.
 Step-by-Step Guide: Ro System Installation Diagram for Clean Drinking Water
When the faucet’s flow slows to a trickle, the tank is full. Open the faucet and watch the glorious, crystal-clear water pour out. It’s like watching a baby unicorn take its first sip. High-five yourself.
Final Steps: Calibrate Your Taste Buds
Fill a glass. Taste the difference. It’s not just water—it’s liberation from calcium deposits and weird city chlorine vibes. Make a joke about “RO-tally awesome water.” No one will laugh, but you’re a water wizard now.
Set a reminder to change the filters in 6–12 months. Most systems have a little cap that screws off—it’s easier than untangling Christmas lights. You’ll be a pro by then, anyway.
Why This Matters (More Than You Think)
You just took control of your kitchen’s soul. Every time you pour a glass, you’ll remember the slight panic when the tube didn’t click, or the gentle curse when the wrench slipped. You did it anyway.
Sustainable living isn’t about perfection—it’s about showing up with a smile and a wrench. You saved money, reduced plastic trash, and gained bragging rights. Not too shabby for a Tuesday afternoon.
You’re a Water Superhero
So go ahead, fill up that reusable bottle. Drink a toast to your own determination. You installed an RO system, you glorious, water-filtering genius. The world just got a little cleaner, one delicious drop at a time. Cheers to you.
Now go explain to your friends how you did it. They’ll be amazed. You might even inspire a revolution. Start with their sink.
