How To Filter Rain Water

So there I was, standing in my backyard during a particularly angry thunderstorm, watching a torrent of water pour off my roof and straight into a muddy puddle. I’d just paid...

So there I was, standing in my backyard during a particularly angry thunderstorm, watching a torrent of water pour off my roof and straight into a muddy puddle. I’d just paid my astronomically high water bill the day before, and let’s just say my wallet was feeling a personal grudge against Mr. Rain. It hit me, soaking wet and slightly ridiculous: Mother Nature was literally dumping a free, perfectly good resource right in front of me, and I was letting it go to waste. That’s when the adventure of DIY rainwater filtering really began.
Why Bother? (Besides Saving Money and Saving Face)
Look, I get it. You probably think filtering rainwater sounds like a complicated survivalist project for people who store beans in bunkers. But hear me out: rainwater is incredibly soft (great for your fancy houseplants) and completely free from the chlorine and fluoride they pump into your tap. Plus, using it for your garden can actually give you a smug sense of superiority over your neighbors with their sprinklers—trust me, it’s addictive.
The big catch, however, is that your roof is a grimy buffet of bird droppings, dead leaves, and who-knows-what-else that washed down from the sky. You don’t want to drink that—and your plants don’t want a side of crud with their hydration. Filtering isn’t optional; it’s the difference between a refreshing drink for your tomatoes and murky gutter smoothie.
Must Read
Step One: The “First Flush” – Your Rainwater’s Awkward First Impression
This is the smartest, laziest trick in the book. The very first rush of rain after a dry spell is basically rinsing your roof. You absolutely do not want to collect that water. It’s carrying dirt, pollen, and the sacramental remains of some unlucky bugs. You need a “first flush” diverter—basically a pipe that catches and discards the first few gallons before letting the clean stuff through.
You can buy these for cheap, or you’re the DIY type (like I was) you can rig one up with a PVC pipe and a simple ball valve. It’s one of those rare projects that feels high-tech but costs the price of a pizza. Pro tip: Drill a tiny hole in the bottom of your diverter pipe so it slowly empties between storms, ready for the next one.
Step Two: Coarse Filtration – The “Big Stuff” Bouncer
Now that you’re collecting the good stuff, you need to keep out the floaters. A simple mesh screen over your downspout entrance or rain barrel is step one. Anything bigger than a mosquito larvae-shaped piece of leaf gets blocked at the door. Don’t skip this. I did once, and spent three hours scooping out a drowned squirrel’s winter stash of acorns from my barrel.
 How to set up a rainwater filtration system the right way – Artofit
For an extra layer of protection, use a fine mesh or even an old pair of pantyhose over the barrel’s opening. It sounds ridiculous, but pantyhose are actually brilliant at catching sediment without slowing the flow—plus, you get to recycle something your partner was going to throw out anyway. Double win for the planet and your street cred.
Step Three: The Gravity-Powered Sand Filter – You, the Mad Scientist
If you want water for your houseplants or even for laundry (not drinking—we’ll get to that), you need a slow sand filter. This is where it gets fun, and honestly, a little beautiful. You grab a 55-gallon drum or a large bucket, and layer it from top to bottom: gravel, coarse sand, fine sand, and a piece of fabric on the very bottom.
When you pour your collected water in the top, gravity pulls it through these layers. The sand traps tiny particles, while beneficial bacteria living in the top layer actually eat some of the organic gunk. The water that drips out the bottom is astonishingly clear—clearer than some tap water I’ve seen in bad restaurants. It’s slow, yes (about 5 gallons per hour), but it requires zero electricity and zero effort.
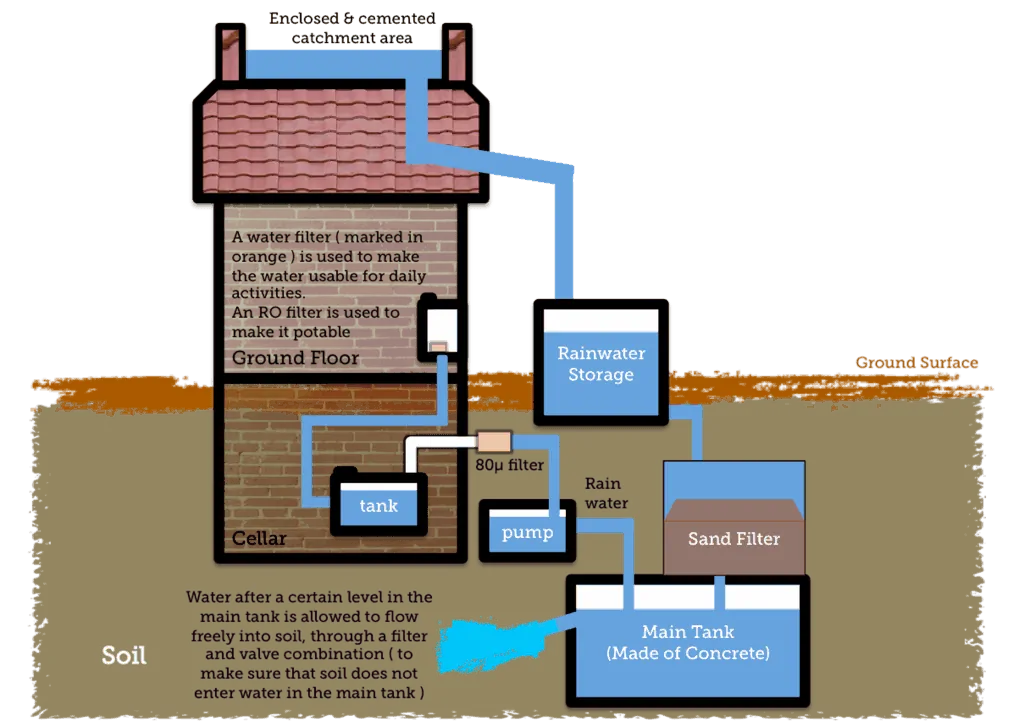 How to Set Up a Rainwater Filtration System the Right Way – World Water
Step Four: Activated Charcoal – The Final Snob Filter
For water you want to feel smug about—water for your fish tank, your steam mop, or your drinking pitcher (with further boiling)—you add a layer of activated charcoal above the sand. Charcoal is like the picky professor of filtration: it removes odors, weird tastes, and certain chemicals. You can buy it bagged, or crush up your own from hardwood charcoal (not the lighter-fluid-soaked briquettes from your BBQ, obviously).
I run my filtered water through a cheap camping water filter afterward, just to be a paranoid ninny. The result is water so pure my cat now refuses to drink from the tap, preferring her personal rain-barrel bowl. Yes, I know that’s ridiculous. Yes, I comply.
The Bottom Line (And a Confession)
Is this going to replace your entire municipal water supply? Not unless you really like engineering. But for gardening, washing your car, or even topping off your toilet tank to save on flushing fees, it’s a total game-changer. The startup cost on a basic barrel system? About fifty bucks. The satisfaction of watching your plants thrive on water you caught yourself? Priceless, but also probably more than fifty bucks.
So next time it rains, stand by your window, look at that downspout, and whisper, “I’m gonna trap you, buddy.” Your wallet will thank you, your plants will worship you, and you’ll finally have a smart answer next time someone asks what you did last weekend. Go get wet. It’s worth it.
