Reverse Osmosis Filtration System Installation

Let’s be honest, the tap water in your home isn’t exactly a mountain spring. It’s more like a polite handshake from the city’s plumbing system—functional, but carrying a few s...
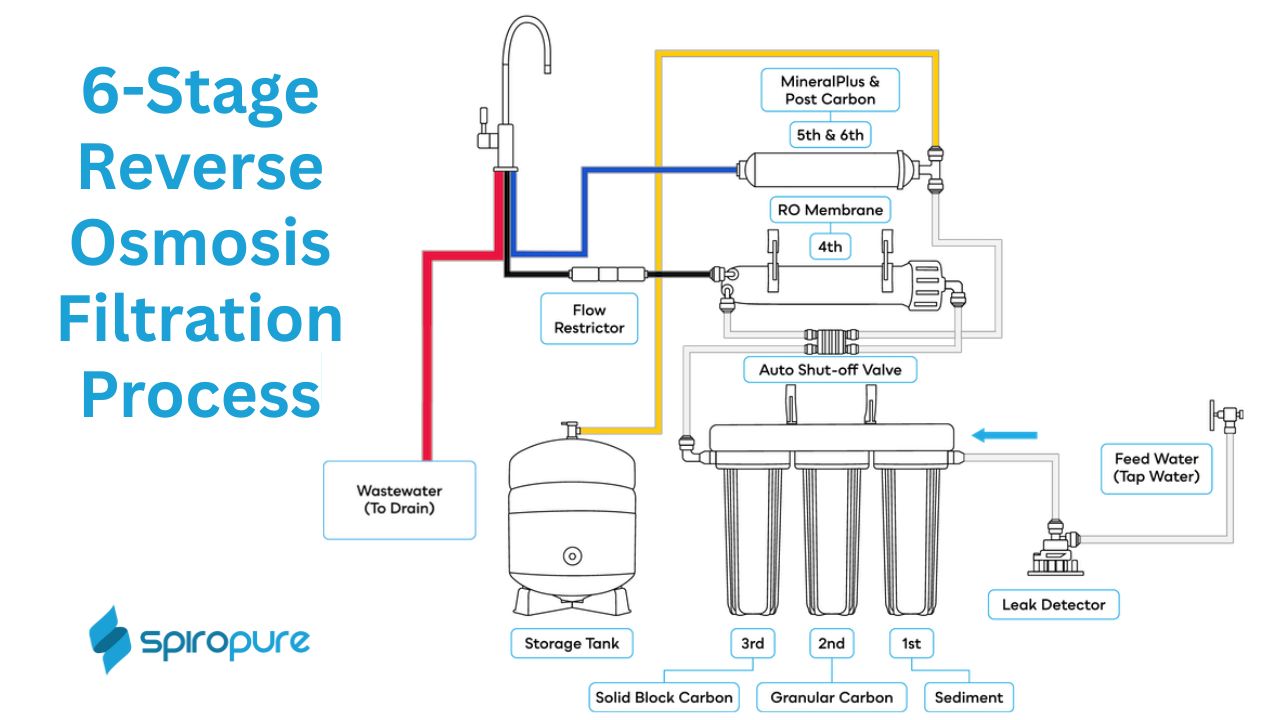
Let’s be honest, the tap water in your home isn’t exactly a mountain spring. It’s more like a polite handshake from the city’s plumbing system—functional, but carrying a few secrets you’d rather not know about. That’s where a Reverse Osmosis (RO) filtration system comes in, promising water so pure it makes your ice cubes look smug.
The “Why Now?” Moment
You’ve probably stared at a glass of tap water and sensed a faint taste of “pool day” or “old pipe.” That’s your cue. Installing an RO system is like giving your kitchen a tiny, plumbed-in superhero that fights chlorine, lead, and that mysterious floaty stuff. I finally caved after my wife pointed out our kettle’s mineral buildup looked like a prehistoric coral reef.
But here’s the kicker—I’m not a handyman. I’m the guy who hangs a picture frame and ends up with a level, a hammer, and a whispered apology to the wall. Yet, the installation of this thing was shockingly doable. It’s like assembling IKEA furniture, but instead of a Swedish-name dresser, you get crystal-clear water and zero leftover screws.
Must Read
The Under-Sink Shuffle
First, you’ll need to clear out the disaster zone under your sink. I found a 2017 bottle of hot sauce, a sponge that had seen better days, and a leaky pipe that smelled like “regret.” Once you’ve conquered Mount Clutter, you’ll see a cold-water line—your gateway to hydration glory. Most RO kits come with a self-piercing saddle valve, which sounds violent but is really just a polite little clamp that taps into your pipe without calling a plumber.
You’ll also need to drill a hole in your countertop for a dedicated faucet. I used a power drill, held my breath, and imagined I was a dentist for countertops. It took ten seconds, and now my wife calls the shiny new chrome spout our “water throne.” The included instructions are surprisingly clear—like a good friend explaining how to untangle Christmas lights—so breathe.
The Filter Can of Worms
Now, you’ll handle the actual cans. RO systems usually have three or four filters: a sediment filter, a carbon block, the RO membrane itself, and a post-filter. They look like miniature paint cans, and swapping them in is shockingly simple—just twist and click. It’s like changing a lightbulb, except the bulb is a $30 cylinder that scrubs your water of 90% of contaminants.
The trick is to flush the system after installation. You’ll run the water for about an hour until all the black carbon dust is gone. I promise your dog will stare at the sink the entire time, wondering if you’ve lost your mind. Mine did, and then she licked a puddle and gave me a look that said, “Not bad, human.”
I won’t lie—the first glass of RO water tastes weirdly perfect. It’s like tasting air, but in a good way. My coffee went from “acceptable” to “I should open a café.” The only downside? You’ll become that person who judges other people’s tap water with a raised eyebrow.
 Reverse Osmosis System Installation: 7 Easy Steps
The Unexpected Life Lesson
Here’s the thing no one tells you: installing an RO system makes you feel like a minor deity of domestic engineering. You’ll find yourself bragging at dinner parties: “Oh, that? I just tapped the cold water line.” People will nod, but inside, they’ll be equally impressed and terrified of your new skill.
You’ll also start noticing water everywhere. The “waste water” from the RO process (about three gallons for every gallon of filtered water) goes down the drain, but you can repurpose it for plants. I tried it, and now my basil plants are growing so fast they look like they’re heading to a music festival.
One last tip: don’t overtighten the fittings. They’re plastic and friendly, not steel and angry. I learned this after a tiny leak sent my sponge into retirement. A quick hand-tighten later, and the system was silent as a ninja.
The Verdict (and Your Next Move)
Installing a reverse osmosis system is like adopting a quiet, helpful roommate who never eats your leftovers. It costs around $200 to $400 for a good kit, and it takes about two hours, plus one trip to the hardware store for a missing brass fitting (you’ll need one, promise). The payoff? You’ll drink more water, your tea will taste like tea, and your ice cubes will look like tiny diamonds instead of cloudy regrets.
So go ahead, drill that hole. Spill a little water. Curse under your breath once. Then pour yourself a glass of the purest water you’ve ever had, and smile at your sink like it just got a promotion. You’ve earned it.
