Under Sink Reverse Osmosis System Installation

Let’s be honest: most of us have a complicated relationship with our kitchen sink. It’s where we dump coffee grounds, hide dirty dishes, and occasionally pretend we’re going t...
Let’s be honest: most of us have a complicated relationship with our kitchen sink. It’s where we dump coffee grounds, hide dirty dishes, and occasionally pretend we’re going to finally cook that fancy pasta. But if you’ve ever tasted your tap water and wondered if it came from a garden hose mixed with a dusty attic, you’ve probably stared longingly at an under sink reverse osmosis system. Installing one sounds like a job for a wizard or a plumber with a PhD, but it’s actually more like assembling a slightly intimidating Lego set.
The first thing you’ll notice when you crack open the box is that it looks like a mad scientist’s lunchbox. There are tubes, filters, a little tank that resembles a mini spaceship, and a faucet that promises to deliver water so pure it might cure your existential dread. You’ll tell yourself, “I can do this,” while your spouse watches from the doorway eating chips, silently judging your life choices. That’s normal. Embrace the chaos.
Before you start, carve out a solid afternoon—and maybe a backup afternoon. You’ll need a drill, an adjustable wrench, and the willingness to crawl into the dark, dusty cave under your sink. Remember that Tupperware lid you lost in 2019? It’s probably there, along with a bottle of bleach you forgot about. Prepare for a small archaeological dig.
Must Read
The Under-Sink Shuffle
Under the sink, space is a premium real estate—like a studio apartment in a big city. You’ll have to move your cleaning supplies, that half-empty jar of pickles, and the scrub brush that fell behind the pipe. I like to call this the “Jenga Phase.” If you pull out the wrong bottle, the whole stack collapses, and you find yourself holding a can of Comet and questioning your entire setup.
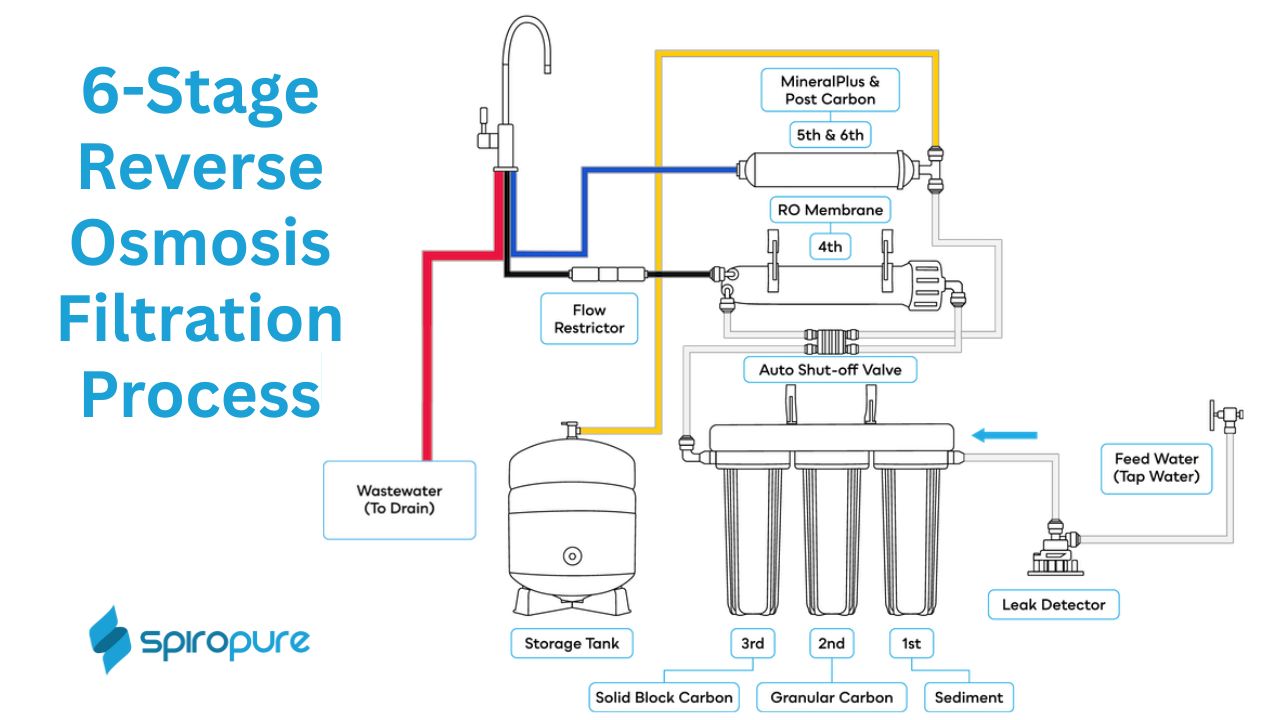
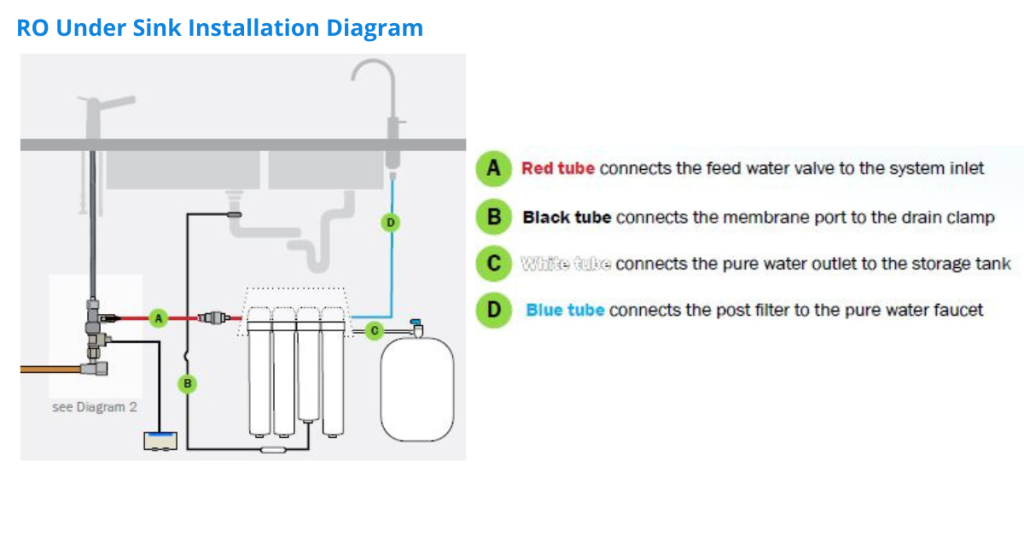
Once you’ve cleared the area, take a deep breath and look at the instructions. Most diagrams look like they were drawn by a spider after two cups of coffee. Don’t panic. Follow the colors. The blue tube goes here, the red tube goes there, and the yellow tube is probably a decoy. Just kidding—sort of.
Drilling the hole for the dedicated faucet is the part that makes your heart race. You’ll measure three times, then drill once, hoping you don’t hit a stud, a wire, or your own hand. Most people end up with the hole slightly off-center, which is fine because it gives your sink that “handcrafted” look. I call it the “loose tooth” aesthetic.
Where the Magic Happens
The actual filter housing screws together like a giant, water-loving Pez dispenser. You’ll install the sediment filter, the carbon block, and the membrane, which is the fancy part that actually removes the bad stuff. Think of it as a tiny bouncer for your water—no fluoride, no lead, no bad vibes allowed. Your water is about to become a VIP.
 Ultra High Purity Under Sink Reverse Osmosis System with Alkaliser – 5
Connecting the feed water valve is where things get real. You’ll need to shut off the cold water supply under the sink, which sounds easy until you realize the valve hasn’t been turned since the Carter administration. It might groan and refuse to budge, but a little WD-40 and a prayer usually do the trick. Once it’s on, you’ll attach a tiny saddle valve that pierces the pipe like a mosquito on a mission.
If you hear a hissing noise, don’t panic. That’s just the system taking its first breath. Or it’s a leak. Either way, tighten everything by hand plus a quarter turn. You don’t need Hulk strength; you need the gentle touch of a person who’s learned from past mistakes. Trust me, I once over-tightened a fitting and launched the whole thing across the kitchen like a water balloon.
The First Drop
After all the tubes are connected, the tank is full, and the little red float is happy, you’ll turn on the water. The first few gallons will go straight to waste as the system flushes itself out. This is the quietest part. You’ll stand there, hands on hips, feeling like a modern-day pioneer who just invented clean water. That feeling is worth the bruised knuckles.
The dedicated faucet will eventually drip out water so clear it looks like a science experiment. Fill a glass, hold it up to the light, and take a sip. It tastes like… nothing. And that’s the point. Pure, crisp, nothingness. It’s the sort of water you’d expect a unicorn to drink straight from a crystal stream.
Now, every time you fill a pot for pasta or pour a glass for your morning coffee, you’ll remember the afternoon you spent wrestling with plastic tubing under the sink. You’ll smile, maybe even laugh. Because you did it. You turned a dusty cabinet into a purification station, and your water has never tasted better. Plus, you finally found that Tupperware lid. Worth it.
