How To Install Ro System

So, you’ve heard about this whole reverse osmosis thing, and now you’re wondering if you can actually set one up yourself without summoning a plumber or flooding your kitchen....
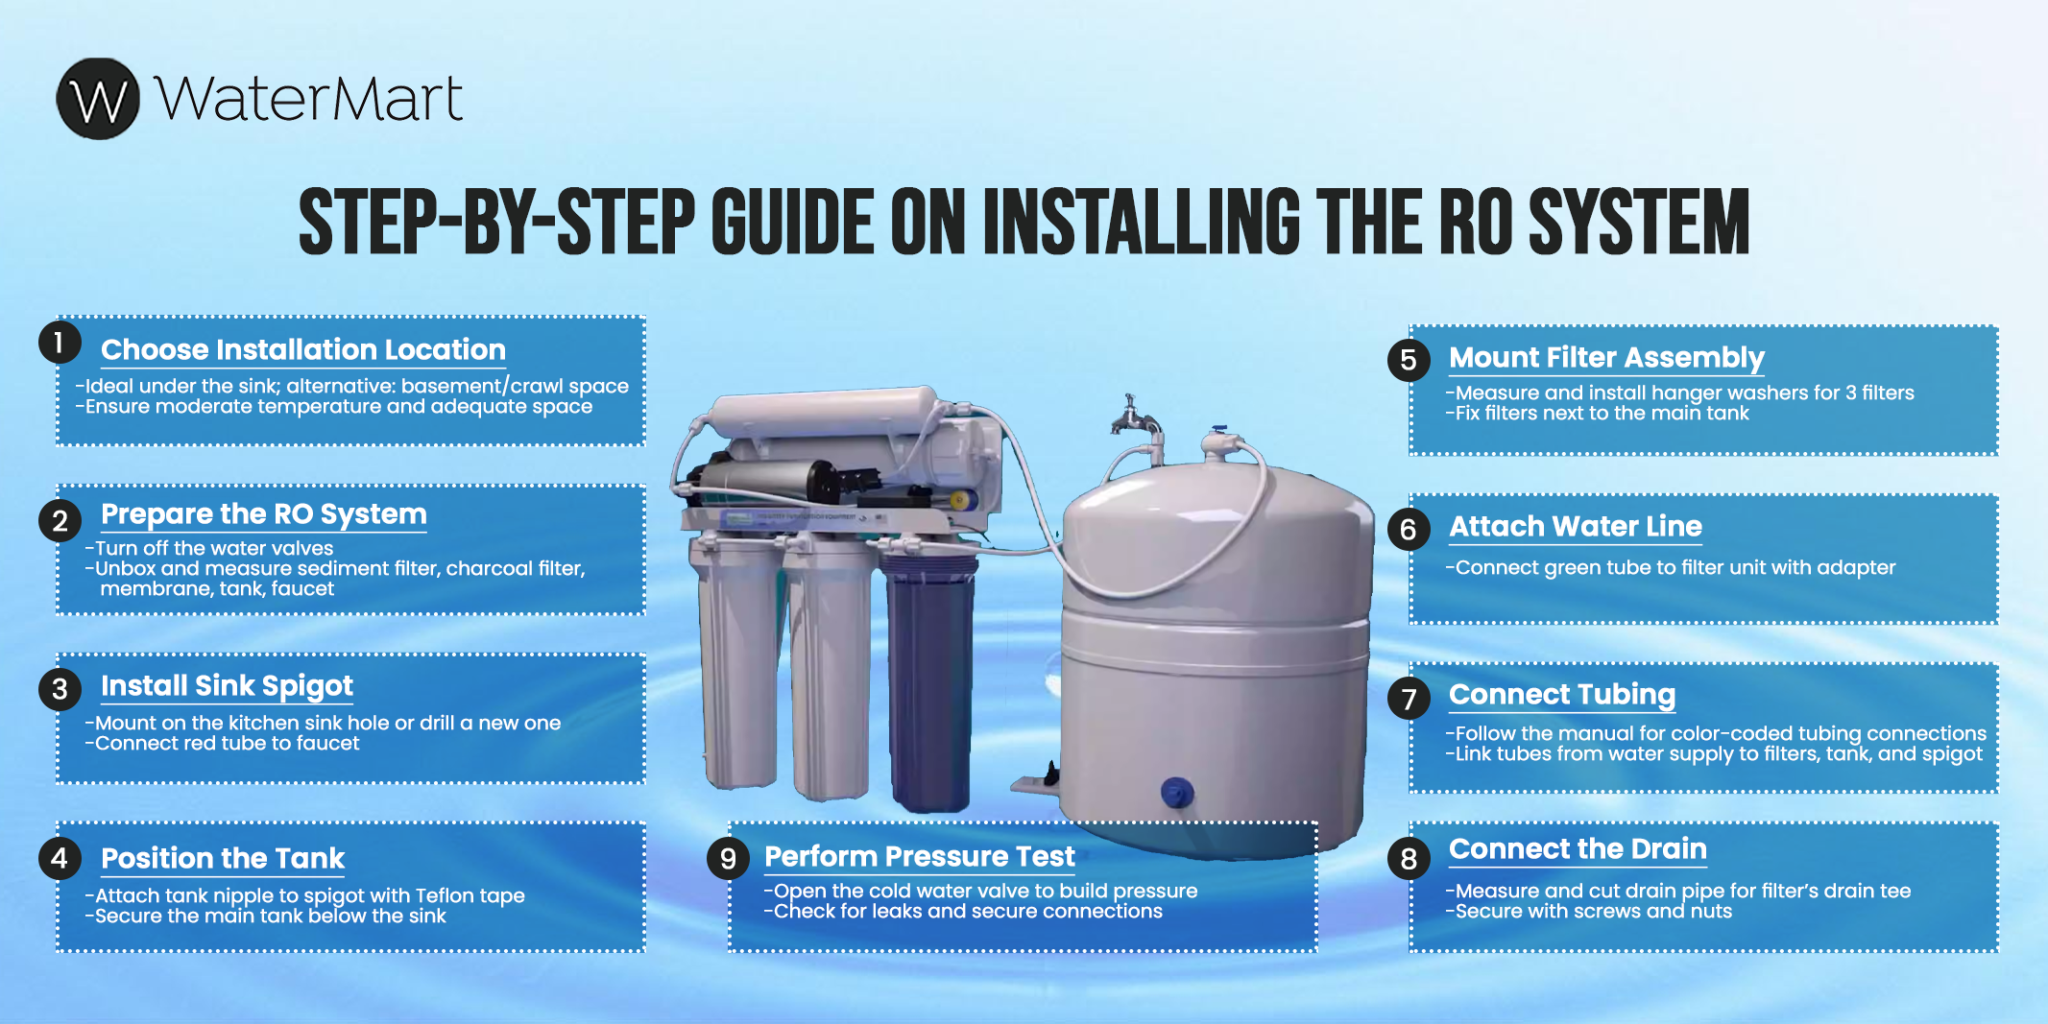
So, you’ve heard about this whole reverse osmosis thing, and now you’re wondering if you can actually set one up yourself without summoning a plumber or flooding your kitchen. Trust me, if I can do it while half-listening to a podcast, you absolutely can. It’s like assembling a slightly fancy LEGO set, but instead of a spaceship, you get water that tastes like it came from a mountain spring.
Why Bother? The Cool Factor of RO
First off, why install a reverse osmosis system? It’s not just about bragging rights—though that’s a nice bonus. An RO system is your own personal water factory, stripping out chlorine, lead, and all those weird flavors tap water sometimes picks up from pipes.
Think of it as a superpowered coffee filter for your entire drinking supply. You know that crisp, clean taste from bottled water? You can get that straight from your faucet, without the plastic guilt or the grocery store trips.
Must Read
Unboxing the Beast: What You’ll See
When you open the box, don’t panic. You’ll see a bunch of white canisters, a shiny faucet, and a pile of tubing that looks like it belongs in a sci-fi movie. The beauty is that most systems come pre-assembled—you’re just connecting the dots, not building a particle accelerator.
Really, it’s three main jobs: hook up the water supply, install a dedicated faucet, and route the drain line. That’s it. Three jobs, each easier than making a pot of coffee.
Step One: The Water Tapping Dance
You’ll start by turning off the cold water under your sink—just a simple twist of a valve. Then, you attach a little brass “saddle valve” or a push-fit connector that pierces the pipe to give your system its own water feed.
It sounds intimidating, but it’s really like clipping a tiny hose onto a garden spigot. No soldering, no welding, just a few turns with a wrench you probably already own.
The Under-Sink Tango
Most of the magic happens under your kitchen sink, which is usually a chaotic cave of cleaning supplies and old sponges. Clear out that space—it’s your staging area. The RO system will hang on the cabinet wall or just sit on the floor, no big deal.
 Reverse Osmosis System Installation Diagram
You’ll use the provided blue and red tubing to link the filters together. Color-coded tubing makes it almost impossible to mess up; it’s like connecting a hose to a sprinkler, but for your water.
Step Two: The Faucet Drill (The Scary Part)
Okay, this is where people get nervous: drilling a hole in your countertop or sink for the new faucet. But guess what? You don’t have to be a carpenter. Use the template provided, mark the spot, and drill slowly with a carbide bit.
It takes about 30 seconds, and afterward, you feel like a total DIY badass. If you have a spare hole in your sink (like for a soap dispenser), you can use that instead—no drilling required. Look for a knockout plug you can pop out.
Step Three: The Drain Connection
Last part: you need to send the “waste” water down the drain. No, it’s not gross wastewater—it’s just the water that carried away the impurities. A small plastic saddle clamp attaches to your sink drain pipe, and you slip the tubing in.
It’s literally a snap-and-click mechanism. You’ll feel like a pro plumber when you hear that satisfying click. Then you tighten a couple of screws, and boom—the drain line is done.
 Step-by-Step Guide: Ro System Installation Diagram for Clean Drinking Water
Flushing and Forgetting
Once everything is connected, turn the water back on and let the system flush for a few minutes. The first batch of water might look cloudy, relax—it’s just air bubbles. Let it run for 10 minutes, then taste it.
That first sip? It’s like biting into a crisp apple. Suddenly, your tap water goes from “eh, I’ll filter it” to “why did I ever drink anything else?” You did that with your own hands.
Why It’s Worth the 45 Minutes
Here’s the thing: installing an RO system is infinitely more satisfying than buying a Brita pitcher. You never have to refill it, you never have to wait for it to drip, and you get about 50 gallons of pristine water before you even think about changing a filter.
It’s like having a personal water fairy under your sink. And when guests ask, “Wow, your water tastes amazing,” you get to casually shrug and say, “Oh, just my reverse osmosis system I installed myself.”
Seriously, give it a shot. Read the manual once, watch a 5-minute YouTube video if you’re nervous, and then just go for it. Worst case? You save money on bottled water and gain a weirdly useful new skill. Best case? You never buy a plastic water bottle again. That’s a win either way.
