How To Install A Reverse Osmosis Water System

So, you finally bought that reverse osmosis system. Congratulations. You’re about to become the purest-water person on your block. I’m not kidding—you’ll be that friend who br...
So, you finally bought that reverse osmosis system. Congratulations. You’re about to become the purest-water person on your block. I’m not kidding—you’ll be that friend who brings a glass of “lab-grade” water to parties.
But now you’re staring at a box of tubes, canisters, and a faucet that looks like it belongs on a spaceship. Don’t panic. We’re doing this together, like we’re assembling IKEA furniture—except you won’t have leftover screws this time.
What You’ll Need (Besides Patience)
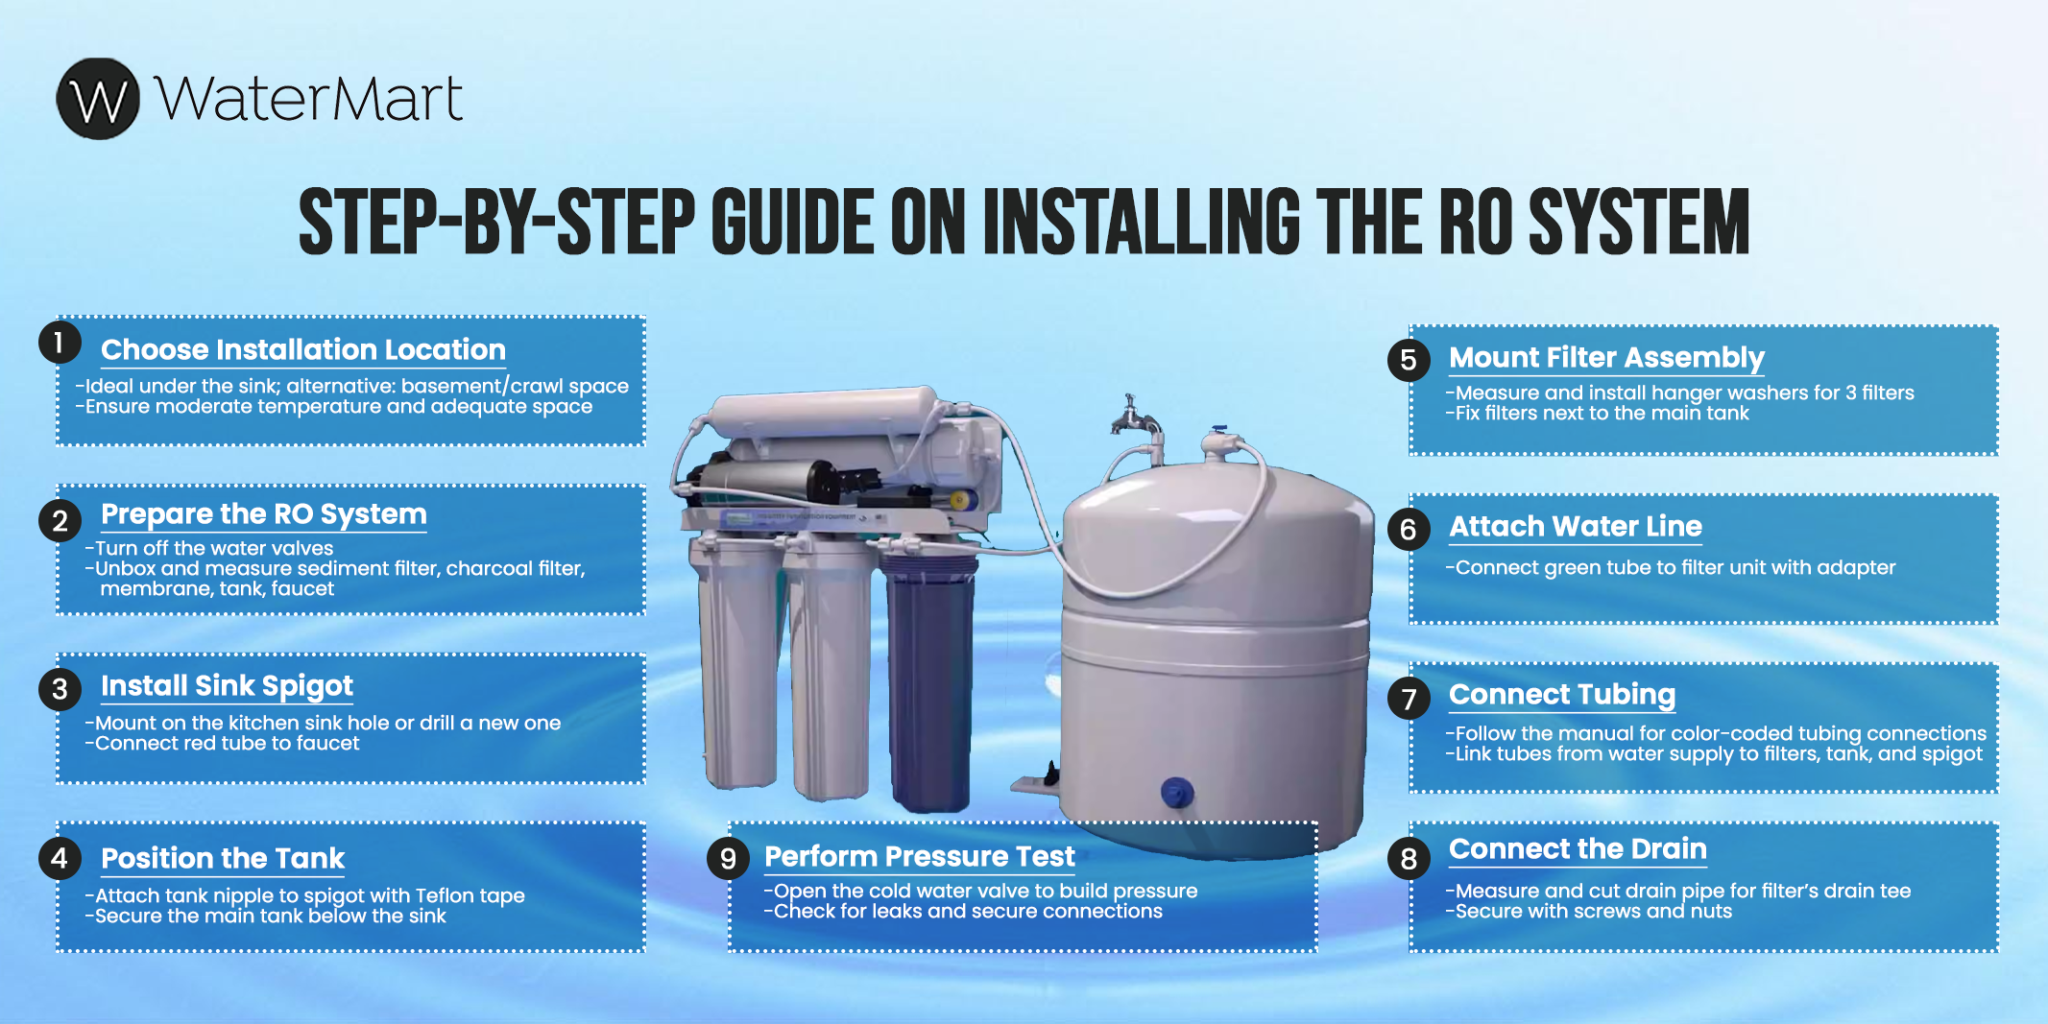
First, clear off your kitchen counter. You’ll need space for the filter unit, which is about the size of a small cat. Read the manual—yes, the whole thing. I know it’s boring, but skipping it is how you end up with a geyser under your sink.
Must Read
Grab a bucket, a wrench (usually ⅜-inch), and some Teflon tape. Oh, and a drill if you’re cutting a hole for the new faucet. Don’t have a drill? Borrow your neighbor’s. They’ll probably ask why you’re drilling into your sink, and that’s a fun conversation.
Step 1: Shut Off the Water (Seriously)
Find the shutoff valve under your sink. Turn it clockwise until it stops. Then open your cold faucet to release pressure. You’ll hear a little sigh of relief from your pipes. If water sprays everywhere, you did it wrong. Try again.
Pro tip: Put that bucket under the pipes anyway. Trust me, your socks will thank you later. Also, take out all the junk under your sink—old sponges, that bottle of mystery cleaner—make a clean workspace.
Step 2: Mount the Faucet (The Fancy Part)
Your new faucet needs a home. If you have an extra hole in your sink, you’re golden. No hole? Time to drill. Measure twice, drill once. Use a hole saw bit slightly larger than your faucet’s base. Wear goggles. Glass shards in your eye are not a good look.
 How to Install a Reverse Osmosis Water Filtration System?
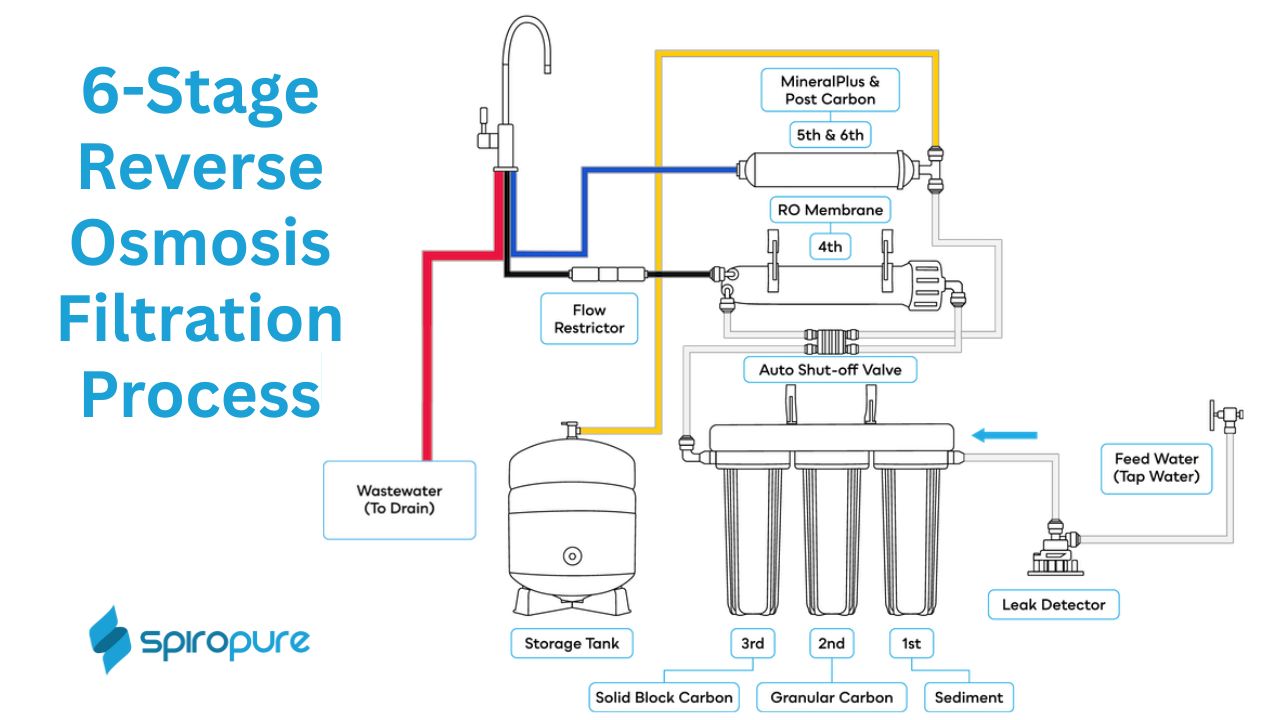
Drop the faucet through the hole from above. Tighten the locking nut underneath. It should feel snug, not “Hulk-tight”—you’ll hate yourself if you strip the plastic. Now, connect the little red and blue tubes to the faucet. They’re color-coded because even your plumber needs a cheat sheet.
Step 3: Hook Up the Filters
Your RO system has three or four canisters. They look like little tanks. Unscrew each one and drop in the corresponding filter cartridges. Don’t force them—they slide in like a gentle hug. Screw them back on hand-tight. Over-tightening is the enemy of “easy future replacements.”
Now, connect the incoming water line. Find the cold water supply pipe under your sink (the one with the metal braided hose). Unscrew it, slide in the included saddle valve or “T-fitting,” and reattach. Turn the valve slowly. If you hear a drip, you didn’t use enough Teflon tape. Wrap it again. You can never wrap too much tape.
Step 4: The Drain Line (Gross but Necessary)
Your RO system produces waste water. Yes, it’s wasteful—that’s the trade-off for pure water. You’ll run a small tube to your drain pipe. Drill a small hole in the drain pipe (above the P-trap) and insert the drain saddle clamp. Tighten it with a screwdriver. This sends the bad water straight to the sewer. Out of sight, out of mind.
Done? Good. Now connect the final tube to your faucet. It’s the one that says “permeate” in the manual. That’s the good stuff. Fancy word for “water you can actually drink.”
 Reverse Osmosis System Installation: 7 Easy Steps
The Moment of Truth: Test the System
Open the shutoff valve. Slowly. Watch for leaks at every connection. If you see a drip, tighten that connection or wrap more Teflon tape. Don’t panic—a drip is not a flood, just a gentle suggestion to fix your work.
Now, turn on the new faucet. At first, you’ll get cloudy water. That’s air bubbles. Let it run for 10–15 minutes. Taste it. It should taste like… nothing. That’s the point. If it tastes like pennies or salt, let it run a little longer.
Pro Tips From a Fellow Water Snob
Replace the pre-filters every six months. The membrane lasts 2–3 years. Set a reminder on your phone, because you’ll forget. I forgot for a year, and my water started tasting like a swimming pool. Don’t be me.
Also, keep the bucket under the system during filter changes. A little water always escapes. It’s like your system saying, “I’m alive!” Annoying, but endearing.
One last thing: brag a little. Offer a glass to your next guest. They’ll say, “Wow, this water is so crisp!” And you’ll smile, knowing you wrestled with tiny tubes and won. You’re a hero. A very thirsty hero.
